A QUICK AND EASY GUIDE TO SETTING UP THE DELL POWEREDGE C8000 A Principled Technologies setup guide commissioned by Dell Inc.
TABLE OF CONTENTS Table of contents ..................................................................................... 2 Introduction ............................................................................................ 3 Dell 42U rack .......................................................................................3 Installing the rails ................................................................................4 Installing the C8000 chassis .............................................
INTRODUCTION Highly dense computing solutions pack the processing power you need into a small space to help you save on both capital expenditure and operating expenses. Setting up large chassis designed to hold multiple dense servers, or sleds, can appear a daunting task. In this guide, we walk you through the simple process for setting up a full Dell PowerEdge C8000 chassis.
Installing the rails 1. Install cage nuts in the appropriate position. 2. Push tabs and snap rails into place. 3. Add the stopping bracket. The smaller holes in the stopping bracket act as a washer. The bolt heads are smaller than the riser opening and slide if the stopping bracket is not installed. (Note: Refer to the Getting Started guide1 for additional installation details.) Figure 2: Rail and rack installation. 1 http://www.dell.
Installing the C8000 chassis Follow the steps below to install the C8000 chassis. Note: For best weight distribution, place the storage sleds toward the bottom of the server rack whenever possible, as they tend to weigh more than the compute sleds. 1. Remove power sleds, compute sleds, and storage sleds from the chassis prior to rack installation to lighten the load. 2. Use at least two people to slide the C8000 chassis onto the rails until the front ears touch the cage nuts. 3.
Installing power cables The steps below assume you have power distribution units (PDU) and rackmounted network switches installed in the rack according to the included documentation. This document does not include installation instructions for these items, as instructions can vary depending on the type you are installing. Note: Distribute C8000 power across two power circuits for redundancy. 1.
Installing BMC cables You can access the Baseboard Management Controller (BMC) of a sled using two modes of operation: Non-Central Independent Mode, in which you access BMC through a dedicated NIC using the sled’s BMC management port Non-Central Consolidated Mode, in which you access BMC through a shared NIC using the PowerEdge C8000 server enclosure’s BMC management port and Ethernet port.
Connecting Ethernet cables to management ports For Non-Central Consolidated Mode, run Ethernet cables from your network switch to the management port on the front right of the Dell PowerEdge C8000 enclosure as the yellow cables in Figure 6 show. You can also run Ethernet cables to the rear BMC management port (see Figure 7). Before setting up the BMC, connect the sled to a local console and configure the BMC NIC in the BIOS F2 setup menu.
We ran cables through the front pass-through holes (see Figure 6) to make the setup easier to see and understand in the pictures. While this is a valid configuration option, please note that running the cables this way has the potential to allow heat from the back of the server rack to come through those holes and create unfavorable temperatures. To avoid such issues, you can run cables on top of the mounting rails instead, using a cable lacing arm to keep cables neatly bundled (see Figure 9).
Installing network cables Each compute sled has two embedded 1Gb NIC connectors on the front of the sled. Figure 10 shows a single bay C8220 sled, a dual bay C8220x GPU sled, and a dual bay C8220x compute sled. Depending on the required bandwidth, these ports should be connected to your network switch. We connected both NIC ports to our network switch to allow for maximum bandwidth and configuration options as shown in Figure 11. Use various lengths of Ethernet cable to ensure neat cabling.
Optional 40GbE PCI Express adapter card One of the options available with the C8220 and C8220X sleds is a Mellanox dual-port InfiniBand® 40GbE PCI Express expansion card. Figure 12 shows two C8220X sleds with an InfiniBand 40GbE card installed in each and network cables attached. When using 40GbE network adapters, the two embedded 1Gb NIC connectors may be unnecessary and therefore not connected. Figure 12: Ethernet cable installation with 40GbE connectors.
Connecting the C8000XD storage sled The C8000XD storage sled is available with 3.5-inch or 2.5-inch SAS/SATA/SSD in 12or 24-disk configurations. Compute sleds connect to the C8000XD through four SAS connections on the front of the sled. The four SAS ports are labeled A1, A2, B1 and B2. (Figure 13 shows the C8000XD and highlights the four SAS ports.) You can configure these ports in the following four configurations.
Refer to the C8000XD owner's manual for more zoning options used in different hard drive configurations.3 The C8220 and C8220X compute sleds have an internal SAS RAID controller to connect to internal drives. To connect the C8000XD storage sleds to the compute sleds, an external SAS controller must be installed in the available PCI Express slot. The external SAS controller is a dual-port card with four external connections. SAS cables must be connected between these ports and the C8000XD storage sled.
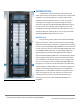
NOTE: All cabling should not interfere with sled serviceability. To ensure that sled access is quick and easy, run cables out of the way whenever possible. Avoid running cables across main access points. Figure 15 shows the completed installation. Figure 15: Three views of the completed installation. PowerEdge C8000 weight considerations Racks have weight limits, so it is important to know how much your solution will weigh when you add your Dell PowerEdge C8000 and sleds.
Weight of C8000 configuration options Storage and compute configuration C8220 sled C8000XD sled with 12 x 3.5” SAS and SATA drives C8000XD sled with 12 x 2.5” SAS drives C8000XD sled with 24 x2.5" SSD drives C8220X sled with 2 x 2.5” SAS, 2 x 2.5” SATA, 4 x 3.5” SAS C8220X sled with 4 x 2.5” SATA, 8 x 2.5” SAS Other components C8000 chassis Power sled Switches Number of sled bays 1 2 2 2 2 2 Number of sled bays 8 1 N/A Weight 10 lbs. 38 lbs. 25 lbs. 26 lbs. 23 lbs. 21 lbs. Weight 45 lbs. 10 lbs. 51 lbs.
ABOUT PRINCIPLED TECHNOLOGIES Principled Technologies, Inc. 1007 Slater Road, Suite 300 Durham, NC, 27703 www.principledtechnologies.com We provide industry-leading technology assessment and fact-based marketing services. We bring to every assignment extensive experience with and expertise in all aspects of technology testing and analysis, from researching new technologies, to developing new methodologies, to testing with existing and new tools.