
Users Guide
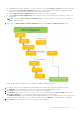
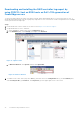
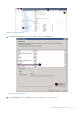
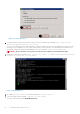
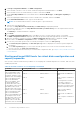
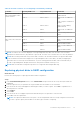
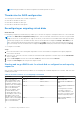
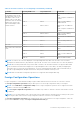
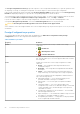
Table Of Contents
- Dell EMC PowerEdge Servers Troubleshooting Guide
- Contents
- Introduction
- Diagnostic indicators
- Status LED indicators
- System health and system ID indicator codes
- iDRAC Quick Sync 2 indicator codes
- iDRAC Direct LED indicator codes
- NIC indicator codes
- Power supply unit indicator codes
- Non-redundant power supply unit indicator codes
- Hard drive indicator codes
- uSATA SSD indicator codes
- Internal dual SD module indicator codes
- Running diagnostics
- Troubleshooting hardware issues
- Troubleshooting system startup failure
- Troubleshooting external connections
- Troubleshooting the video subsystem
- Troubleshooting a USB device
- Troubleshooting a serial Input Output device
- Troubleshooting a NIC
- Troubleshooting a wet system
- Troubleshooting a damaged system
- Troubleshooting the system battery
- Troubleshooting cooling problems
- Troubleshooting cooling fans
- Troubleshooting an internal USB key
- Troubleshooting a micro SD card
- Troubleshooting expansion cards
- Troubleshooting processors
- Troubleshooting a storage controller
- OMSA flagging PERC driver
- Importing or clearing foreign configurations using the foreign configuration view screen
- Importing or clearing foreign configurations using the VD mgmt menu
- RAID controller L1, L2 and L3 cache error
- PERC controllers do not support NVME PCIe drives
- 12 Gbps hard drive does not support in SAS 6ir RAID controllers
- Hard drives cannot be added to the existing RAID 10 Array
- PERC battery discharging
- PERC battery failure message is displayed in ESM log
- Creating non-raid disks for storage purpose
- Firmware or Physical disks out-of-date
- Cannot boot to Windows due to foreign configuration
- Offline or missing virtual drives with preserved cache error message
- Expanding RAID array
- LTO-4 Tape drives are not supported on PERC
- Limitations of HDD size on H310
- System logs show failure entry for a storage controller even though it is working correctly
- Troubleshooting hard drives
- Troubleshooting an optical drive
- Troubleshooting a tape backup unit
- Troubleshooting no power issues
- Troubleshooting power supply units
- Troubleshooting RAID
- RAID configuration using PERC
- RAID configuration using OpenManage Server Administrator
- RAID configuration by using Unified Server Configurator
- Downloading and installing the RAID controller log export by using PERCCLI tool on ESXi hosts on Dell’s 13th generation of PowerEdge servers
- Configuring RAID by using Lifecycle Controller
- Starting and target RAID levels for virtual disk reconfiguration and capacity expansion
- Replacing physical disks in RAID1 configuration
- Thumb rules for RAID configuration
- Reconfiguring or migrating virtual disks
- Foreign Configuration Operations
- Viewing Patrol Read report
- Check Consistency report
- Virtual disk troubleshooting
- Rebuilding of virtual disk does not work
- Rebuilding of virtual disk completes with errors
- Cannot create a virtual disk
- A virtual disk of minimum size is not visible to Windows Disk Management
- Virtual disk errors on systems running Linux
- Problems associated with using the same physical disks for both redundant and nonredundant virtual disks
- Enable the alarm on PERC 5/E adapter to alert in case of physical disk failures
- RAID controller displays multibit ECC errors
- PERC goes offline with an error message
- Reconfiguring the RAID level and virtual disks
- Lost shared storage access
- Troubleshooting memory or battery errors on the PERC controller on Dell PowerEdge servers
- Slicing
- RAID puncture
- Troubleshooting thermal issue
- Input/Output errors while reseating SAS IOM storage sled on hardware configurations
- Server management software issues
- What are the different types of iDRAC licenses
- How to activate license on iDRAC
- Can I upgrade the iDRAC license from express to enterprise and BMC to express
- How to find out missing licenses
- How to export license using iDRAC web interface
- How to set up e-mail alerts
- System time zone is not synchronized
- How to set up Auto Dedicated NIC feature
- How to configure network settings using Lifecycle Controller
- Assigning hot spare with OMSA
- Storage Health
- How do I configure RAID using operating system deployment wizard
- Foreign drivers on physical disk
- Physical disk reported as Foreign
- How to update BIOS on 13th generation PowerEdge servers
- Why am I unable to update firmware
- Which are the operating systems supported on Dell EMC PowerEdge servers
- Unable to create a partition or locate the partition and unable to install Microsoft Windows Server 2012
- JAVA support in iDRAC
- How to specify language and keyboard type
- Message Event ID - 2405
- Installing Managed System Software On Microsoft Windows Operating Systems
- Installing Managed System Software On Microsoft Windows Server and Microsoft Hyper-V Server
- Installing Systems Management Software On VMware ESXi
- Processor TEMP error
- PowerEdge T130, R230, R330, and T330 servers may report a critical error during scheduled warm reboots
- SSD is not detected
- OpenManage Essentials does not recognize the server
- Unable to connect to iDRAC port through a switch
- Lifecycle Controller is not recognizing USB in UEFI mode
- Guidance on remote desktop services
- Troubleshooting operating system issues
- How to install the operating system on a Dell PowerEdge Server
- Locating the VMware and Windows licensing
- Troubleshooting blue screen errors or BSODs
- Troubleshooting a Purple Screen of Death or PSOD
- Troubleshooting no boot issues for Windows operating systems
- No POST issues in iDRAC
- Troubleshooting a No POST situation
- Migrating to OneDrive for Business using Dell Migration Suite for SharePoint
- Windows
- Installing and reinstalling Microsoft Windows Server 2016
- FAQs
- Why are the USB keyboard and mouse not detected during the Windows Server 2008 R2 SP1 installation
- Why does the installation wizard stop responding during the Windows OS installation
- Why does Windows OS installation using Lifecycle Controller, on PowerEdge Servers fail at times with an error message
- Why does Windows Server 2008 R2 SP1 display a blank screen in UEFI mode after installation
- Symptoms
- Troubleshooting system crash at cng.sys with watchdog Error violation
- Host bus adapter mini is missing physical disks and backplane in Windows
- Converting evaluation OS version to retail OS version
- Partitions on disk selected for installation of Hyper-V server 2012
- Install Microsoft Hyper-V Server 2012 R2 with the Internal Dual SD module
- VMware
- Linux
- Installing operating system through various methods
- Getting help

Table 18. Possible scenarios for reconfiguring a virtual disk (continued)
Controller Starting RAID Level Target RAID Level Comments
Blades, PERC H730P Slim,
PERC H830 Adapter, PERC
FD33xD/FD33xS
RAID 5 RAID 0 With or without adding
additional disks
RAID 5 RAID 5, RAID 6 Add at least one additional
disk.
RAID 6 requires a minimum of
4 disks.
RAID 6 RAID 0, RAID 5 With or without adding
additional disks
RAID 6 RAID 6 Add at least one additional
disk
RAID 10 RAID 10 Without adding additional
disks
SAS 6/iR N/A N/A N/A
PERC S100, S110, S130, and
S300
RAID 0 RAID 0 With or without additional
disks
RAID 1 RAID 1 Without additional disks
RAID 5 RAID 5 With or without additional
disks
RAID 10 RAID 10 Without additional disks
NOTE: The order of the controllers displayed on Storage Management may differ from the order of the controllers
displayed in the Human Interface (HII) and PERC Option ROM. The order of the controllers does not cause any limitation.
NOTE: When creating virtual disks using software RAID controllers, the information related to the physical disks linked
to the virtual disk is enumerated or displayed on Storage Management after a short delay. This delay in displaying the
information does not cause any functional limitation. If you are creating partial virtual disks, Dell recommends that you
provide Storage Management adequate time between each partial virtual disk creation process.
NOTE: RAID 10 virtual disk reconfiguration operation is not supported with Intelligent Mirroring.
Replacing physical disks in RAID1 configuration
About this task
Perform the following steps to replace physical disks in RAID1 configuration:
Steps
1. In the Virtual Disk Management window, select Virtual Disk # and press the down-arrow key until Physical Disks are
highlighted.
2. Press the right-arrow key to expand the list of physical disks that are members of the virtual disk.
3. Press the down-arrow key and highlight the desired physical disk you want to replace. Press <F2> to expand the list of
allowed operations on the disk.
4. Select Replace.
5. Select Start.
6. Press the down-arrow to highlight a replacement disk and then press the spacebar to select the disk.
7. Select OK to start the replacement.
NOTE:
The replacement disk must be a hot spare or an unconfigured disk without a foreign configuration. It must have
the same or greater capacity and should be of the same type as the disk it is replacing.
Troubleshooting hardware issues 77