
Owners Manual


Related references
Safety instructions on page 67
Related tasks
Before working inside your system on page 67
Removing a sled on page 71
Installing the 1.8-inch solid state drive on page 80
Installing a sled on page 72
After working inside your system on page 68
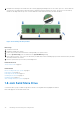
Installing the 1.8-inch solid state drive
Prerequisites
CAUTION: Many repairs may only be done by a certified service technician. You should only perform
troubleshooting and simple repairs as authorized in your product documentation, or as directed by the online or
telephone service and support team. Damage due to servicing that is not authorized by Dell is not covered by
your warranty. Read and follow the safety instructions that are shipped with your product.
1. Follow the safety guidelines listed in the Safety instructions section.
2. Follow the procedure listed in the Before working inside your system section.
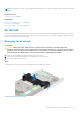
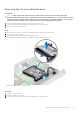
3. Remove the sled from the enclosure.
Steps
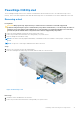
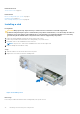
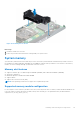
1. Connect the SATA power and data cable to the solid state drive (SSD).
2. Slide the SSD with the SATA power and data cable into the SSD drive holder.
3. Press the SSD down until the drive lock clicks into place and secures the SSD.
80
Installing and removing sled components