
Computer Hardware User Manual


Table Of Contents
- Contents
- About Your System
- Using The System Setup And Boot Manager
- Installing Blade Components
- Recommended Tools
- Removing And Installing A Blade
- Opening And Closing The Blade
- Inside The Blade
- Cooling Shroud
- System Memory
- I/O Module Mezzanine Cards
- Management Riser Card
- SD vFlash Card
- Network Daughter Card/LOM Riser Card
- Processors
- Hard Drives/SSDs
- Hard-Drive/SSD Backplane
- System Board
- NVRAM Backup Battery
- Storage Controller Card
- Troubleshooting Your System
- Using System Diagnostics
- Jumpers And Connectors
- Technical Specifications
- System Messages
- Getting Help
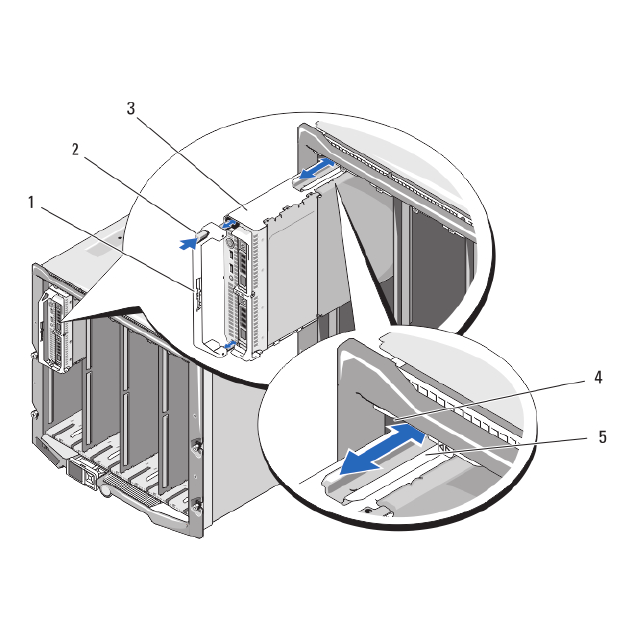
Figure 3. Removing or Installing the Blade
1. blade handle
2. release button
3. blade
4. guide rail on enclosure
5. guide rail on blade (or blade blank)
Installing The Blade
1. If you are installing a new blade, remove the plastic cover from the I/O connector(s) and save for future use.
2. Orient the blade so that the handle is on the left side of the blade.
3. If you are installing a half-height blade in bays 11 or 12, rotate the LCD module to the horizontal storage position to
prevent accidental damage to the LCD screen.
4. If you are installing a half-height blade in one of the eight upper bays, align the guide rail on the upper edge of the
blade so that the rail fits between the plastic guides on the enclosure.
If you are installing a half-height blade in one of the eight lower bays, align the edge of the blade with the guide rail
on the floor of the M1000e enclosure.
5. Slide the blade into the enclosure until the handle engages and locks the blade in place.
26