
Users Guide


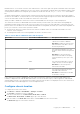
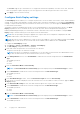
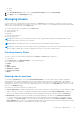


Table Of Contents
- Dell EMC OpenManage Enterprise-Modular Edition Version 1.20.10 for PowerEdge MX7000 Chassis User's Guide
- Overview
- Updating firmware for PowerEdge MX solution
- Updating MX7000 components using OME-Modular 1.20.10
- Upgrading ethernet switch using DUP
- Logging in to OME-Modular
- Logging in to OME–Modular as local, Active Directory, or LDAP user
- OME-Modular home page
- Viewing device health
- Setting up chassis
- Initial configuration
- Configuring chassis settings
- Managing chassis
- Chassis groups
- Controlling chassis power
- Backing up chassis
- Restoring chassis
- Exporting chassis profiles
- Managing chassis failover
- Troubleshooting in chassis
- Blinking LEDs
- Interfaces to access OME-Modular
- Viewing chassis hardware
- Viewing chassis alerts
- Viewing chassis hardware logs
- Configuring OME–Modular
- Viewing current configuration
- Configuring users and user settings
- Configuring login security settings
- Configuring alerts
- Managing compute sleds
- Managing storage
- Managing templates
- Managing identity pools
- Ethernet IO Modules
- MX Scalable Fabric architecture
- SmartFabric Services
- Managing networks
- Managing Fibre Channel IOMs
- Managing firmware
- Monitoring alerts and logs
- Monitoring audit logs
- Use case scenarios
- Troubleshooting
- Storage
- Firmware update is failing
- Storage assignment is failing
- SAS IOM status is downgraded
- SAS IOM health is downgraded
- Drives on compute sled are not visible
- Storage configuration cannot be applied to SAS IOMs
- Drives in OpenManage are not visible
- iDRAC and OpenManage drive information do not match
- The assignment mode of storage sled is unknown
- Unable to access OME-Modular using Chassis Direct
- Troubleshooting lead chassis failure
- Storage
- Recommended slot configurations for IOMs
- Upgrading networking switch using different DUP versions
- Upgrading networking switch using CLI

NOTE: The Timeout Limit option is available only if the Enable Inactivity Timeout is selected.
5. Select Enable Read Authentication to use your user credentials to read the inventory in a secure data center.
By default, this option is selected. If you clear this check box, you cannot access the secure data center.
6. Select Enable Quick Sync Wi-Fi to use WiFi to communicate with the chassis. By default, the Enable Quick Sync Wi-Fi
check box is selected.
7. Select Enable KVM Access to configure the quick sync setting using KVM. You can also use the RACADM or Redfish
command to enable or disable KVM. For more information, see the OME - Modular for PowerEdge MX7000 Chassis
RACADM CLI Guide available at https://www.dell.com/openmanagemanuals.
You can use the DisplayPort in the chassis to stream the video in the KVM. If the external DP to Video Graphics Array (VGA)
converter is available, you can stream the KVM video in the VGA too.
8. Select the LCD Access option for quick sync.
The available options are:
● Disabled
● View Only
● View and Modify
NOTE: The LCD Access option is displayed only if there is a system with LCD available in the chassis.
9. In the User Defined text box, enter the text that you want to see on the LCD Home screen. The LCD Home screen is
displayed when the system is reset to factory default settings. The text can have a maximum of 62 characters and supports
a limited number of UTF-8 characters. If a UTF-8 character that is used in the text is not supported, a box is displayed
instead of the character. The default string is the service tag of the system.
10. From the LCD Language drop-down, select the language in which the text on the LCD must be displayed.
The available options are:
● English
● French
● Spanish
● German
● Japanese
● Chinese
By default, the text is displayed in English.
11. Select the Enable Chassis Direct Access text box to enable accessing the MX7000 chassis from a host such as a laptop or
server, using a USB On-The-Go (OTG) cable.
If the Enable Chassis Direct Access check box is cleared, the existing chassis direct sessions are disconnected and
the Chassis Direct LED turns off. When the feature is disabled, you cannot connect the laptop to the chassis. The URL
https://ome-m.local is inaccessible. After enabling the feature, reattach the USB cable and wait for Chassis Direct
LED to turn green to access the chassis phonebook. For more information, see the section, Chassis Direct.
12. Click Apply to save the quick sync settings.
Chassis Direct
The Chassis Direct feature in OME-Modular enables users to access management consoles such as iDRAC and management
module of devices on the chassis. The MX7000 chassis has several USB ports. The Right Control Panel (RCP) on the front
of the chassis has three USB ports. Two ports are regular sized USB-A ports, for keyboards and mouse used for the chassis
level KVM. The third port is a Micro-AB port that supports USB OTG. To use Chassis Direct, connect the USB OTG port to a
laptop. The processor on the management module emulates a USB network interface and provides a network bridge into the
management VLAN. The network is same that QuickSync 2 bridges for OpenManage Mobile Wi-Fi access.
Remove the USB cable that is connected to the front panel and AC power cycle the chassis.
With the system that is connected to the USB OTG port on the chassis, you can access the MM user interface and iDRAC user
interface or KVM. You can get access by launching a browser on the laptop and entering the URL, https://ome-m.local. A
chassis phonebook page which contains a list of entries to the available devices on the chassis, is displayed. This option provides
a better experience than the front panel KVM, which provides access only the command-line prompt access for OME-Modular.
Select the check box to enable accessing the MX7000 chassis from a host such as a laptop or server, using a USB On-The-Go
(OTG) cable. Connect the USB OTG cable from the host to the micro USB port on the front panel (right control panel) of the
32
Logging in to OME-Modular