Install_proc.
Install_proc.book Page 2 Friday, May 4, 2012 2:24 PM Notes, Cautions, and Warnings NOTE: A NOTE indicates important information that helps you make better use of your computer. CAUTION: A CAUTION indicates either potential damage to hardware or loss of data and tells you how to avoid the problem. WARNING: A WARNING indicates a potential for property damage, personal injury, or death. __________________ Information in this document is subject to change without notice. © 2012 Dell Inc. All rights reserved.
Install_proc.book Page 3 Friday, May 4, 2012 2:24 PM Overview This document provides important information for installing the second processor in Dell PowerEdge R520 and PowerEdge R420 systems. Before You Begin To install a second processor in your system, you must ensure that you have: • Replaced the dummy fan in the FAN 6 slot with a cooling fan. For more information on replacing the fan, see "Removing a Cooling Fan" and "Installing a Cooling Fan" in the relevant Owner’s Manual on support.dell.com.
Install_proc.book Page 4 Friday, May 4, 2012 2:24 PM Removing a Processor Blank CAUTION: Many repairs may only be done by a certified service technician. You should only perform troubleshooting and simple repairs as authorized in your product documentation, or as directed by the online or telephone service and support team. Damage due to servicing that is not authorized by Dell is not covered by your warranty. Read and follow the safety instructions that came with the product.
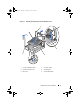
Install_proc.book Page 5 Friday, May 4, 2012 2:24 PM Figure 1-1.
Install_proc.book Page 6 Friday, May 4, 2012 2:24 PM Installing the Second Processor CAUTION: Only trained service technicians are authorized to remove the system cover and access any of the components inside the system. Before you begin this procedure, review the safety instructions that came with the system. 1 Ensure that you have followed the steps mentioned in "Before You Begin" on page 3. 2 Unpack the new processor.
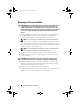
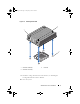
Install_proc.book Page 7 Friday, May 4, 2012 2:24 PM Figure 1-2. Installing the Heat Sink 2 1 3 1 retention sockets (4) 3 retention screws (4) 2 heat sink 9 Install the cooling shroud. For more information, see "Installing the Cooling Shroud" in the Owner’s Manual. 10 Close the system.
Install_proc.book Page 8 Friday, May 4, 2012 2:24 PM 11 Reconnect your system and peripherals to their electrical outlets, and turn on the system. 12 Press to enter the System Setup and check that the processor information matches the new system configuration. 13 Run the system diagnostics to verify that the new processor operates correctly.