
Users Guide


Considerations before creating virtual disks
Before creating virtual disks, consider the following:
● Virtual disk names not stored on controller—The names of the virtual disks that you create are not stored on the controller.
This means that if you reboot using a different operating system, the new operating system may rename the virtual disk
using its own naming conventions.
● Disk grouping is a logical grouping of disks attached to a RAID controller on which one or more virtual disks are created, such
that all virtual disks in the disk group use all of the physical disks in the disk group. The current implementation supports the
blocking of mixed disk groups during the creation of logical devices.
● Physical disks are bound to disk groups. Therefore, there is no RAID level mixing on one disk group.
●
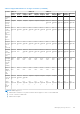
There are limitations on the number of physical disks that can be included in the virtual disk. These limitations depend on the
controller. When creating a virtual disk, controllers support a certain number of stripes and spans (methods for combining
the storage on physical disks). Because the number of total stripes and spans is limited, the number of physical disks that
can be used is also limited. The limitations on stripes and spans affect the RAID levels as follows:
○ Maximum number of spans affects RAID 10, RAID 50, and RAID 60.
○ Maximum number of stripes affects RAID 0, RAID 5, RAID 50, RAID 6, and RAID 60.
○ Number of physical disks in a mirror is always 2. This affects RAID 1 and RAID 10.
NOTE:
○ RAID 1 is only supported for BOSS controllers.
○ SWRAID controller only supports RAID 0, 1, 5 and 10.
● Cannot create virtual disks on PCIe SSDs. But PERC 11 and later controllers support creating virtual disks using PCIe SSDs.
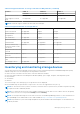
Creating virtual disks using web interface
To create virtual disk:
1. In the iDRAC Web interface, go to Storage > Overview > Virtual DisksAdvanced Filter.
2. In the Virtual Disk section, do the following:
a. From the Controller drop-down menu, select the controller for which you want to create the virtual disk.
b. From the Layout drop-down menu, select the RAID level for the Virtual Disk.
Only those RAID levels supported by the controller appear in the drop-down menu and it is based on the RAID levels are
available based on the total number of physical disks available.
c. Select the Media Type, Stripe Size, Read Policy, Write Policy, Disk Cache Policy, .
Only those values supported by the controller appear in the drop-down menus for these properties.
d. In the Capacity field, enter the size of the virtual disk.
The maximum size is displayed and then updated as disks are selected.
e. The Span Count field is displayed based on the selected physical disks (step 3). You cannot set this value. It is
automatically calculated after selecting disks for multi-raid level. Span Count field is applicable to RAID 10, RAID 50, and
RAID 60. If you have selected RAID 10 and if the controller supports uneven RAID 10, then the span count value is not
displayed. The controller automatically sets the appropriate value. For RAID 50 and RAID 60, this field is not displayed
when minimum number of disks are used to create RAID. It can be changed if more disks are used.
3. In the Select Physical Disks section, select the number of physical disks.
For more information about the fields, see the iDRAC Online Help
4. From the Apply Operation Mode drop-down menu, select when you want to apply the settings.
5. Click Create Virtual Disk.
Based on the selected Apply Operation Mode, the settings are applied.
NOTE:
You can use alphanumeric characters, spaces, dashes, and underscores in the disk name.
Any other special characters that you enter are removed and replaced by space while creating the virtual disk.
Creating virtual disks using RACADM
Use the racadm storage createvd command.
For more information, see the iDRAC RACADM CLI Guide available at https://www.dell.com/idracmanuals.
240
Managing storage devices