Dell Technologies Host Bus Adapter 355i User's Guide Dell HBA355i Part Number: UCSA-1111, UCSF-1100, UCSN-1100 September 2020 Rev.
Notes, cautions, and warnings NOTE: A NOTE indicates important information that helps you make better use of your product. CAUTION: A CAUTION indicates either potential damage to hardware or loss of data and tells you how to avoid the problem. WARNING: A WARNING indicates a potential for property damage, personal injury, or death. © 2020 Dell Inc. or its subsidiaries. All rights reserved. Dell, EMC, and other trademarks are trademarks of Dell Inc. or its subsidiaries.
Contents Chapter 1: Dell Technologies Host Bus Adapter 355i......................................................................5 Features of Dell HBA355i adapter...................................................................................................................................5 Features of Dell HBA355i front card.............................................................................................................................. 6 Technical specification of Dell HBA355i.............
Navigating to the Dell HBA355i configuration utility.................................................................................................21 Controller management ................................................................................................................................................... 21 Viewing the controller properties............................................................................................................................. 21 Refreshing the topology..
1 Dell Technologies Host Bus Adapter 355i Dell Technologies Host Bus Adapter 355i (Dell HBA355i) is a non–RAID solution card that is can be used as boot controller and also as a data controller: ● PCIe card with Gen 4 PCIe x 8 host interface ● Dual SAS/SATA Gen 3 device interfaces ● Supports both SAS/SATA drives NOTE: For the safety, regulatory, and ergonomic information associated with these devices, and for more information about the Integrated Dell Remote Access Controller (iDRAC) or Lifecycle Controller
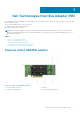
Features of Dell HBA355i front card Figure 2. Features of Dell HBA355i front card 1. PCIe input connector 3. Heatsink 5. Secondary SAS output connector port B 2. Power edge connector 4. Primary SAS output card edge connector port A Technical specification of Dell HBA355i The table below describes the Dell HBA355i card specifications that are applicable to both adapter and front form factors. Table 1.
2 Applications supported by Dell HBA355i Dell HBA355i card management applications include the Human Interface Infrastructure Configuration Utility, Dell OpenManage Storage Management, The Command Line Interface, The Integrated Dell Remote Access Controller (iDRAC), and Lifecycle Controller (LC). They enable you to manage and configure the RAID system, create and manage a disk group, and provide online maintenance.
3 Features of Dell HBA355i The Dell HBA355i card supports the following features and is applicable to both adapter and front form factors. Topics: • • • • Hardware Root of Trust Non–RAID drives Event management of Dell HBA355i LED activity Hardware Root of Trust Hardware Root of Trust (RoT) builds a chain of trust by authenticating all the firmware components prior to its execution, and it permits only authenticated firmware to execute and flashed.
4 Install and remove a Dell HBA355i card Topics: • • • • • • • Safety instructions Before working inside your system After working inside your system Remove the Dell HBA355i adapter Install the Dell HBA355i adapter Remove the Dell HBA355i front card Install the Dell HBA355i front card Safety instructions NOTE: To avoid injury, do not lift the system on your own. Get others to assist you. WARNING: Opening or removing the system cover while the system is turned on may expose you to a risk of electric shock.
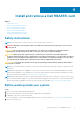
After working inside your system Steps 1. Replace the system cover. 2. If applicable, install the system into the rack. For more information, see the Rail Installation Guide relevant to your rail solutions at www.dell.com/poweredgemanuals. 3. Reconnect the peripherals and connect the system to the electrical outlet, and then power on the system. Remove the Dell HBA355i adapter Prerequisites CAUTION: Many repairs may only be done by a certified service technician.
Figure 3. Remove the Dell HBA355i adapter Install the Dell HBA355i adapter Prerequisites CAUTION: Many repairs may only be done by a certified service technician. You should only perform troubleshooting and simple repairs as authorized in your product documentation, or as directed by the online or telephone service and support team. Damage due to servicing that is not authorized by Dell is not covered by your warranty. Read and follow the safety instructions that are shipped with your product. 1.
Figure 4. Install the Dell HBA355i adapter Next steps 1. Follow the procedure listed in After working inside your system on page 10. Remove the Dell HBA355i front card Prerequisites CAUTION: Many repairs may only be done by a certified service technician. You should only perform troubleshooting and simple repairs as authorized in your product documentation, or as directed by the online or telephone service and support team.
b. Pull the SAS cable out of the connector. 6. Remove the Dell HBA355i controller from the controller carrier. NOTE: If the replacement storage controller is a front controller, then reinsert the controller into the carrier and secure it with the appropriate screws. 7. Take the replacement storage controller, and reconnect the SAS cable before reconnecting it to the backplane.
Steps 1. Turn off the system, including any attached peripherals, and disconnect the system from the electrical outlet. NOTE: It is recommended that you always use a static mat and static strap while working on components in the interior of the system. 2. Open the system. 3. Connect the SAS data cable connectors to the card. NOTE: Ensure that you connect the cable according to the connector labels on the cable. The cable does not function properly if reversed. 4.
5 Driver support for Dell HBA355i The Dell HBA355i series require software drivers to operate with the supported operating systems. This chapter contains the procedures for installing the drivers for the Dell HBA355i cards. NOTE: The driver for Dell HBA355i for VMware ESXi is packaged within the VMware ESXi ISO image downloaded from Dell. For more information, see the VMware documentation at www.dell.com/virtualizationsolutions.
Download and save Dell HBA355i drivers from the Dell Systems Service and Diagnostic Tools About this task To download drivers from the Dell Systems Service and Diagnostic Tools media: Steps 1. Insert the Dell Systems Service and Diagnostics Tools media in your system. The Welcome to Dell Service and Diagnostic Utilities screen is displayed. 2. Select your system model and operating system. 3. Click Continue. 4. From the list of drivers displayed, select the driver you require. 5.
Steps 1. Turn off the system. 2. Install the new RAID controller in the system. For detailed instructions on installing the RAID controller in the system, see Install and remove a Dell HBA355i card on page 9. 3. Turn on the system. The Found New Hardware Wizard screen displays the detected hardware device. 4. Click Next. 5. On the Locate device driver screen, select Search for a suitable driver for my device and click Next. 6. Browse and select the drivers from the Locate Driver Files screen. 7. Click Next.
Installing or updating the RPM driver package with KMOD support. If not, proceed with using the native device driver and then skip to the topic Installing or Updating the RPM Driver Package With KMP Support. NOTE: The driver update disk (DUD) images are created only for those operating system releases in which the native (inbox) driver is insufficient for installation. In the event that an operating system is being installed with a corresponding DUD image, follow the instructions below.
Steps 1. At a terminal window, type the following: dkms build -m – v – k dkms install -m – v – k . 2. To check if the driver is successfully installed in the new kernel, type: dkms status. A message similar to the following is displayed: , , : installed. 3. If the previous device driver is in use, you must restart the system for the updated driver to take effect.
6 Manage Dell HBA355i card using HII configuration utility The Human Interface Infrastructure (HII) configuration utility is a storage management application integrated into the System BIOS . It is used to configure and manage RAID disk groups, virtual disks, and physical disks. This utility is independent of the operating system. The HII configuration utility is a standardized way of viewing and setting device configuration.
Exit the Dell HBA355i HII configuration utility About this task To exit the HII configuration utility (Ctrl+C), perform the following steps: Steps 1. Press Esc on any menu screen. If there is only one controller, then a dialog box is displayed to confirm your choice. 2. Select OK to exit and press Enter. If multiple controllers are present, then the Esc key brings you to the Controller Selection screen. 3. Press Esc again to reach the exit screen. A dialog box is displayed to confirm your choice. 4.
Table 4. View Controller Properties options (continued) Option Description SAS address Controller SAS Address Package version Controller package version Number of SAS and SATA Devices* Number of SAS and SATA devices supported Number of enclosures* Number of controller enclosures *This option is displayed only after you refresh the topology. Refreshing the topology Refresh topology allows you to rediscover the devices.
Table 6.
7 Updating the firmware of Dell HBA355i Topics: • Install the Dell HBA355i firmware using Dell Update Package (DUP) Install the Dell HBA355i firmware using Dell Update Package (DUP) Steps 1. Navigate to www.dell.com/support/home. 2. Locate your controller. 3. Download the DUP. a. For Window/iDRAC update, download Windows executable file. b. For Linux update, download .bin file. NOTE: For VMware, firmware should be updated through iDRAC or the PERC CLI utility. 4. Install the DUP. a.
8 Getting help Topics: • • • Recycling or End-of-Life service information Contacting Dell Receiving automated support with SupportAssist Recycling or End-of-Life service information Take back and recycling services are offered for this product in certain countries. If you want to dispose of system components, visit www.dell.com/recyclingworldwide and select the relevant country. Contacting Dell Dell provides online and telephone based support and service options.
● Automated diagnostic collection — SupportAssist automatically collects system state information from your devices and uploads it securely to Dell EMC. This information is used by Dell EMC Technical Support to troubleshoot the issue. ● Proactive contact — A Dell EMC Technical Support agent contacts you about the support case and helps you resolve the issue. The available benefits vary depending on the Dell EMC Service entitlement purchased for your device.
9 Documentation resources This section provides information about the documentation resources for your system. To view the document that is listed in the documentation resources table: ● From the Dell EMC support site: 1. Click the documentation link that is provided in the Location column in the table. 2. Click the required product or product version. NOTE: To locate the product name and model, see the front of your system. 3. On the Product Support page, click Manuals & documents.
Table 7. Additional documentation resources for your system (continued) Task Managing your system Document Location For information about installing the operating system, see the operating system documentation. www.dell.com/operatingsystemmanuals For information about updating drivers and firmware, see the Methods to download firmware and drivers section in this document. www.dell.