Cable Routing Procedures for Dell™ PowerEdge™ R320 & R420 Systems This Dell Technical White Paper explains the best practices for routing and securing the cables exiting the back of the R320 & R420 systems. Greg Henderson and Jose L.
Cable Routing Procedures for Dell PowerEdge R320 & R420 Systems This document is for informational purposes only and may contain typographical errors and technical inaccuracies. The content is provided as is, without express or implied warranties of any kind. © 2012 Dell Inc. All rights reserved. Dell and its affiliates cannot be responsible for errors or omissions in typography or photography. Dell, the Dell logo, and PowerEdge are trademarks of Dell Inc.
Cable Routing Procedures for Dell PowerEdge R320 & R420 Systems Contents Introduction ............................................................................................................. 4 Section 1: Cabling a PowerEdge R320 or R420 system with a CMA ............................................ 4 1.1. Connecting the cables to the system ................................................................... 4 1.2. Routing the power cables through the strain reliefs .................................
Cable Routing Procedures for Dell PowerEdge R320 & R420 Systems Introduction This white paper covers recommended cable routing procedures for the Dell™ PowerEdge™ R320 & R420 systems in the following racks: • • • PowerEdge 2410, 4210 PowerEdge 2420, 4220, 4820 (including wide and deep versions) PowerEdge Energy Smart 4020S, 4620S If you are using the optional cable management arm (CMA), following these procedures will allow you to extend the system from the rack for service without powering down or disco
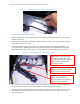
Cable Routing Procedures for Dell PowerEdge R320 & R420 Systems 1.2. Routing the power cables through the strain reliefs After you have installed the tray and cables, route the power cable(s) through the strain relief(s) located on the power supply handle(s) as shown in Figures 2 & 3. Figure 2. Figure 3. Routing power cables through the strain reliefs on hot swap power supplies Routing the power cable through the strain relief on a fixed power supply 1.3.
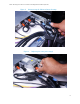
Cable Routing Procedures for Dell PowerEdge R320 & R420 Systems Figure 4. Attaching the inner CMA attachment bracket 1.3.2. Left-side mounting instructions 1. Install the CMA on the rear left side of the rails by attaching both CMA housings to the attachment brackets on the rails. 2. Route the cables through the CMA while avoiding twisting the cables. Use the hook-and-loop straps on the CMA to secure the cables. 3.
Cable Routing Procedures for Dell PowerEdge R320 & R420 Systems 6. Extend the system out of the rack to verify that there is sufficient slack in the cables on both ends of the CMA. See Figure 6 for an example of a completed left-side mounted CMA installation. Figure 6. Left-side mounted CMA installation (preferred) 1.3.3. Right-side mounting instructions Install the CMA on the rear right side of the rails by attaching both CMA housings to the attachment brackets on the rails.
Cable Routing Procedures for Dell PowerEdge R320 & R420 Systems Section 2: Replacing a hot swap power supply on a PowerEdge R320 or R420 system with a CMA 2.1. Replacing a hot swap power supply with a left-side mounted CMA 1. Swing the CMA to its service position as described in the CMA Installation Instructions provided with the CMA kit. 2. Remove the tray from underneath the CMA as described in the CMA Installation Instructions. 3.
Cable Routing Procedures for Dell PowerEdge R320 & R420 Systems Figure 8. Disconnecting the CMA attachment housings Figure 9.
Cable Routing Procedures for Dell PowerEdge R320 & R420 Systems Section 3: Cabling a PowerEdge R320 or R420 system on sliding rails without a CMA NOTE: The CMA for the Dell PowerEdge R320 & R420 is optional. Without the CMA installed, the system must be powered down and all cables disconnected before it can be extended out of the rack. 3.1. Routing the cables 1. Connect all applicable cables to the rear of the system and verify that all connections are secure. 2.
Cable Routing Procedures for Dell PowerEdge R320 & R420 Systems Section 4: Cabling a PowerEdge R320 or R420 system installed on static rails NOTE: The CMA is compatible only with the sliding rails, not the static rails. 1. Follow the instructions contained in the Rack Installation Instructions found in the static rail kit to install the server into a two-post or four-post rack. 2.