
User Manual


Table Of Contents
- Dell PowerEdge Rack Enclosure
- Installation Guide
- Contents
- Safety Instructions
- Rack Installation Instructions
- Rack Specifications
- Before You Begin
- Installation Tasks
- Recommended Tools and Supplies
- Removing and Replacing the Rack Doors
- Removing and Replacing the Side Panels
- Reversing the Front Door (Optional)
- Securing the Rack Leveling Feet
- Installing the Rack Stabilizer Feet
- Adjusting the Rack Posts (Optional)
- Routing Cables
- Coupling Two Racks
- Guide d'installation
- Table des matières
- Consignes de sécurité
- Instructions d'installation de l'armoire
- Spécifications de l'armoire rack
- Avant de commencer
- Tâches d'installation
- Outils et fournitures recommandés
- Retrait et réinstallation des portes
- Retrait et réinstallation des panneaux latéraux
- Inversion du sens d'ouverture de la porte avant (facultatif)
- Fixation des pieds réglables de l'armoire
- Installation des stabilisateurs
- Réglage des montants (facultatif)
- Cheminement des câbles
- Couplage de deux armoires
- Installationsanleitung
- Inhalt
- Sicherheitshinweise
- Anleitung für die Rackmontage
- Rack-Spezifikationen
- Bevor Sie beginnen
- Ablauf der Installation
- Empfohlene Werkzeuge und Zubehör
- Entfernen und Installieren der Racktüren
- Entfernen und Installieren der Seitenteile
- Umgekehrtes Einbauen der vorderen Tür (optional)
- Einstellen der höhenverstellbaren Rackfüße
- Anbringen der Stabilisatoren
- Anpassen der Rackstützen (optional)
- Verlegen der Kabel
- Zwei Racks verbinden
- 設置ガイド
- Guía de instalación
- Contenido
- Instrucciones de seguridad
- Instrucciones de instalación del rack
- Especificaciones del rack
- Antes de comenzar
- Tareas de instalación
- Herramientas y material recomendados
- Extracción y colocación de las puertas del rack
- Extracción y colocación de los paneles laterales
- Inversión de la puerta frontal (opcional)
- Fijación de los pies niveladores del rack
- Instalación de los pies estabilizadores del rack
- Ajuste de los postes del rack (opcional)
- Colocación de los cables
- Acoplamiento de dos racks
- Installation Guide
Installation Guide 13
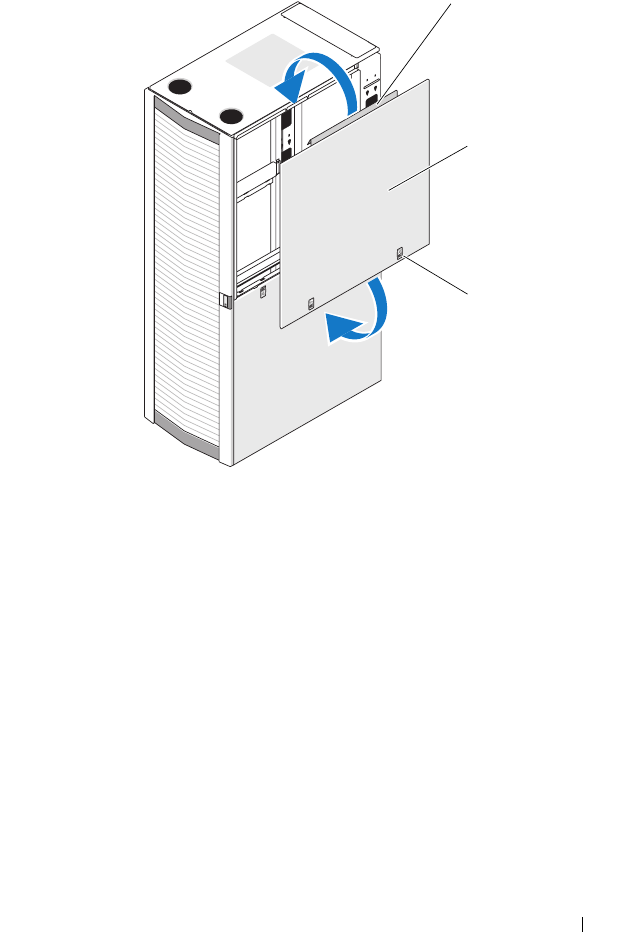
Figure 1-4. Replacing the Upper Side Panels
Removing the Lower Side Panels
1
Pull both latches down and allow the side panel to swing outward
slightly at the top.
2
Firmly grasp both sides of the panel.
3
Lift the panel upward until the panel hooks clear the holes in the
bottom of the rack frame.
4
Place the panel in a safe location with the panel’s outer surface facing
upward to help prevent damage to its cosmetic coating.
5
Repeat step 1 through step 4 for the other lower side panel.
1 panel lip 2 upper side panel (2)
3 latches (2)
2
3
1