
Reference Guide
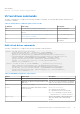
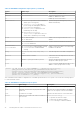


Table Of Contents
- Dell EMC PowerEdge RAID Controller Command Line Interface Reference Guide
- Contents
- Overview
- Accessing the command prompt
- Working with the PERC Command Line Interface Tool
- System commands
- Controller commands
- Drive commands
- Virtual drives commands
- Add virtual drives commands
- Delete virtual drives commands
- Delete non-RAID disks
- Virtual drive show commands
- Preserved cache commands
- Change virtual drive properties commands
- Virtual drive initialization commands
- Virtual drive erase commands
- Virtual drive migration commands
- Virtual drive consistency check commands
- Background initialization commands
- Foreign configurations commands
- BIOS-related commands
- Drive group commands
- BBU commands
- Enclosure commands
- PHY commands
- Logging commands
- PERC CLI command examples
- Getting a complete list of CLI commands
- Checking controller availability
- Viewing controllers
- Viewing free space information
- Viewing disk1 information
- Viewing controller, virtual disk, and drivers information
- Checking for preserved cache
- Deleting preserved cache
- Viewing expansion information
- Viewing expansion size
- Viewing the foreign configuration
- Importing the foreign configuration
- Viewing BBU information
- Viewing physical drive details for the specified slot in the controller
- Viewing the boot drive for the controller
- Setting virtual drive as boot drive
- Locating a drive
- Stopping a locate operation
- Snapdump commands
- Getting help
- Documentation resources

Table 14. Add RAID configuration input options (continued)
Option Value range Description
sed
— Creates security-enabled drives.
pdcache on|off|default
Enables or disables PD cache.
pi
— Enables protection information.
dimmerswitch
● default: Logical device uses controller
default power-saving policy.
● automatic (auto): Logical device
power savings are managed by firmware.
● none: No power-saving policy.
● maximum (max): Logical device uses
maximum power savings.
● MaximumWithoutCaching
(maxnocache): Logical device does not
cache write to maximize power savings.
Specifies the power-saving policy. Sets to
default automatically.
wt|wb
● wt: Write through.
● wb: Write back.
Enables write through. Write back is the
default.
nora|ra
● ra: Read ahead
● nora: No read ahead
Disables read ahead. Enabled is the default.
cachedbadbbu|
nocachedbadbbu
● cachedbadbbu: Enable bad BBU caching.
● nocachedbadbbu: Disable bad BBU
caching
Enables caching when BBU is not functioning.
Disabled is the default.
strip 8, 16, 32, 64, 128, 256, 512,
1024
Sets the strip size for the RAID configuration.
aftervd
Valid virtual drive number. Creates the VD in the adjacent free slot next
to the specified VD.
spares
Number of spare physical drives present. Specifies the physical drives that are to be
assigned to a disk group for spares.
force
— Forces a security-capable physical drive to be
added to a drive group without security.
perccli /cx add vd each r0 [name=<VDNAME1>,..][drives=e:s|e:s-x|e:s-x,y]
[SED][pdcache=on|off|default][pi][DimmerSwitch(ds)=default|
automatic(auto)|none|maximum(max)|MaximumWithoutCaching(maxnocache)]
[wt|wb] [nora|ra][direct|cached] [CachedBadBBU|NoCachedBadBBU]
[Strip=<64|128|256|512|1024>][EmulationType=0|1|2] [ExclusiveAccess]
[Cbsize=0|1|2 Cbmode=0|1|7] [unmap]
This command creates a RAID 0 configuration for each disk specified in the drives option. You can use the following options
to create the RAID volume:
Table 15. Add RAID 0 configuration input options
Option Value range Description
type RAID [0|1|5|6|10|50|60]
Sets the RAID type of the configuration.
size
Maximum size based on the physical drives and
RAID level.
Sets the size of each virtual drive. The default
value is for the capacity of all referenced disks.
name
15 characters of length. Specifies the drive name for each virtual drive.
drives
Valid enclosure number and valid slot numbers for
the enclosure.
In e:s|e:s-x|e:s-x,y:
● e specifies the enclosure target.
● s represents the disk slot number.
● e:s-x is the range of disk slot numbers.
32 Working with the PERC Command Line Interface Tool