
Users Guide

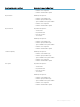


Notation Meaning and Use Example
<F1> Press <F1> to accessHelp information. The Help screens
display a glossary of topics you can use to access
information about navigation, RAID levels, and general topics.
<F1>
<F2> Press <F2> to access the context menu, which displays the
list of options.
<F2>
<F5> Press <F5> to refresh the information on the screen. <F5>
<F11> Switch between two controllers. <F11>
<F12> Press <F12> to display a list of controllers. <F12>
Spacebar Press the <spacebar> to select an item. Press the <spacebar> to select or deselect a controller
setting in the Ctrl Mgmt View.
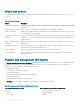
Setting up virtual disks
You can set up a disk group and create virtual disks using the procedures in this section. Each procedure is explained individually in this
section in detail.
To set up virtual disks:
1 Create virtual disks. See Creating virtual disks.
2 Select the virtual disk options.
3 Designate hot spares (optional).
For more information, see Managing dedicated hot spares.
4 Initialize the virtual disks.
NOTE
: When you use one physical disk group to create multiple virtual disks, all the virtual disks must be congured
with the same RAID level.
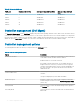
When you dene the virtual disks, you can set the following virtual disk parameters:
• RAID level
• Stripe element size
• Read policy
• Write policy
• Type of initialization
• Hot spare conguration
NOTE
: The default hard drive cache policy for a virtual disk with SAS hard drives is disabled, and the cache
policy for a virtual disk with SATA hard drives is enabled. The Virtual Disk parameter cannot be changed in the
BIOS Conguration Utility Ctrl R . Use Dell OpenManage Storage Management for the hard drive cache setting
operation.
The following table shows the parameters that you can congure when dening virtual disks.
64
BIOS Conguration Utility