
Owners Manual


102 Installing System Components
CAUTION: The processor and heat sink can become extremely hot. Allow
sufficient time for the processor and heat sink to cool before handling.
9
Remove the processor heat sink. See "Removing the Processor" on page 85.
10
Using a #2 Phillips screwdriver, remove the ten screws securing the system
board to the chassis and then slide the system board toward the front end
of the chassis.
CAUTION: Do not lift the system board by grasping a memory module, processor,
or other components.
11
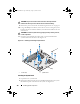
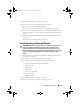
Grasp the system board by the edges of the system board and lift the
system board out of the chassis. See Figure 3-24.
Figure 3-24. Removing and Installing the System Board
Installing the System Board
1
Unpack the new system board.
2
Remove the labels from the processor shield and affix them to the system
identification panel on the front of the system. See Figure 3-24.
1 screws (10) 2 system board
1
2
Mayzie_HOM.book Page 102 Monday, August 31, 2009 9:33 PM