
Owners Manual


94 Installing System Components
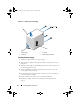
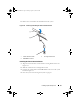
Figure 3-19. Removing the Power Supply
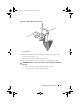
Installing the Power Supply
1
Attach the cable clip to the new power supply.
2
Align the power supply mounting holes with the mounting holes on the
back panel.
3
Slide the power supply toward the back panel until it snaps into place over
the power-supply release tab.
4
Using a #2 Phillips screwdriver, install the four screws that secure the
power supply to the back panel.
5
Secure the I/O panel and SATA cables (if present) to the routing clip on
the side of the power supply.
6
Connect all the power cables to the system board and drives.
7
Replace the cooling shroud. See "Installing the Cooling Shroud" on
page 74.
1 power supply 2 screws (4)
3 cable clip 4 power-supply release tab
3
1
2
4
Mayzie_HOM.book Page 94 Monday, August 31, 2009 9:33 PM