
Install Guide
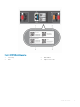


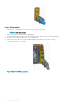

Table Of Contents
- S5148F-ON Installation Guide January 2019
- About this guide
- S5148F-ON switch
- Site preparations
- NEBS compliance
- S5148F-ON switch installation
- Power supplies
- Fans
- Management ports
- Specifications
- Chassis physical design
- IEEE standards
- Agency compliance
- USA Federal Communications Commission statement
- European Union EMC directive conformance statement
- Japan VCCI compliance for class A equipment
- Korean certification of compliance
- Safety standards and compliance agency certifications
- Electromagnetic compatibility
- Product recycling and disposal
- Dell EMC support

S5148F-ON switch installation
To install the S5148F-ON switch, complete the installation procedures in the order presented in this section.
Always handle the switch and components with care. Avoid dropping the switch or its eld replaceable units (FRUs).
NOTE: ESD damage can occur if components are mishandled. Always wear an ESD-preventive wrist or heel ground strap when
handling the S5148F-ON switch and components. As with all electrical devices of this type, take all the necessary safety
precautions to prevent injury when installing this switch.
Topics:
• Unpack
• Rack or cabinet hardware installation
• ReadyRails installation
• Switch installation
• Ground cable
• Optics installation
• Switch power-up
• After switch placement
• Switch replacement
Unpack
NOTE
: Before unpacking the switch, inspect the container and immediately report any evidence of damage.
When unpacking the switch, make sure that the following items are included:
• One S5148F-ON switch
• One RJ-45 to DB-9 female cable
• Two sets of rail kits; no tools required
• Two PSUs
• Four fan units
• Two AC power cords; country or region specic
• S5148F-ON Setup Guide
• Safety and Regulatory Information
• Warranty and Support Information
Unpacking steps
Unpack the switch carefully.
1 Place the container on a clean, at surface and cut all straps securing the container.
2 Open the container or remove the container top.
3 Carefully remove the switch from the container and place it on a secure and clean surface.
5
20 S5148F-ON switch installation