
Install Guide

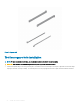

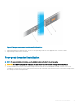

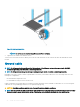
Table Of Contents
- S5148F-ON Installation Guide January 2019
- About this guide
- S5148F-ON switch
- Site preparations
- NEBS compliance
- S5148F-ON switch installation
- Power supplies
- Fans
- Management ports
- Specifications
- Chassis physical design
- IEEE standards
- Agency compliance
- USA Federal Communications Commission statement
- European Union EMC directive conformance statement
- Japan VCCI compliance for class A equipment
- Korean certification of compliance
- Safety standards and compliance agency certifications
- Electromagnetic compatibility
- Product recycling and disposal
- Dell EMC support
Figure 11. Two-post center-mount threaded round-hole installation
2 Slide the back bracket towards the post. Secure it to the post ange with two user-supplied screws. See item 2 and 3.
3 Repeat this procedure for the second rail.
Four-post threaded installation
NOTE
: For more installation instructions, see the installation labels attached to the rail assembly.
CAUTION: To be NEBS Earthquake Z4-compliant, you must remove the tool-less latch castings described in Step 1.
1 For this installation, remove the tool-less latch castings from the front side of each ReadyRails assembly. See item 1. Use a Torx
screwdriver to remove the two screws from each front latch on the switch side of the rail. Remove the tool-less latch casting. Retain
the castings for future rack requirements.
S5148F-ON switch installation
25