
Install Guide
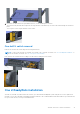

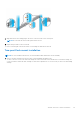
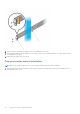
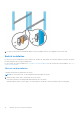
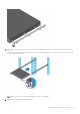
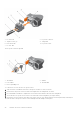
Table Of Contents
- Dell EMC PowerSwitch S5200F-ON Series Installation Guide August 2021
- Contents
- About this guide
- S5200F-ON Series switch
- Site preparations
- S5200F-ON Series switch installation
- Power supplies
- Fans
- Management ports
- Specifications
- Chassis physical design
- IEEE standards
- Agency compliance
- USA Federal Communications Commission statement
- European Union EMC directive conformance statement
- Japan VCCI compliance for class A equipment
- Korean certification of compliance
- Safety standards and compliance agency certifications
- Electromagnetic compatibility
- Product recycling and disposal
- Dell EMC support

2. Align and seat the front flange pegs in the holes on the front side of the vertical post.
NOTE: Be sure that the rails click into place and are secure.
3. Repeat this procedure for the second rail.
To remove each rail, pull on the latch release on each flange ear and unseat each rail.
Two-post flush-mount installation
NOTE: For more installation instructions, see the installation labels attached to the rail assembly.
1. Remove the latch castings from the front side of each ReadyRails assembly, item 1.
To remove the two screws from each front flange ear on the switch side of the rail and remove each latch casting, use
a Torx screwdriver. Retain the latch castings for future rack requirements. It is not necessary to remove the back flange
castings.
S5200F-ON Series switch installation
33