Dell EMC PowerSwitch S5200F-ON Series Setup Guide
Notes, cautions, and warnings NOTE: A NOTE indicates important information that helps you make better use of your product. CAUTION: A CAUTION indicates either potential damage to hardware or loss of data and tells you how to avoid the problem. WARNING: A WARNING indicates a potential for property damage, personal injury, or death. © 2019 Dell Inc. or its subsidiaries. All rights reserved. Dell, EMC, and other trademarks are trademarks of Dell Inc. or its subsidiaries.
Contents 1 About this guide........................................................................................................................... 4 Related documents................................................................................................................................................................4 Information symbols..............................................................................................................................................................
1 About this guide This guide provides site preparation recommendations, step-by-step procedures for rack mounting and desk mounting, inserting modules, and connecting to a power source. CAUTION: To avoid electrostatic discharge (ESD) damage, wear grounding wrist straps when handling this equipment. NOTE: Only trained and qualified personnel can install this equipment. Read this guide before you install and power up this equipment. This equipment contains two power cords.
Information symbols This book uses the following information symbols: NOTE: The Note icon signals important operational information. CAUTION: The Caution icon signals information about situations that could result in equipment damage or loss of data. NOTE: The Warning icon signals information about hardware handling that could result in injury. NOTE: The ESD Warning icon requires that you take electrostatic precautions when handling the device.
2 Site preparations The 5200F-ON Series (S5232F-ON, S5248F-ON, S5296F-ON, S5224F-ON, and S5212F-ON) switch is suitable for installation as part of a common bond network (CBN). You can install the switch in: • • • Network telecommunication facilities Data centers Other locations where the National Electric Code (NEC) applies For more information about the S5200F-ON Series switch specifications, see Specifications.
Switch ground Dell EMC recommends grounding your switch. Use the S5200F-ON Series switch in a CBN. NOTE: For an AC-powered switch, although the third conductor of the AC power cable provides a ground path, Dell EMC recommends grounding your switch with a dedicated ground wire. You can order an AC ground lug separately. NOTE: For a DC-powered switch, the only way to safely ground your switch is to attach a dedicated ground wire.
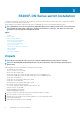
3 S5200F-ON Series switch Installation To install the S5200F-ON Series (S5232F-ON, S5248F-ON, S5296F-ON, S5224F-ON, and S5212F-ON) switch, complete the installation procedures in the order presented in this section. Always handle the switch and its components with care. Avoid dropping the switch or any field replaceable units (FRUs). NOTE: ESD damage can occur if components are mishandled. Always wear an ESD-preventive wrist or heel ground strap when handling the switch and its components.
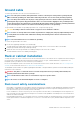
Ground cable To attach a ground cable to the switch, use the included M4 screws. NOTE: For an AC-powered switch, although the third conductor of the AC power cable provides a ground path, Dell EMC recommends grounding your switch with a dedicated ground wire. You can order an AC ground lug separately. NOTE: For a DC-powered switch, the only way to safely ground your switch is to attach a dedicated ground wire.
• • • Reduced airflow—Do not compromise the amount of airflow needed for safe operation of the equipment. Install the equipment in the rack so that the equipment constantly has the correct amount of airflow surrounding it. Reliable earthing—Maintain reliable earthing of rack-mounted equipment. Pay particular attention to the supply connections other than the direct connections to the branch circuit, for example: use of power strips.
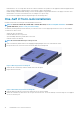
Figure 4. Attach the dual-tray front to the four-post rack front 7. Attach the rear dual-tray switch rails to the four-post rack from the rear. Secure the dual tray to the rack using two user-supplied screws for each rack post. Figure 5. Attach the dual-tray rear to the four-post rack rear 8. Tighten all mounting screws to securely mount the dual tray into the four-post rack. Figure 6.
Figure 8. Dual-tray stop feature 2. Insert the second switch in the open dual-tray slot if you are installing two switches. One-half U switch removal Remove the S5212F-ON switch from the dual tray from the front of the four-post rack. NOTE: To remove the S5232F-ON, S5248F-ON, or S5224F-ON switch, see One U ReadyRails installation. To remove the S5296F-ON switch, see Two U four-post rack assembly. Push in the front switch latches according to the latch arrows and pull out the switch. Figure 9.
NOTE: For more installation instructions, see the installation labels attached to the rail assembly. Figure 11. Separate rails 1U Tool-less mount installation NOTE: For more installation instructions, see the installation labels attached to the rail assembly. 1. Face the ReadyRails flange ears facing outward. Place one rail between the left and right vertical posts. Align and seat the back flange rail pegs in the back vertical post flange.
2. Align and seat the front flange pegs in the holes on the front side of the vertical post. NOTE: Be sure that the rails click into place and are secure. 3. Repeat this procedure for the second rail. To remove each rail, pull on the latch release button on each flange ear and unseat each rail. Two-post flush-mount installation NOTE: For more installation instructions, see the installation labels attached to the rail assembly. 1.
Figure 14. Two-post center-mount installation 2. Slide the back bracket towards the post. Secure it to the post flange with two user-supplied screws, items 2 and 3. 3. Repeat this procedure for the second rail. Four-post threaded installation NOTE: For more installation instructions, see the installation labels attached to the rail assembly. 1. Remove the latch castings from each end of the ReadyRails assemblies. To remove the two screws each latch casting, use a Torx driver.
Figure 15. Four-post threaded installation 2. For each rail, attach the front and back flanges to the post flanges with two user-supplied screws at each end. S5200F-ON Series switch installation For the 1U two-post configurations for the S5248F-ON, S5232F-ON, and S5224F-ON switches, slide the switch into the rails in the same manner as the four-post configurations. For the S5296F-ON switch installation, see S5296F-ON four-post rack assembly.
Figure 16. Switch rail attachment 2. After you install both rails, line them up on the ReadyRails. Slide the switch in until it is flush with the front of rack. About three inches before you fully insert your switch, the rail locking feature engages to keep the switch from inadvertently sliding out and falling. Figure 17. Front rack installation NOTE: Do not the use the mounted Ready-Rails as a shelf or a workplace.
3. Tighten the two thumb screws and rack screws. To remove the chassis from the rack or cabinet, press in the two side-release bars on the chassis at the same time and slide the chassis forward. Two U four-post rack assembly Due to the chassis weight, the S5296F-ON switch does not support a two-post rack installation; you must install the S5296F-ON in a four-post rack. NOTE: To install the S5212F-ON, see One-half U front-rack installation.
Figure 18. S5296F-ON installation 1. Extra screws to restrict front-back movement of the switch. 2. Main screw DC power connections NOTE: Use the following instructions for all S5200F-ON Series switches except for the S5212F-ON switch. To connect DC power to the S5212F-ON switch, see S5212F-ON only DC power connections. Each DC powered system comes with a set containing a prewired (3-inch 8AWG) power supply connector and a four-screw wiring block. One set is provided for each DC PSU.
Figure 19. DC Power Connector and Wiring Block 1. 3. 5. 7. DC wire RTN Captive screws (2) PSU status LED DC wire –48V 2. DC power connector 4. Orange tab 6. DC power socket Figure 20. DC Power Connector Ground 1. Ground nut 3. Lock washer 5. Device grounding rod 2. Washer 4. Ground cable To connect a DC PSU to the site’s DC power source, follow these steps: 1. Strip 1/2 inches of insulation from each of the power connector’s wires, as shown. 2.
NOTE: Never try to force the power connector into or out of the DC PSU power socket. NOTE: To remove the power connector from a DC PSU, squeeze the levers on both sides of the connector. Doing so disengages the power connector’s clamps. While continuing to squeeze, pull the power connector from the DC PSU socket. S5212F-ON only DC power connections NOTE: Use the following instructions for the S5212F-ON switch only. For all other S5200F-ON Series switches, see DC power connections.
Optics installation WARNING: When working with optical fibers, follow all warning labels and always wear eye protection. Never look directly into the end of a terminated or unterminated fiber or connector as it may cause eye damage. 1. Position the optic so it is in the correct position. The optic has a key that prevents it from being inserted incorrectly. 2. Insert the optic into the port until it gently snaps into place.
4 Specifications This section lists the S5200F-ON Series switch specifications. CAUTION: Operate the product at an ambient temperature not higher than 45°C (113°F). CAUTION: Lithium Battery Caution: There is a danger of explosion if the battery is incorrectly replaced. Replace only with same or equivalent type of battery. Dispose of the batteries according to the manufacturer's instructions. NOTE: For RoHS information, see Restricted Material Compliance.
Table 2. Environmental parameters Parameter Specifications Operating temperature 0° to 45°C (32°F to 113°F) continuously NOTE: Reduce maximum temperature by 1°C/125 meters (1°F/228 feet) above 950 meters (3,117 feet).
Table 4. DC power requirements Parameter Specifications Minimum and maximum input voltage range –40VDC minimum Maximum current at full load with fan S5232F-ON: 15.9A @40VDC S5248F-ON: 16.2A @40VDC S5296F-ON: 22.3A @40VDC S5224F-ON: 11.4A@40VDC S5212F-ON: 7.
5 Support The support site provides documents and tools to help you effectively use your equipment and mitigate network outages. Through the support site you can obtain technical information, access software upgrades and patches, download available management software, and manage your open cases. The support site provides integrated, secure access to these services. To access the support site, go to www.dell.com/support/.