
Install Guide

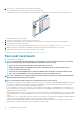
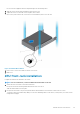


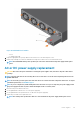
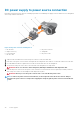

Figure 10. Ground lug assembly attached
7. Attach the GND lug bracket assembly to your switch using the two removed screws, as shown.
Torque the M4 screws to ±8–10 in-lbs.
Figure 11. Ground lug assembly attached
8. Attach the other end of the ground wire to your rack ground point.
9. Install your switch into your rack using the Z9264F-ON installation instructions.
Four-post rack assembly
Due to the chassis weight, the Z9264F-ON switch does not support a two-post rack installation; you must install the switch in a four-post
rack.
To install in a four-post rack, follow the instructions in your rack frame kit. In a four-post rack, the maximum distance between the front
and back vertical posts is 36 inches (91.44 cm); the minimum distance is 24 inches (60.96 cm).
Rack-mounted switch for shipment
Before you install the Z9264F-ON switch in a rack that you intend to ship, you must first remove the tool-less feature from each end of
both Dell EMC rack rails.
CAUTION:
Use two people, an equipment lift, or pallet jack when lifting or moving the chassis. Install the chassis into
the rack before inserting the chassis components. Lift the chassis only from the bottom. Lifting by the chassis shelves
or power supply openings might damage the chassis.
NOTE: For more installation instructions, see the installation labels attached to the rail assembly.
You will need eight user-supplied rack rail screws to complete this procedure.
To install a switch in a rack that you intend to ship:
1. Separate each rail assembly by sliding the inside rail out of the outside rail.
Z9264F-ON switch installation
21