
Install Guide

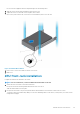


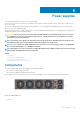
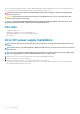
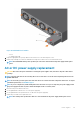

Figure 14. Front rack installation
NOTE:
Do not the use the mounted rack rails as a shelf or a workplace.
3. Tighten the two thumbscrews and rack screws.
To remove the switch from the rack or cabinet, press in the two side-release bars on the switch simultaneously and slide the switch
forward.
Optics installation
The Z9264F-ON switch has QSFP28 and SFP+ optical ports.
For a list of supported optics, see the specification sheets at www.dell.com/support or contact your Dell EMC Sales representative.
CAUTION:
ESD damage can occur if components are mishandled. Always wear an ESD-preventive wrist or heel ground
strap when handling the Z9264F-ON switch and components.
WARNING: When working with optical fibers, follow all warning labels and always wear eye protection. Never look
directly into the end of a terminated or unterminated fiber or connector as it may cause eye damage.
1. Position the optic to enter the port correctly.
The optic has a key that prevents it from being inserted incorrectly.
2. Insert the optic into the port until it gently snaps into place.
NOTE:
When you cable the ports, be sure not to interfere with the airflow from the small vent holes above and below
the ports.
Optics removal
Remove an optic by pushing the tab on the optic and sliding the optic from the port.
When removing optics with direct attach cables (DACs) from the port, pull the release tab firmly and steadily. Before pulling the release
tab, you may need to gently push the optic into the port to ensure that it is seated properly. Do not jerk or tug repeatedly on the tab.
24
Z9264F-ON switch installation