Dell™ PowerVault™ 122T SDLT 320 Autoloader User's Guide Introduction Installing the Autoloader Operating the Autoloader Autoloader Administration Diagnostics and Troubleshooting Technical Specifications Contacting Dell Getting Help Regulatory Notes, Notices, and Cautions Throughout this guide, blocks of text may be accompanied by an icon and printed in bold type or in italic type.
Back to Contents Page Autoloader Administration: Dell™ PowerVault™ 122T SDLT 320 Autoloader User's Guide Configuring the Autoloader Updating Firmware Running the Autoloader System Test Retrieving Information About the Autoloader Configuring the Autoloader The Configuration menu options enable you to perform the following tasks: l Resetting the autoloader l Setting SCSI IDs l Autoloader operating modes l Updating firmware To access the Configuration menu from the Home screen or main menu, press + o
NOTE: If you changed either SCSI ID, you may also need to reboot the host server and reconfigure your backup software before you can use the autoloader. Consult your hardware and software manuals for more information. Autoloader Operating Modes Overview The operating mode is set based on whether you have automation software controlling cartridges in the autoloader or if you are manually loading and unloading cartridges using the autoloader Operator's Panel commands.
To use this option, follow these steps: 1. From the Home screen or main menu, press + or - until Configuration appears on the top line of the LCD screen, and then press Enter. 2. Press + or - until Code Update appears on the LCD screen, and then press Enter. If the carousel is full, the LCD screen displays No slot free for transfer. Press Cancel repeatedly until the main menu or Home screen is displayed. Export a cartridge to make room for the firmware update cartridge (see "Exporting Cartridges").
1. From the Home screen or main menu, press + or - button until Information appears on the top line of the LCD screen. 2. Press Enter to access the available options. 3. Press + or - until View Event Log appears on the LCD screen. The LCD screen also displays the quantity of errors and events currently stored in the event log. 4. Press Enter to access the most recently logged event. 5. Press + or - to display each event in the log. 6. Press Cancel when finished.
Back to Contents Page Contacting Dell Contacting Dell To contact Dell electronically, you can access the following websites: l www.dell.com l support.dell.com (technical support) l premiersupport.dell.com (technical support for educational, government, healthcare, and medium/large business customers, including Premier, Platinum, and Gold customers) For specific web addresses for your country, find the appropriate country section in the table below.
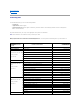
Barbados General Support Belgium (Brussels) Website: support.euro.dell.com International Access Code: 00 E-mail: tech_be@dell.com Country Code: 32 City Code: 2 1-800-534-3066 E-mail for French Speaking Customers: support.euro.dell.com/be/fr/emaildell/ Technical Support 02 481 92 88 Customer Care 02 481 91 19 Corporate Sales 02 481 91 00 Fax 02 481 92 99 Switchboard 02 481 91 00 Bermuda General Support 1-800-342-0671 Bolivia General Support toll-free: 800-10-0238 Brazil Website: www.
Large Corporate Accounts East toll-free: 800 858 2020 Large Corporate Accounts East Government and Education toll-free: 800 858 2669 Large Corporate Accounts Queue Team toll-free: 800 858 2222 Large Corporate Accounts South Large Corporate Accounts West Large Corporate Accounts Spare Parts toll-free: 800 858 2355 toll-free: 800 858 2811 toll-free: 800 858 2621 Colombia General Support 980-9-15-3978 Costa Rica General Support 0800-012-0435 Czech Republic (Prague) Website: support.euro.dell.
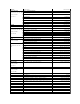
Customer Care 01 55 94 71 00 Sales 01 55 94 71 00 Fax 01 55 94 71 01 Germany (Langen) Website: support.euro.dell.com International Access Code: 00 E-mail: tech_support_central_europe@dell.
Italy (Milan) Website: support.euro.dell.com International Access Code: 00 E-mail: support.euro.dell.com/it/it/emaildell/ Country Code: 39 Home and Small Business Technical Support 02 577 826 90 Customer Care 02 696 821 14 Fax 02 696 821 13 Switchboard 02 696 821 12 City Code: 02 Corporate Technical Support 02 577 826 90 Customer Care 02 577 825 55 Fax 02 575 035 30 Switchboard Jamaica General Support (dial from within Jamaica only) Japan (Kawasaki) Website: support.jp.dell.
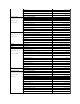
Corporate Sales (Brussels, Belgium) 02 481 91 00 Customer Care (Brussels, Belgium) 02 481 91 19 Fax (Brussels, Belgium) 02 481 92 99 Switchboard (Brussels, Belgium) Macao Technical Support Country Code: 853 Customer Service (Penang, Malaysia) 02 481 91 00 toll-free: 0800 582 604 633 4949 Transaction Sales toll-free: 0800 581 Malaysia (Penang) Technical Support toll-free: 1 800 888 298 International Access Code: 00 Customer Service 04 633 4949 Transaction Sales toll-free: 1 800 888 202 C
Nicaragua General Support Norway (Lysaker) Website: support.euro.dell.com International Access Code: 00 E-mail Support (portable computers): Country Code: 47 nor_nbk_support@dell.com 001-800-220-1006 E-mail Support (desktop computers): nor_support@dell.com E-mail Support (servers): nordic_server_support@dell.
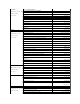
Country Code: 34 Home and Small Business Technical Support 902 100 130 Customer Care 902 118 540 Sales 902 118 541 Switchboard 902 118 541 Fax 902 118 539 City Code: 91 Corporate Technical Support Customer Care 91 722 92 00 Fax 91 722 95 83 Website: support.euro.dell.com International Access Code: 00 E-mail: swe_support@dell.com City Code: 8 902 118 546 Switchboard Sweden (Upplands Vasby) Country Code: 46 902 100 130 E-mail Support for Latitude and Inspiron: Swe-nbk_kats@dell.
Home and Small Business Customer Care 0870 906 0010 Corporate Customer Care 01344 373 185 Preferred Accounts (500 5000 employees) Customer Care 0870 906 0010 Central Government Customer Care 01344 373 193 Local Government & Education Customer Care 01344 373 199 Health Customer Care 01344 373 194 Home and Small Business Sales 0870 907 4000 Corporate/Public Sector Sales 01344 860 456 Home and Small Business Fax 0870 907 4006 Uruguay General Support U.S.A.
Back to Contents Page Diagnostics and Troubleshooting: Dell™ PowerVault™ 122T SDLT 320 Autoloader User's Guide Troubleshooting Removing Lodged Cartridges Autoloader Error Codes Troubleshooting Installation Problems Problems encountered during the installation of the autoloader are usually caused by improper SCSI bus configuration, application software configuration errors, or by an incorrectly configured operating system.
l autoloader Operator Panel controls. Allow the tape drive to complete all operations, and then retry unloading the tape using the autoloader Operator Panel controls. Make sure that the backup software is not reserving the slot or preventing the tape drive from ejecting the cartridge. The backup software needs to cancel the reservation and any hold it has on the tape drive. Temporarily disconnecting the autoloader from the host server eliminates the host and its software as a problem source.
Errors Displayed on Front Panel "!" in autoloader operator panel inventory display l An exclamation point (!) displayed in the inventory indicates that the autoloader has identified a cartridge in the indicated slot that is either an invalid or faulty catridge or has had a media error. The Media Attention LED is also illuminated in this case (see "LED Indicators"). Exporting the indicated cartridge will clear the error condition (see "Exporting Cartridges").
10. After removing the cartridges from the desired carriers, reinstall each carrier on the autoloader belt (see "Installing the Carrier"). 11. Make sure that the rollers on the bottom of the carrier are aligned in the carrier tracks. 12. Make sure that the belt post beneath each carrier is inserted into the proper autoloader belt loop. NOTE: There are unused loops on the belt. The proper belt loops have an extra bump on the outside of the loop (see "Installing the Carrier").
NOTE: Error codes displayed on the front panel LCD during normal operation, as opposed to when viewing them through the event log, will not display the preceding '3' and '0' characters, included in the table below. Also note that when viewing the event log, error codes must be preceded by the '3' and '0' characters to be considered valid. Error Codes Error Code Description Details 3 0 81 Invalid Command Error.
Back to Contents Page Getting Help Technical Assistance Dell Enterprise Training and Certification Problems With Your Order Product Information Returning Items for Warranty Repair or Credit Before You Call Technical Assistance If you need assistance with a technical problem, perform the following steps: 1. Complete the procedures in "Troubleshooting Your System." 2. Run the system diagnostics and record any information provided. 3. Make a copy of the Diagnostics Checklist, and fill it out. 4.
www.euro.dell.com (Europe only) www.dell.com/la (Latin American countries) www.dell.ca (Canada only) l Anonymous file transfer protocol (FTP) ftp.dell.com/ Log in as user:anonymous, and use your e-mail address as your password. l Electronic Support Service support@us.dell.com apsupport@dell.com (Asian/Pacific countries only) support.jp.dell.com (Japan only) support.euro.dell.com (Europe only) l Electronic Quote Service sales@dell.com apmarketing@dell.
Technical Support Service Dell's technical support service is available 24 hours a day, 7 days a week, to answer your questions about Dell hardware. Our technical support staff use computer-based diagnostics to provide fast, accurate answers. To contact Dell's technical support service, see "Before You Call" and then see the contact information for your region. Dell Enterprise Training and Certification Dell Enterprise Training and Certification is available; see www.dell.
NOTE: Have your Express Service Code ready when you call. The code helps Dell's automated-support telephone system direct your call more efficiently. To obtain your express service code, go to support.dell.com and enter your service tag. Your express service code will be displayed. Please make a note of the express service code for use when calling technical support. Remember to fill out the Diagnostics Checklist.
Back to Contents Page Installing the Autoloader: Dell™ PowerVault™ 122T SDLT 320 Autoloader User's Guide Installation Overview Unpacking the Autoloader Understanding Autoloader Features Identifying Product Components Bar Code Reader Connecting the SCSI and Power Cables SCSI Requirements Product Overview Preparing the Host and Verifying the Connection Installing the Device Drivers Choosing a Location Installation Overview Installing the autoloader consists of the following steps, which are explaine
Front Panel Controls 1 Power Switch 2 Media Door 3 Front Panel LEDs 4 Front Panel LCD Screen 5 Control Keys Back Panel Overview 1 68-pin SCSI Connectors 2 Fan Vent 3 Power Connector 4 Bar Code Reader (optional) NOTE: The arrows indicate the screws on the back of the unit that need to be removed if you want to remove the cover. Three additional screws on each side of the unit must also be removed in order to lift the top cover.
Unpacking the Autoloader Before you begin, clear a desk or table so that you can unpack the autoloader. You also need to select an open 2U computer rack location or choose a desk top location near the server that will host the autoloader. NOTICE: If the room in which you are working differs from the temperature in which the autoloader was shipped or stored by 30°F (15° C) or more, let the autoloader acclimate to the surrounding environment for at least 12 hours before opening the shipping carton.
If the supplied SCSI cable does not fit the connector on your SCSI host adapter, you either have an incompatible SCSI host adapter or you need to purchase a cable adapter. Contact your service representative or your SCSI host adapter manufacturer for information. 1. Attach the terminator to the remaining SCSI connector on the back panel of the autoloader (if the autoloader is the last or only device on the SCSI bus). Otherwise, attach the cable to the next device on the SCSI bus.
3. Open the device manager (please refer to your OS documentation for specific instructions). For example, right-click the My Computer icon on the Windows desktop, click Manage, and then click Device Manager. 4. The SDLT 320 drive should be listed under the ? Other Devices item as Quantum SDLT 320 SCSI Sequential Device. 5. Right-click the Quantum SDLT 320 SCSI Sequential Device listing, click Uninstall, and then click OK to confirm that you want to remove the device. 6.
The autoloader now appears in Device Manager under Medium Changers as a Dell PowerVault 122T Autoloader and is ready to use.
Back to Contents Page Introduction: Dell™ PowerVault™ 122T SDLT 320 Autoloader User's Guide Overview The PowerVault 122T SDLT 320 autoloader is the first fully automated, rack mountable, 2U (3.34" height, 16.5" width), enterprise class SDLT tape storage system designed to provide unattended, near-line and off-line data storage.
Back to Contents Page Operating the Autoloader: Dell™ PowerVault™ 122T SDLT 320 Autoloader User's Guide Operator's Panel Overview Understanding the Menu Structure Using Cartridges Cleaning the Tape Drive Creating an Inventory of Cartridges Operator's Panel Overview The Operator's Panel consists of four LEDs, four buttons, and a 2-line by 16-character LCD screen. The Operator's Panel provides everything you need to monitor autoloader status and to control all of its functions.
LED Ready/Activity Color Green Description Illuminated when power is on. Blinking whenever there is tape drive or autoloader robotics activity. Clean Drive Amber Illuminated when the tape drive needs to be cleaned. The LED turns off when cleaning is successfully completed (see "Cleaning the Tape Drive"). Regular, periodic cleaning of the SDLT 320 tape drive is not required. Media Attention Amber Error Red Illuminated if a media-elated error has occurred.
Importing Cartridges This option forces the autoloader to import a cartridge into a specific empty slot in the carousel. To import tapes into the autoloader: 1. Make sure the write-protect switch is set as desired for each data cartridge (see "Write-Protecting Cartridges"). If applicable, apply a bar code label to the recessed area on the front of each cartridge (see "Bar Code Reader"). 2. From the Home screen or main menu, press + or - until Commands appears on the top line of the LCD screen. 3.
Unloading Cartridges This option unloads the cartridge from the tape drive into its original slot. To use this option, follow these steps: 1. From the Home screen or main menu, press + or - until Commands appears on the top line of the LCD screen. Press Enter. 2. Press + or - until Unload Cartridge appears on the LCD screen. Press Enter to unload the cartridge from the tape drive. NOTE: Status messages will be displayed while the cartridge is unloading.
NOTE: If you are using Operator's Panel commands to clean the drive, import the cleaning cartridge only after you have selected the Clean Drive command. If you would like to keep a cleaning cartridge in the autoloader, the backup software must manage drive cleaning. To clean the tape drive, follow these steps: 1. From the Home screen or main menu, press + or - until Commands appears on the top line of the LCD screen, and then press Enter. 2.
Back to Contents Page Regulatory: Dell™ PowerVault™ 122T SDLT 320 Autoloader User's Guide UL and CUL Listing CE Compliance FCC Compliance Statement Industry Canada (Digital Apparatus) Manufacturer Declaration UL and CUL Listing This information technology equipment is UL-Listed and CUL-Listed for use with UL-Listed personal computers that have installation instructions detailing user installation of card cage accessories.
Back to Contents Page Technical Specifications: Dell™ PowerVault™ 122T SDLT 320 Autoloader User's Guide Physical Specifications Autoloader Specifications Autoloader Environmental Specifications Tape Drive Specifications Physical Specifications Characteristic Product Alone Packaged Height Width 8.4 cm (3.34 in) 41.9 cm (16.5 in) 20.5 cm (8.0 in) 60 cm (23.6 in) Depth Weight 60.9 cm (24 in) (Approximately 65 cm (25.6 in) with Bar Code Reader) 74.3 cm (29.
Characteristic Super DLTtape I Super DLTtape I formatted capacity Basic description Tape length Cartridge dimensions 160 GB (non-compressed) 320 GB (2:1 typical compression) Advanced Metal Particle 548.64 m (1800 ft) 10.414 x 10.414 x 2.54 cm (4.1 x 4.1 x 1.0 in) 30 years minimum @ 20° C 40% RH (non-condensing) 1,000,000 passes (any point on the tape passing the recording head in either direction). Typically 2000 full backup and restore operations.