Dell™ PowerVault™ 122T LTO-2 Autoloader User's Guide Introduction Installing the Autoloader Operating the Autoloader Autoloader Administration Diagnostics and Troubleshooting Technical Specifications Contacting Dell Getting Help Regulatory Notes, Notices, and Cautions Throughout this guide, blocks of text may be accompanied by an icon and printed in bold type or in italic type.
Back to Contents Page Autoloader Administration: Dell™ PowerVault™ 122T LTO-2 Autoloader User's Guide Configuring the Autoloader Updating Firmware Running the Autoloader System Test Retrieving Information About the Autoloader Configuring the Autoloader The Configuration menu options enable you to perform the following tasks: l Resetting the autoloader l Setting SCSI IDs l Autoloader Operating Modes l Updating firmware To access the Configuration menu from the Home screen or main menu, press + or -
Autoloader Operating Modes Overview The operating mode is set based on whether you have automation software controlling cartridges in the autoloader or if you are manually loading and unloading cartridges using the autoloader Operator's Panel commands. The autoloader always operates in Autodetect Mode, which is transparent to you. In Autodetect Mode, the autoloader automatically assumes that you are not using an automation software package to control cartridge or drive activity.
If the carousel is full, the LCD screen displays No slot free for transfer. Press Cancel repeatedly until the main menu or Home screen is displayed. Export a cartridge to make room for the firmware update cartridge (see "Exporting Cartridges"). Return to step 1 to update the firmware. If the carousel is not full, the autoloader will select the first available slot and prompt you to insert the code update cartridge. 3. Insert the code update cartridge into the media door.
. Press Cancel when finished. Product Revision This option displays the revision of the hardware that makes up the autoloader. NOTE: The tape drive and autoloader firmware are a single image, but the image may display as three firmware numbers on the front panel, Drive SCSI Controller, Robotics Controller Firmware, and Robotics SCSI Controller Firmware. To use this option, follow these steps: 1.
Back to Contents Page Contacting Dell Contacting Dell To contact Dell electronically, you can access the following websites: l www.dell.com l support.dell.com (technical support) l premiersupport.dell.com (technical support for educational, government, healthcare, and medium/large business customers, including Premier, Platinum, and Gold customers) For specific web addresses for your country, find the appropriate country section in the table below.
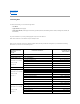
Preferred Accounts/Corporate Customer Care 0820 240 530 16 Home/Small Business Technical Support 0820 240 530 14 Preferred Accounts/Corporate Technical Support Switchboard 0660 8779 0820 240 530 00 Bahamas General Support toll-free: 1-866-278-6818 Barbados General Support 1-800-534-3066 Belgium (Brussels) Website: support.euro.dell.com International Access Code: 00 E-mail: tech_be@dell.com Country Code: 32 E-mail for French Speaking Customers: support.euro.dell.
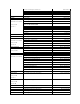
Tech Support (projectors, PDAs, printers, switches, routers, and so on) toll-free: 800 858 2920 Customer Experience toll-free: 800 858 2060 Home and Small Business toll-free: 800 858 2222 Preferred Accounts Division toll-free: 800 858 2557 Large Corporate Accounts GCP toll-free: 800 858 2055 Large Corporate Accounts Key Accounts toll-free: 800 858 2628 Large Corporate Accounts North toll-free: 800 858 2999 Large Corporate Accounts North Government and Education toll-free: 800 858 2955 Large
International Access Code: 00 E-mail: support.euro.dell.
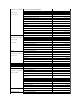
International Access Code: 16 E-mail: dell_direct_support@dell.com Technical Support Country Code: 353 City Code: 1 U.K. Technical Support (dial within U.K. only) Home User Customer Care 01 204 4014 Small Business Customer Care 01 204 4014 U.K. Customer Care (dial within U.K. only) Corporate Customer Care Corporate Customer Care (dial within U.K. only) Ireland Sales U.K. Sales (dial within U.K.
City Code: 2 Fax Switchboard Latin America 2194-6202 2194-6000 Customer Technical Support (Austin, Texas, U.S.A.) 512 728-4093 Customer Service (Austin, Texas, U.S.A.) 512 728-3619 Fax (Technical Support and Customer Service) (Austin, Texas, U.S.A.) 512 728-3883 Sales (Austin, Texas, U.S.A.) 512 728-4397 SalesFax (Austin, Texas, U.S.A.) 512 728-4600 or 512 728-3772 Luxembourg International Access Code: 00 Website: support.euro.dell.com E-mail: tech_be@dell.
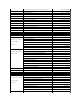
New Zealand International Access Code: 00 Country Code: 64 Relational Customer Care 020 674 4325 Home/Small Business Sales 020 674 55 00 Relational Sales 020 674 50 00 Home/Small Business Sales Fax 020 674 47 75 Relational Sales Fax 020 674 47 50 Switchboard 020 674 50 00 Switchboard Fax 020 674 47 50 E-mail (New Zealand): nz_tech_support@dell.com E-mail (Australia): au_tech_support@dell.
International Access Code: 005 Country Code: 65 South Africa (Johannesburg) International Access Code: Customer Service (Penang, Malaysia) 604 633 4949 Transaction Sales toll-free: 800 6011 054 Corporate Sales toll-free: 800 6011 053 Website: support.euro.dell.com E-mail: dell_za_support@dell.
Country Code: 886 Transaction Sales toll-free: 0080 651 228 Corporate Sales toll-free: 0080 651 227 toll-free: 0880 060 07 Thailand Technical Support International Access Code: 001 Customer Service (Penang, Malaysia) Country Code: 66 Sales Trinidad/Tobago General Support 1-800-805-8035 Turks and Caicos Islands General Support toll-free: 1-866-540-3355 U.K. (Bracknell) Website: support.euro.dell.
Extended Service and Warranty Sales Fax Dell Services for the Deaf, Hard-of-Hearing, or Speech-Impaired toll-free: 1-800-247-4618 toll-free: 1-800-727-8320 toll-free: 1-877-DELLTTY (1-877-335-5889) U.S.
Back to Contents Page Diagnostics and Troubleshooting: Dell™ PowerVault™ 122T LTO-2 Autoloader User's Guide Troubleshooting Removing Lodged Cartridges Autoloader Error Codes Troubleshooting Installation Problems Problems encountered during the installation of the autoloader are usually caused by improper SCSI bus configuration, application software configuration errors, or by an incorrectly configured operating system.
l autoloader Operator Panel controls. Allow the tape drive to complete all operations, and then retry unloading the tape using the autoloader Operator Panel controls. Make sure that the backup software is not reserving the slot or preventing the tape drive from ejecting the cartridge. The backup software needs to cancel the reservation and any hold it has on the tape drive. Temporarily disconnecting the autoloader from the host server eliminates the host and its software as a problem source.
"!" in autoloader operator panel inventory display l An exclamation point (!) displayed in the inventory indicates that the autoloader has identified a cartridge in the indicated slot that is either an invalid or faulty catridge or has had a media error. The Media Attention LED is also illuminated in this case (see "LED Indicators"). Exporting the indicated cartridge will clear the error condition (see "Exporting Cartridges").
10. After removing the cartridges from the desired carriers, reinstall each carrier on the autoloader belt (see "Installing the Carrier"). 11. Make sure that the rollers on the bottom of the carrier are aligned in the carrier tracks. 12. Make sure that the belt post beneath each carrier is inserted into the proper autoloader belt loop. NOTE: There are unused loops on the belt. The proper belt loops have an extra bump on the outside of the loop (see "Installing the Carrier").
must be preceded by the '3' and '0' characters to be considered valid. Error Codes Error Description Code 3 0 81 Invalid Command Error. 3 0 82 Device Status Not Suitable to Execute This Command. 3 0 83 Inventory Not Valid. 3 0 84 Source Empty. 3 0 85 Destination Full. 3 0 86 Import/Export Slot Access Rejected. 3 0 87 Operation Timeout. 3 0 88 Communications Error During Loop-Back. 3 0 89 System Test Timeout. 3 0 8F Recovered Loader Error. 3 0 90 Mechanical Initialization Failure.
Back to Contents Page Getting Help Technical Assistance Dell Enterprise Training and Certification Problems With Your Order Product Information Returning Items for Warranty Repair or Credit Before You Call Technical Assistance If you need assistance with a technical problem, perform the following steps: 1. Complete the procedures in "Troubleshooting Your System." 2. Run the system diagnostics and record any information provided. 3. Make a copy of the Diagnostics Checklist, and fill it out. 4.
l World Wide Web www.dell.com/ www.dell.com/ap/ (Asian/Pacific countries only) www.dell.com/jp (Japan only) www.euro.dell.com (Europe only) www.dell.com/la (Latin American countries) www.dell.ca (Canada only) l Anonymous file transfer protocol (FTP) ftp.dell.com/ Log in as user:anonymous, and use your e-mail address as your password. l Electronic Support Service support@us.dell.com apsupport@dell.com (Asian/Pacific countries only) support.jp.dell.com (Japan only) support.euro.dell.
AutoTech Service Dell's automated technical support service AutoTech provides recorded answers to the questions most frequently asked by Dell customers about their portable and desktop computer systems. When you call AutoTech, use your touch-tone telephone to select the subjects that correspond to your questions. The AutoTech service is available 24 hours a day, 7 days a week. You can also access this service through the technical support service. See the contact information for your region.
Prepare all items being returned, whether for repair or credit, as follows: 1. Call Dell to obtain a Return Material Authorization Number, and write it clearly and prominently on the outside of the box. For the telephone number to call, see the contact information for your region. 2. Include a copy of the invoice and a letter describing the reason for the return. 3.
See your operating system documentation to determine the contents of the system's start-up files. If possible, print each file. Otherwise, record the contents of each file before calling Dell.
Back to Contents Page Installing the Autoloader: Dell™ PowerVault™ 122T LTO-2 Autoloader User's Guide Installation Overview Unpacking the Autoloader Understanding Autoloader Features Identifying Product Components Bar Code Reader Connecting the SCSI and Power Cables SCSI Requirements Product Overview Preparing the Host and Verifying the Connection Installing the Device Drivers Choosing a Location Installation Overview Installing the autoloader consists of the following steps, which are explained i
1 Power Switch 2 Media Door 3 Front Panel LEDs 4 Front Panel LCD Screen 5 Control Keys Back Panel Overview 1 68-pin SCSI Connectors 2 Fan Vent 3 Power Connector 4 Bar Code Reader (optional) NOTE: The arrows indicate the screws on the back of the unit that need to be removed if you want to remove the cover. Three additional screws on each side of the unit must also be removed in order to lift the top cover.
Before you begin, clear a desk or table so that you can unpack the autoloader. You also need to select an open 2U computer rack location or choose a desktop location near the server that will host the autoloader. NOTICE: If the room in which you are working differs from the temperature in which the autoloader was shipped or stored by 30°F (15° C) or more, let the autoloader acclimate to the surrounding environment for at least 12 hours before opening the shipping carton.
If the supplied SCSI cable does not fit the connector on your SCSI host adapter, you either have an incompatible SCSI host adapter or you need to purchase a cable adapter. Contact your service representative or your SCSI host adapter manufacturer for information. 1. Attach the terminator to the remaining SCSI connector on the back panel of the autoloader (if the autoloader is the last or only device on the SCSI bus). Otherwise, attach the cable to the next device on the SCSI bus.
Windows desktop, click Manage, and then click Device Manager. The LTO-2 drive should be listed under the ? Other Devices item as IBM Ultrium-TD2 SCSI Sequential Device. 4. Right-click the IBM Ultrium-TD2 SCSI Sequential Device listing, click Uninstall, and then click OK to confirm that you want to remove the device. 5. Click Action in the upper-left corner of the Computer Management dialog box. 6. Click Scan for Hardware Changes. Windows now scans for the PowerVault 122T LTO-2 drive.
Back to Contents Page
Back to Contents Page Introduction: Dell™ PowerVault™ 122T LTO-2 Autoloader User's Guide Overview The PowerVault 122T LTO-2 autoloader is a fully automated, rack mountable, 2U (3.34" height, 16.5" width), enterprise class LTO tape storage system designed to provide unattended, near-line and off-line data storage.
Back to Contents Page Operating the Autoloader: Dell™ PowerVault™ 122T LTO-2 Autoloader User's Guide Operator's Panel Overview Understanding the Menu Structure Using Cartridges Cleaning the Tape Drive Creating an Inventory of Cartridges Operator's Panel Overview The Operator's Panel consists of four LEDs, four buttons, and a 2-line by 16-character LCD screen. The Operator's Panel provides everything you need to monitor autoloader status and to control all of its functions.
Ready/Activity Green Illuminated when power is on. Blinking whenever there is tape drive or autoloader robotics activity. Clean Drive Amber Illuminated when the tape drive needs to be cleaned. The LED turns off when cleaning is successfully completed (see "Cleaning the Tape Drive"). Regular periodic cleaning of the LTO-2 tape drive is not required. Media Attention Amber Illuminated if a media-related error has occurred.
Before you use the autoloader, make sure you observe these general rules: l Use only LTO Ultrium cartridges. The tape drive rejects all other types of cartridges. LTO Ultrium formatted cartridges contain embedded servo code, written on the media during the cartridge manufacturing process. LTO Ultrium cartridges cannot be bulk erased or degaussed. You can order tape cartridges at www.dell.com/tapebackup.
3. Press + or - until the desired slot number appears on the LCD screen and press Enter. The slot number you select indicates the cartridge to be loaded into the tape drive. 4. Press Cancel when you are finished loading the cartridge. Unloading Cartridges This option unloads the cartridge from the tape drive into its original slot. To use this option, follow these steps: 1. From the Home screen or main menu, press + or - until Commands appears on the top line of the LCD screen, and then press Enter.
Cleaning the tape drive with a cleaning cartridge can take as long as five minutes, during which the Ready LED blinks. Each cleaning cartridge can be used for 15 cleanings. The drive will automatically reject a cleaning cartridge after it has been used 15 times. You may also refer to your backup software documentation for information on enabling automatic cleanings with the use of a dedicated cleaning slot. NOTICE: Use only LTO Ultrium universal cleaning cartridges in the autoloader, available at www.dell.
Back to Contents Page Regulatory: Dell™ PowerVault™ 122T LTO-2 Autoloader User's Guide UL and CUL Listing CE Compliance FCC Compliance Statement Industry Canada (Digital Apparatus) Manufacturer Declaration UL and CUL Listing This information technology equipment is UL-Listed and CUL-Listed for use with UL-Listed personal computers that have installation instructions detailing user installation of card cage accessories.
Back to Contents Page Technical Specifications: Dell(tm) PowerVault(tm) 122T LTO-2 Autoloader User's Guide Physical Specifications Autoloader Specifications Autoloader Environmental Specifications Tape Drive Specifications Physical Specifications Characteristic Product Alone Height 8.4 cm (3.34 in) Width Depth Weight Packaged 20.5 cm (8.0 in) 41.9 cm (16.5 in) 60 cm (23.6 in) 60.9 cm (24 in) (Approximately 65 cm (25.6 in) with Bar Code Reader) 74.3 cm (29.
Media Specifications Characteristic LTO-2 Ultrium formatted capacity Basic description Tape length Cartridge dimensions Shelf life Cartridge life LTO Universal Cleaning cartridge life Back to Contents Page LTO-2 Ultrium Media 200 GB (non-compressed) 400 GB (2:1 typical compression) Advanced Metal Particle 609 m (1998 ft) 10.2 x 10.54 x 2.15 cm (4 x 4.15 x .85 in) 30 years minimum @ 20°C 40% RH (non-condensing) 1,000,000 passes (any point on the tape passing the recording head in either direction).