Dell PowerVault DL Backup To Disk Appliance Powered By CommVault Simpana User’s Guide
Notes, Cautions, and Warnings NOTE: A NOTE indicates important information that helps you make better use of your computer. CAUTION: A CAUTION indicates either potential damage to hardware or loss of data and tells you how to avoid the problem. WARNING: A WARNING indicates a potential for property damage, personal injury, or death. © 2012 Dell Inc.
Contents Notes, Cautions, and Warnings...................................................................................................2 1 Introduction..................................................................................................................................7 Compatibility Matrix..................................................................................................................................................8 2 Setting Up DL Backup To Disk Appliance..................
Creating Virtual Disks.......................................................................................................................................23 Preparing Manually Created Virtual Disks For Use With CommVault Simpana...............................................24 Launching Simpana Software..........................................................................................................................24 Logging On To The CommCell......................................................
Reinstalling CommVault Simpana Backup And Recovery During Disaster Recovery............................................43 Repairing CommVault Simpana Backup And Recovery...................................................................................44 6 Solution Map..............................................................................................................................45 Deployment Planning..............................................................................................
Introduction 1 The Dell PowerVault DL Backup to Disk Appliance is the latest generation of backup to disk protection powered by CommVault Simpana software. The DL Backup to Disk Appliance allows: • Scalable storage capabilities to support organizations of any size. • Faster backups, as well as quicker recovery scenarios over conventional tape devices and backup methodologies. • Optional deduplication capability. • Simplified and unified management for disk and tape.
Table 1.
Setting Up DL Backup To Disk Appliance 2 Installation Prerequisites Network Requirements The Dell PowerVault DL Backup to Disk Appliance requires the following network environment: • Active network with available Ethernet cables and connections • A static IP address and DNS server IP address, if not provided by the Dynamic Host Configuration Protocol (DHCP) • At least one IPv4 address (for licensing purposes) • A Microsoft Windows Domain Controller to set up a CommVault CommServe system • User na
1. Rack and cable the PowerVault DL2x00 system and storage enclosure(s). 2. Configure the PowerVault MD1x00 storage enclosure(s) to unified mode. 3. Connect the storage enclosure(s) to the PowerVault DL2x00 system. 4. Turn on the PowerVault DL2x00 system and the storage enclosure(s). Installing The Appliance In A Rack If the PowerVault DL2x00 system and the optional storage enclosure include a rail kit, locate the Rack Installation Instructions supplied within the rack kit.
1. configuration switch Figure 2. Setting the PowerVault MD1200 Storage Enclosure Configuration Switch 1. configuration switch Connecting The Storage Enclosure To The PowerVault DL2x00 System Connect the SAS data cable from the PowerEdge RAID Controller (PERC) installed in the PowerVault DL2x00 system to the primary Enclosure Management Module (EMM) SAS In port of the storage enclosure. For more information, see the figures below. NOTE: Do not connect tape devices to the PERC adapter.
1. PERC 2. EMM Figure 4. Connecting the SAS Cable From the PowerVault DL2x00 System to the PowerVault MD1200 Storage Enclosure 1. PERC 2.
Figure 5. Connecting the SAS Cable From the PowerVault DL2x00 System to the PowerVault MD1200 Storage Enclosure (Redundant Configuration) 1. Primary EMM 2. DL2x00 system 3. Optional MD1200 storage enclosures (4) Figure 6.
1. 2. 3. 4. 5. PERC (optional) PowerVault DL2x00 system SAS HBA (optional) tape backup (optional) storage enclosure (optional) NOTE: If a SCSI, SAS, or Fibre Channel host adapter is installed for use with an optional tape device, see Adding An Optional Tape Library. Connecting The Cable Management Arm (Optional) If the appliance includes a cable management arm (CMA), locate the CMA Installation Instructions that shipped with the CMA kit and follow the instructions to install the CMA.
Reboot the PowerVault DL2x00 and log on to resume the PowerVault DL Backup to Disk Appliance Configuration Wizard. Configuring SNMP Settings Simple Network Management Protocol (SNMP) is a network protocol used to manage TCP/IP networks. In Windows, the SNMP service, known as the SNMP agent, provides status information about an SNMP host. You can add the appliance to an SNMP community. In addition, you can add the name of other SNMP host(s) or an SNMP management system.
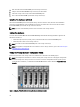
Figure 7. Dell PowerVault DL2000 and DL2100 Disk Slots PowerVault DL2100 Disk Configurations The PowerVault DL2100 supports SATA drives only. The operating system resides on a RAID 1 (mirrored) virtual disk using slots 0 and 1. See the figure above. If the DL2100 system shipped with a SAS 6i/R internal storage controller, slots 2 through 5 are not available for automatic disk configuration but can be manually configured.
Figure 9. Dell PowerVault DL2200, DL2300, and MD1200 Disk Slots PowerVault DL2200 Disk Configurations Running Windows Server 2008 R2 In addition to the RAID 5 standard configuration supported under Windows Server 2008 Standard x64 Edition, the DL2200 and MD1200 storage enclosures support alternative RAID 6 standard configurations, if the following conditions are met: • • The appliance software stack version must be version 3.3 or higher CommVault Simpana must be version 9.
NOTE: Under certain circumstances, a physical disk failure can cause the configuration state to transition from advanced to standard. In this case, the disk subsystem reverts to advanced after the failed physical disk is replaced and the copy back operation is complete. Disk Configuration Policies You can select one of the following disk configuration policies on the Settings tab in the DL Backup To Disk Appliance Console if the disk subsystem state is standard.
Configuring The PowerVault DL2x00 System With NIC Teaming The Broadcom Advanced Control Suite (BACS) is preinstalled on the appliance. You use BACS to configure, manage, and team Network Interface Controllers (NICs) on the PowerVault DL2x00 system. The benefits of teaming include traffic load balancing and fault tolerance. If the Team Management button is not present in the lower left corner of the BACS management tool, you must install the Broadcom teaming software. Run setup.exe at C:\Install\BroadcomAdva
3 Using The DL Backup To Disk Appliance Console You can use the Dell PowerVault DL Backup to Disk Appliance Console to: • Manage the DL Backup to Disk appliance • Launch the CommVault Simpana Backup and Recovery software • Display appliance information • Report appliance status • Display the available disk space • Add or remove tape devices • Configure network and SNMP settings NOTE: After the system boots, the PowerVault DL Backup to Disk Appliance Console may take up to three minutes to repo
Depending on the error condition, automatic disk configuration may or may not be able to proceed. The following table lists the error conditions that can occur during automatic disk configuration and recommends you can proceed with automatic disk configuration. Table 2. Automatic Disk Configuration Error Conditions Error Condition Description Solution/Workaround Unconfigured physical disks are not all the same size One or more physical disks vary in capacity.
6. – Detect on Selected MediaAgents in Parallel – Automatically Create DOS Drivepools – Exhaustive Detection (Only for Libraries without Drive IDs Support) Click OK. Adding The Tape Device To The Disk Appliance Console To add a tape device to the disk appliance console: 1. On the PowerVault DL Backup to Disk Appliance Console, click the Settings tab. 2. Under Tape Devices, click Add. 3. Enter the model, description, and the IP address of the tape device.
To launch the Express and Advanced Create Virtual Disk wizards: 1. In Dell OpenManage Server Administrator Storage Management, expand the storage tree object to display the controller objects. 2. Select the PERC adapter object for which the physical disks must be configured. 3. In the Properties tab of the PERC adapter, select Information/Configuration. 4. Locate Controller Tasks, select Create Virtual Disk, and then select Execute. 5.
Logging On To The CommCell For versions of Simpana prior to 9.0, the default user name and password to log on to the CommCell is cvadmin. For Simpana versions 9.0 and later, the default user name and password is admin. It is recommended that you change the password after you first log on. You receive a reminder if you do not activate the license. For more information about using the CommCell console including licensing, see documentation.commvault.com/dell.
When all the critical software components have been updated to a supported version, backup application jobs resume. See Updating DL Backup To Disk Appliance Applications for instructions on how to update the software components on the DL appliance. NOTE: The Compatibility Manager feature is available on versions 3.2 and later of the appliance software stack. See the Dell PowerVault DL Backup to Disk Appliance Interoperability Guide for supported DL2x00 platforms.
4 Updating DL Backup To Disk Appliance Software Dell PowerVault DL Backup to Disk Appliance software is updated periodically to correct problems, improve performance, introduce new capabilities, and support additional hardware. It is recommended that you apply these updates to keep the appliance running optimally. See the Dell PowerVault DL Backup to Disk Appliance Interoperability Guide at support.dell.com/manuals to determine the minimum software versions supported on the appliance.
Updating The Operating System To acquire and run the latest security patches, fixes, and updates for the operating system, click the Windows Update link in the PowerVault DL Backup to Disk Appliance Console. Updating DL Backup To Disk Appliance Applications Use the Dell PowerVault DL Backup to Disk Appliance Recovery and Update Utility to update DL Backup to Disk Appliance Applications. Download the latest version of the DL Backup to Disk Appliance Recovery and Update Utility from support.dell.
Disaster Recovery 5 You can recover the Dell PowerVault DL Backup to Disk Appliance from a number of hardware or software failures.
• Reinstallation of the operating system requires you to reinstall all the applications on the appliance. • A non-recoverable failure of the disk group containing the operating system requires reinstallation of the operating system and all applications. • A non-recoverable failure of the disk group containing one or more CommVault Simpana Backup and Recovery backup sets requires restoration of the backup sets on that disk group from tape or secondary disk.
Recovering From Disk Failures About RAID Types The internal disk storage containing the operating system and applications in the DL2x00 system is preconfigured as RAID 1. RAID 1 is a mirrored disk group that provides uninterrupted operation of the appliance if a single disk fails within that disk group. CAUTION: A failed system disk must be replaced immediately to avoid data loss or complete failure of the appliance.
• Dell Management Console — The Dell Management Console (DMC) centrally monitors the status of Dell systems. For more information about installing and using DMC, see the Dell Management Console User’s Guide at support.dell.com/manuals. Recovering From Single Disk Failures After you replace the failed disk drive within a RAID group, the appliance automatically rebuilds the disk group.
NOTE: SBUU is only supported on the DL2000 appliance. For all other appliance models, see Using The Dell Unified Server Configurator - Lifecycle Controller Enabled To Recover The Operating System. The SBUU requires the original Microsoft installation media to install the operating system. NOTE: The SBUU is shipped with the appliance and is also available at support.dell.com. When using the SBUU from support.dell.com, you must download the Dell Windows Operating Systems install support pack to a CD/DVD.
NOTE: USC LCE is not supported on the DL2000 appliance. See Using The Dell Systems Build And Update Utility To Manually Recover The Operating System. Locate the Microsoft operating system media that came with the system to proceed with the installation. After a multiple disk failure of the DL2x00 system boot disk, you must replace the failed disks, create a RAID 1 disk group, and then reinstall the operating system. See Recovering From Disk Failures.
NOTE: Perform the following steps to either repair a corrupted application or during the system recovery process of a disaster recovery scenario. Using The Dell PowerVault DL Backup To Disk Appliance Recovery And Update Utility During Disaster Recovery In a disaster recovery scenario, download the Dell PowerVault DL Backup to Disk Appliance Recovery and Update Utility from support.dell.com/support/downloads.
Figure 10. Commvault Simpana 8.
Figure 11. CommVault Simpana 9.
Figure 12. Database Restore for CommVault Simpana 9.0 SP4 and Later 11. For Simpana versions prior to 9.0, on the SQL Restore tab in the CommServeDisasterRecoveryGUI, select Restore DB and provide the DR dump location for the database restore in the Restore file field. 12. For Simpana version 9.0 and later, on the Database Restore tab in the CommServeDisasterRecoveryGUI, select Restore DB and Restore Single Dump or Restore Single Database radio button.
Figure 13. Simpana 8.0 Post Recovery For Simpana versions 9.
Figure 14. Simpana 9.0 Post Recovery 14. Click OK to continue with the restore. 15. If prompted to stop the Simpana services to proceed with the restore, click Yes. 16. When the restore is complete, close the CommServeDisasterRecoveryGUI. 17. Click Launch the Service Control Manager from the Home tab of the appliance management console to start the services. 18. Close the Service Control Manager. NOTE: When the restore operation is complete, CommVault Simpana services are started.
20. Right-click the CommServe system name at the top of the tree view and select Properties. 21. Select all the options in the Activity Control tab. 22. Click OK. 23. For Simpana version prior to 9.0, right-click the CommServe system name and select All Tasks and Schedules. 24. For Simpana version 9.0 and later, right-click the CommServer system name and select View then Schedules. 25. Enable all the available Schedule Policies and click Close.
Table 4. List of Windows Server 2008 Roles and Features in the Add Features Wizard Features Notes .NET Framework 3.0 Features A dialog box may display the required roles and features for .NET 3.0. Click Add Required Role Services to continue. Remote Server Administration Tools A dialog box may display the required roles and features for Remote Server Administration Tools. Click Add Required Role Services to continue. SNMP Services Windows Process Activation Service .NET Framework 3.
Role Services Management Tools 6. Sub Options – – IIS Management Console IIS 6 Management Compatibility (select all sub-options) Click Next. The Confirm Installation Selections window is displayed. 7. Click Install to proceed with the installation of the selected roles and features. If required, the system reboots after the installation is complete.
• Verify the functionality to be installed on the appliance. CommVault Simpana Backup and Recovery can be installed as a CommServe system including the Media Agent, or as a Media Agent only. • Windows network domain information is required for installation. Check with the network administrator for these settings. • Confirm that Windows Disk Manager can access the external disk. • Ensure that the CommVault Backup and Recovery software is not already installed on the DL2x00 system.
6 Solution Map Depending on the version of CommVault Simpana software installed on the DL2x00 system, select the appropriate documentation link at documentation.commvault.com/dell. Deployment Planning What do You Want to do? Documents and Resources Available Learn about system requirements for the DL Backup to Disk Appliance For a list of Dell-supported hardware and software, see the Dell PowerVault DL Backup to Disk Appliance Interoperability Guide at support.dell.com/manuals.
Deployment And Maintenance What do You Want to do? Documents and Resources Available Learn more about system requirements for the DL Backup to Disk Appliance For a list of Dell-supported hardware and software, see the Dell PowerVault DL Backup to Disk Appliance Interoperability Guide at support.dell.com/manuals. Learn about supported backup agent requirements Visit documentation.commvault.com/dell. For CommVault Simpana 8.
What do You Want to do? Documents and Resources Available Understand and set up a media management strategy for the optional tape library in CommVault Simpana Visit documentation.commvault.com/dell. Click Simpana → Common Technology Engine → Media Management. Recover backup data Visit documentation.commvault.com/dell. For Simpana 8.0, click Simpana → Getting Started → Recover Your Data. For Simpana 9.0, click Simpana → Popular Features → All Features... → D → Restore Backup Data.
What do You Want to do? Documents and Resources Available Management , and type migrate a magnetic library in the search tool. For Simpana 9.0, click Simpana → Dell PowerVault DL Backup to Disk Appliance → Other Features → Disk Management → Migrate Libraries. Create an advanced RAID group on the PowerVault DL2x00 system See Configuring The Storage Manually. Troubleshooting And Getting Help What do You Want to do? Documents and Resources Available Contact Dell for support Visit support.dell.
7 Additional References NOTE: Depending on the version of CommVault Simpana software installed on the PowerVault DL2x00, select the appropriate documentation link at documentation.commvault.com/dell. Software Documents Table 6. DL Backup to Disk Appliance Documents Document Description Location Setting Up Your Dell PowerVault DL Backup to Helps you set up the appliance Disk Appliance hardware and configure the software before using the system for the first time. support.dell.
Document Description Location Dell Serial-Attached SCSI 6/iR Integrated and Adapter User’s Guide Contains information on the Serial Attached SCSI (SAS) 6/iR adapter. support.dell.com/manuals Dell PERC 6/i, PERC 6/E, and CERC 6/i User's Guide Contains information on the PERC 6series adapters. support.dell.com/manuals Dell PERC H700 and H800 User's Guide Contains information on the PERC H700 and H800 adapters. support.dell.
Document Description Location Dell Unified Server Configurator and Describes how to deploy an Operating support.dell.com/manuals Unified Server Configurator - Lifecycle System, run diagnostics, and apply Controller Enabled User Guide updates to the system. Dell OpenManage Server Update Utility User's Guide Describes how to use the Server Update Utility to update system software. Dell Update Packages for Microsoft Windows Operating Systems User's Guide Describes how to use Dell Update support.dell.
CD/DVD Media Description Location Dell Management Console DVD containing the installation software and documentation for the Dell Management Console. Supplied with your system (disk image can also be downloaded from support.dell.com/support downloads) CommVault Simpana software installation media Contains setup files for the CommVault Simpana software.