Dell™ PowerVault™ Data Protection Solution Anleitung zur Systemwiederherstellung w w w. d e l l . c o m | s u p p o r t . d e l l .
Anmerkungen, Hinweise und Vorsichtshinweise ANMERKUNG: Eine ANMERKUNG macht auf wichtige Informationen aufmerksam, die die Arbeit mit dem Computer erleichtern. HINWEIS: Ein HINWEIS warnt vor möglichen Beschädigungen der Hardware oder vor Datenverlust und zeigt auf, wie derartige Probleme vermieden werden können. VORSICHT: Hiermit werden Sie auf eine potenziell gefährliche Situation hingewiesen, die zu Sachschäden, Verletzungen oder zum Tod führen könnte.
Inhalt 1 Einführung 2 Übersicht der Lösungen zur Wiederherstellung . . 3 . . . . . . . . . . . . . . . . . . . . . Wiederherstellen nach Datenträgerausfällen . . . . . . . . . . . . . . . . . . . . . . . . . . . . . . . . . . Erkennen und Überwachen von Laufwerkfehlern 7 9 11 . . . 11 Akustischer Alarm des RAID-Adapters . . . . . . 11 OpenManage™ Server Administrator . . . . . . 12 . . . . . . . . 12 . . . . . . . . . . . . . . 13 Dell OpenManage™ IT Assistant .
Neuinstallation des Betriebssystems Verwenden des „Dell Systems Build and Update“-Dienstprogramms . . . . . 17 . . . . . . . . . 17 Updates von BIOS, Firmware und Treiber . . . . . . . Betriebssystem-Updates mit Windows Update . . . . 27 . . . . . . . . . . 27 . . . . . . . . . . . 28 Lokalisieren des Betriebssystems Installieren des Multilingual User Interface-Pakets . . . . . . . . . . . . . 29 . . . . . . . . . . . . . 31 . . . . . . . . . . . . . .
8 Wiederherstellen von DPM-Datenbanken und Duplikaten 9 . . . . . . . . . . . . . . . . . . . . . . . . 43 . . . . . . . . . . . . . 43 Andere Dokumente und Ressourcen Informationen von Microsoft 41 Hardware-Informationen von Dell Software-Informationen von Dell . . . . . . . . . . 43 . . . . . . . . . . .
Inhalt
Einführung In diesem Dokument sind die erforderlichen Schritte zur Wiederherstellung der Dell™ PowerVault™ Data Protection Solution nach verschiedenen Hardware- oder Softwareausfällen beschrieben.
Einführung
Übersicht der Lösungen zur Wiederherstellung Dieses Dokument enthält Abschnitte, in denen spezifische Themen und Vorgehensweisen zur Wiederherstellung beschrieben werden. In Tabelle 2-1 ist dargestellt, wie jeder Ausfalltyp die verschiedenen DPM-Komponenten potentiell beeinträchtigt, und nennt den Abschnitt in diesem Dokument, der sich mit dem spezifischen Ausfalltyp befasst.
Tabelle 2-1.
Wiederherstellen nach Datenträgerausfällen Der interne Datenträgerspeicher des Systems ist als RAID 5 vorkonfiguriert. Auch weitere Datenträger, die Sie dem System hinzufügen, wird als RAID 5 konfiguriert, wie im Speichererweiterungshandbuch zur Dell PowerVault Data Protection Solution beschrieben. RAID 5 ermöglicht unterbrechungsfreien Systembetrieb, wenn ein einzelnes Laufwerk in der Gruppe ausfällt.
OpenManage™ Server Administrator Mit Dell™ OpenManage™ Server Administrator (OMSA) lässt sich der Zustand von internen und externen Laufwerken überwachen. Im Abschnitt „Ersetzen von Laufwerken“ dieses Kapitel erfahren Sie mehr darüber. In Abbildung 3-1 ist dargestellt, wie der Laufwerkzustand in OMSA wiedergegeben wird. Abbildung 3-1.
Ersetzen von Laufwerken Wenn Sie Festplatten ersetzen, verwenden Sie nur Laufwerke, die in der Support-Matrix für die Dell PowerVault Data Protection Solution aufgeführt sind. Achten Sie darauf, dass die neue Festplatte die gleiche Kapazität wie die ausgefallene Festplatte aufweist. Weitere Einzelheiten erhalten Sie im Abschnitt „Disk Size Selection and Considerations“ (Hinweise zur Auswahl der Laufwerkkapazität) des Speichererweiterungshandbuch zur Dell PowerVault Data Protection Solution.
Wiederherstellen nach dem Ausfall eines einzelnen Laufwerks Nach dem Ersetzen eines ausgefallenen Laufwerks in einer RAID-5-Gruppe beginnt das System automatisch mit dem Wiederaufbau der RAID-Gruppe. Die Daten auf den virtuellen Datenträgern in der RAID-Gruppe stehen dem Betriebssystem immer noch zur Verfügung und das System sollte unterbrechungsfrei funktionieren.
Wenn Sie ein globales Ersatzlaufwerk installiert hatten, das dem gleichen PERC-Adapter wie das ausgefallene Laufwerk zugewiesen war, geht die Rolle des ausgefallenen Laufwerks in der RAID-Gruppe automatisch auf das Ersatzlaufwerk über und der Wiederaufbauvorgang wird automatisch eingeleitet. In diesem Fall müssten Sie die ausgefallene Festplatte ersetzen und sie als neues globales Ersatzlaufwerk für den betreffenden PERC-Adapter zuweisen.
Wiederherstellen nach Datenträgerausfällen
Neuinstallation des Betriebssystems In diesem Abschnitt ist beschrieben, wie das Betriebssystem auf dem PowerVault-System neuinstalliert wird. ANMERKUNG: Das Betriebssystem war bei Erwerb des Systems vorinstalliert. Führen Sie die Schritte in diesem Abschnitt nur aus, wenn Sie ein nicht mehr funktionierendes Betriebssystem reparieren müssen.
6 Wählen Sie auf der linken Seite des Bildschirms die entsprechende Sprach- und Tastatureinstellung, und wählen Sie die Option Server OS Installation (Installation des Serverbetriebssystems) im Bereich Single Server Solution (Einzelner Server). Abbildung 4-1. System Build and Update-Dienstprogramm 7 Wählen Sie das Datum und die Uhrzeit, und klicken Sie dann auf Continue (Weiter).
10 Das Fenster Configure or Skip RAID (RAID konfigurieren oder Konfiguration überspringen) wird angezeigt. Mit dieser Option wird der virtuelle Datenträger konfiguriert, auf dem das Betriebssystem und Anwendungen wie OMSA und DPM installiert werden. Führen Sie folgende Schritte durch: a Wählen Sie Configure RAID (RAID konfigurieren) und klicken Sie dann auf Weiter (siehe Abbildung 4-2). Abbildung 4-2.
Abbildung 4-3. Express-Erstellung von virtuellem Datenträger (Schritt 1 von 2) c Wenn der Bildschirm Create Virtual Disk Advanced Wizard (Step 1 of 4) (Erstellung von virtuellem Datenträger mit erweiterten Einstellungen) angezeigt wird, wählen Sie die Option RAID-5 und klicken Sie auf Weiter. d Wählen Sie im Bildschirm Create Virtual Disk Advanced Wizard (Step 2 of 4) (siehe Abbildung 4-4) alle für Anschluss 0 des internen PERC-Adapters aufgeführten physischen Laufwerke.
Abbildung 4-4. Erstellung von virtuellem Datenträger mit erweiterten Einstellungen (Schritt 2 von 4) f Wählen Sie im Bildschirm Create Virtual Disk Advanced Wizard (Step 3 of 4) den Eintrag 25 GB als Größe des virtuellen Datenträgers. Lassen Sie alle anderen Einstellungen unverändert und klicken Sie auf Weiter. g Wenn der Zusammenfassungsbildschirm Create Virtual Disk Advanced Wizard (Step 4 of 4) angezeigt wird, überprüfen Sie die Informationen und klicken Sie auf Weiter.
h Wenn eine Warnmeldung angezeigt wird, klicken Sie auf OK. Alle vorhandenen virtuellen Datenträger an diesem Controller werden am Ende des Dialogvorgangs gelöscht und alle Daten gehen verloren. i Wählen Sie im Bildschirm Configure the Physical Disk for Microsoft Windows Server 2003 Service Pack 2 x64 Edition (Physisches Laufwerk für Microsoft Windows Server 2003 Service Pack 2 x64 Edition konfigurieren) (siehe Abbildung 4-5) den Eintrag NTFS als das Dateisystem für die Startpartition.
11 Geben Sie im Bildschirm Network Adapter(s) configuration (Konfiguration der Netzwerkadapter) Ihre IP-Adressen und Netzmasken an, und klicken Sie auf Weiter. (Wenden Sie sich gegebenenfalls an den Netzwerkadministrator, um Hilfe beim Bestimmen der korrekten Werte zu erhalten.
Abbildung 4-6. Informationen zum Betriebssystem eingeben 13 Wenn der Bildschirm Operating System Installation Summary (Zusammenfassung der Betriebssysteminstallation) angezeigt wird, überprüfen Sie die Informationen auf Richtigkeit, und klicken Sie dann auf Weiter. 14 Der Microsoft Windows Server 2003 Service Pack 2 x64 Edition Installation Wizard (Installationsassistent von Microsoft Windows Server 2003 Service Pack 2 x64 Edition) erscheint, und der Kopiervorgang beginnt.
Abbildung 4-7. Fertig stellen 18 Wenn Sie auf Fertig stellen klicken, wird das System automatisch neu gestartet und die Betriebssysteminstallation fortgesetzt. ANMERKUNG: Der automatische Neustart und die Installation nehmen eventuell mehrere Minuten in Anspruch. Möglicherweise wird das System mehrfach neu gestartet. 19 Nach Abschluss der Einrichtungs- und Neustartvorgänge werden Sie nach einem Administratorkennwort gefragt.
22 Der Endbenutzer-Lizenzvertrag wird angezeigt. Lesen Sie den Vertrag sorgfältig, und klicken Sie dann auf Weiter. 23 Klicken Sie im Bildschirm Setup Summary (Setup-Übersicht) auf Weiter. 24 Nehmen Sie nach Abschluss des Setups von Windows Server 2003 R2 die CD aus dem Laufwerk, und klicken Sie auf Fertig stellen. 25 Klicken Sie bei der Aufforderung zum Neustart auf Ja. 26 Wieder werden Sie nach einem Administratorkennwort gefragt.
Updates von BIOS, Firmware und Treiber Bevor Sie weitere Software auf dem System installieren, etwa die DPMAnwendung, bestimmen Sie anhand der Support-Matrix für die PowerVault Data Protection Solution die erforderlichen Versionen von BIOS, Firmware und Treibern für Ihr System. Updates für diese Komponenten stehen unter support.dell.com zur Verfügung.
Installieren des Multilingual User Interface-Pakets Die PowerVault Data Protection Solution wird mit einem Satz von Multilingual Support-CDs geliefert, die sich bei den Medien für Windows Storage Server 2003 R2 x64 with SP2 befinden. Nehmen Sie die CD mit der gewünschten Sprache zur Hand. Lesen Sie die Datei readme.txt auf der CD, bevor Sie mit den folgenden Schritten beginnen: 1 Legen Sie die ausgewählte Multilingual Support-CD im System ein, und suchen Sie die Datei muisetup.
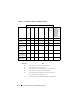
Tabelle 4-1. Sprachkennungen Language (Sprache) Kennung Französisch 040c Deutsch 0407 Japanisch 0411 Koreanisch 0412 Chinesisch (vereinfacht) 0804 Spanisch 0c0a Chinesisch (traditionell) 0404 Anwenden der MUI-Sprache: So stellen Sie die MUI-Sprache ein: 1 Wählen Sie Start→ Systemsteuerung→ Regions- und Sprachoptionen. 2 Wählen Sie auf der Registerkarte Regionale Einstellungen unter Standards und Formate die entsprechende Region, und klicken Sie auf OK.
f Um eine Sprache zu entfernen, wählen Sie die Sprache aus, und klicken Sie auf Entfernen. g Klicken Sie auf OK. h Schließen Sie das Fenster Internetoptionen. Wenn Sie Mozilla Firefox verwenden: 30 a Öffnen Sie ein Browser-Fenster. b Wählen Sie Extras→ Einstellungen. c Klicken Sie auf der Registerkarte Allgemein im Fenster Optionen auf Sprachen. d Nehmen Sie im Fenster Sprachen und Zeichenkodierung die entsprechende Auswahl vor, und klicken Sie auf OK.
OMSA-Neuinstallation OpenManage™ Server Administrator (OMSA) muss auf dem System installiert sein, um virtuelle RAID-5-Datenträger zur Verwendung mit PowerVault Data Protection Manager (DPM) zu überwachen und zu konfigurieren. Einzelheiten zur OMSA-Installation erhalten Sie im Abschnitt „Installieren von Dell OpenManage Server Administrator“ des SchnellstartHandbuchs zur Dell PowerVault Data Protection Solution.
OMSA-Neuinstallation
DPM-Neuinstallation In diesem Abschnitt ist beschrieben, wie DPM auf der PowerVault Data Protection Solution neu installiert wird. Nehmen Sie das mit dem System gelieferte Microsoft System Center Data Protection Manager 2007Neuinstallationsmedium zur Hand (siehe Abbildung 6-1). Abbildung 6-1. DVD zur DPM-Neuinstallation Erforderliche Software und Netzwerkkonfiguration Zur Installation von DPM sind bestimmte Software und Netzwerkkonfigurationsmaßnahmen notwendig.
Tabelle 6-1. Für DPM erforderliche Software Erforderliche Hotfixes Verzeichnis auf dem DPMNeuinstallationsmedium PowerShell 1.0 \prereqs\KB926139-x64-ENU.exe PowerShell MUI-Paket \prereqs\ KB926141-x64-ENU.exe Hotfix KB940349 \prereqs\KB940349-v3-x64-ENU.exe Führen Sie die einzelnen Softwarekomponenten in Tabelle 6-1 in der angegebenen Reihenfolge aus, indem Sie darauf doppelklicken.
• Alle Benutzer müssen angemeldet sein als Domänenbenutzer, die der lokalen Administratorengruppe angehören.
4 Lesen Sie den Lizenzvertrag auf der Seite Microsoft Software License Terms (Microsoft Software-Lizenzbestimmungen) und nehmen Sie ihn an. ANMERKUNG: Nach Abschluss der Installation können Sie den Lizenzvertrag von der DPM-Verwaltungskonsole aus aufrufen, indem Sie in der Navigationsleiste auf das Informationssymbol klicken. 5 Klicken Sie auf der Begrüßungsseite auf Weiter. DPM überprüft das System zunächst hinsichtlich der erforderlichen Hardware und Software.
b Geben Sie im Feld Enterprise licenses (Enterprise-Lizenzen) die Anzahl der Lizenzen ein, die Sie für den Schutz von Datei-, Anwendungs- und Datenbankressourcen erworben haben. Dies bezieht sich auf die Anzahl der erworbenen E-DPMLs. ANMERKUNG: Weitere Informationen über DPM Product Keys und DPMLs erhalten Sie im Abschnitt „DPM-Lizenzen“ des Schnellstart-Handbuchs zur Dell PowerVault Data Protection Solution.
ANMERKUNG: Aus Sicherheitsgründen führt DPM SQL Server und den SQL Server Agent-Dienst unter dem Konto MICROSOFT$DPM$Acct aus. DPM richtet dieses Konto während der Installation ein. Für eine sichere Berichterstellung erstellt DPM das Konto DPMR$computername. Das Kennwort, das Sie für diese Konten angeben, läuft nicht ab. 13 Geben Sie auf der Seite Microsoft Update Opt-In an, ob Sie sich für den Microsoft Update-Dienst anmelden möchten, und klicken Sie auf Weiter.
Neuinstallation des Konfigurationsassistenten der PowerVault Data Protection Solution Verwenden Sie den Konfigurationsassistenten der PowerVault Data Protection Solution, um die DPM-Anforderungen zu überprüfen, die Firewall für das System zu konfigurieren und alle verfügbaren virtuellen Datenträger dem DPM-Speicherpool hinzuzufügen. Der Assistent steht unter support.dell.com zum Herunterladen bereit.
Ausführen des Assistenten Starten Sie den Assistenten, indem Sie auf das Symbol PowerVault DPS Wizard auf dem Desktop doppelklicken. Wählen Sie die Standardeinstellungen und klicken Sie weiter, bis der Assistent beendet wird. ANMERKUNG: Da DPM bereits installiert ist, wird der Mini-Setup-Teil des Assistenten übergangen.
Wiederherstellen von DPMDatenbanken und Duplikaten Die Vorausplanung ist entscheidend für die Fähigkeit, DPM-Konfigurationsinformationen und von DPM geschützte Daten wiederherstellen zu können.
Wiederherstellen von DPM-Datenbanken und Duplikaten
Andere Dokumente und Ressourcen Die Standort der folgenden Dokumente und Ressourcen können Sie dem PowerVault Data Protection Solution Quick Reference Guide unter support.dell.com entnehmen.
Software-Informationen von Dell 44 • Dell Systems Build and Update Utility-CD • Console and Agent-CD für Dell-Systeme • Support-Matrix für die Dell PowerVault Data Protection Solution • Benutzerhandbuch für Dell OpenManage™ Server Administrator • Schnellstart-Handbuch für die Dell PowerVault Data Protection Solution • Speichererweiterungshandbuch für die Dell PowerVault Data Protection Solution • Benutzerhandbuch für Dell™ OpenManage Server Administrator • Benutzerhandbuch für Dell™ OpenMan