Setting Up the Dell™ DR Series System on Veeam Dell Engineering May 2014 A Dell Technical White Paper
Revisions Date Description January 2014 Initial release May 2014 Updated to add note to explain purpose of enabling dedupe on Veeam side. THIS WHITE PAPER IS FOR INFORMATIONAL PURPOSES ONLY, AND MAY CONTAIN TYPOGRAPHICAL ERRORS AND TECHNICAL INACCURACIES. THE CONTENT IS PROVIDED AS IS, WITHOUT EXPRESS OR IMPLIED WARRANTIES OF ANY KIND. © 2014 Dell Inc. All rights reserved. Reproduction of this material in any manner whatsoever without the express written permission of Dell Inc. is strictly forbidden.
Table of contents Revisions...................................................................................................................................................................................... 2 Executive summary ...................................................................................................................................................................... 4 3 1 Install and Configure the DR Series Deduplication Appliance ..............................................
Executive summary This paper provides information about how to set up the Dell DR Series system as a backup target for Veeam® Backup & Replication™ software. This document is a quick reference guide and does not include all DR Series system deployment best practices. For additional data management application (DMA) best practice whitepapers, see the DR Series system documentation at http://www.dell.com/support/Manuals/us/en/19/Product/powervault-dr4100.
1 5 Install and Configure the DR Series Deduplication Appliance 1. Rack and cable the DR Series system and power it on. 2. Initialize the DR Series system. Refer to the Dell DR Series System Administrator Guide under the following topics: “iDRAC Connection,” “Logging in and Initializing the DR Series System,” and “Accessing iDRAC6/iDRAC7 Using RACADM”. 3. Log in to iDRAC using the default address 192.168.0.120, or the IP that is assigned to the iDRAC interface.
5. After the virtual console is open, log in to the system with the user administrator and the password St0r@ge! (the “0” in the password is the numeral zero). 6. Set the user-defined networking preferences. 7. View the summary of preferences and confirm that the preferences are correct.
8. Log on to the DR Series system administrator console, using the IP address you just provided for the DR Series system, with username administrator and password St0r@ge! (the “0” in the password is the numeral zero). 9. Join the DR Series system to the Active Directory domain. Note: If you do not want to add the DR Series system to Active Directory, please see the DR Series System Owner’s Manual for guest login instructions. 7 a.
Enter Active Directory Info 10. Create and mount the container. Select Containers in the navigation panel on the left side of the dashboard, and then click the Create at the top of the page. 11. Enter a Container Name and select the Enable CIFS or Enable NFS checkbox. (Symantec NetBackup supports both CIFS and NFS protocols.
12. Select the preferred client access credentials. Name the container Select CIFS or NFS Enter Backup Server Info Note: For improved security, Dell recommends adding IP addresses for the backup console (Veeam backup servers and proxy servers). Not all environments will have all components included.
13. Click Create a New Container. Confirm that the container has been added. 14. Click Edit. Note the container share/export path, which you will use later to target the DR Series system.
15. To exit, click Cancel.
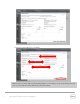
2 12 Configure the backup proxy 1. Log on to the backup proxy server. Click Start My Computer. 2. Click Map network drive.
3. 13 In the Folder field, enter the DR container share’s UNC path, then : a. Select the Reconnect at logon checkbox. b. When prompted, enter the DR CIFS access credentials. c. Verify that the DR container share is mapped as a network drive.
3 Set up Veeam Notes: To maximize the DR-Veeam deduplication savings, it is highly recommended to use the exact settings in this guide for all the data being backed up. The backup data will change format completely when backup settings are changed. Hence, to get accurate savings numbers, all the data needs to be backed up with same settings. 1. 14 Open Veeam Backup & Replication console. Click the Backup Infrastructure section, right-click on Backup Repositories, and select Add Backup Repository.
2. Enter a name for the DR container repository and click Next. 3. Select Shared folder and click Next.
4. In the Shared folder field, enter the DR container share UNC path (or TCP/IP address to replace hostname), choose the backup proxy setting, and click Next. 5. To customize repository settings, click Advanced.
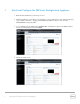
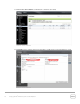
6. Check Decompress backup data blocks before storing. Note: Deselecting the Decompress backup data blocks before storing option may increase your overall deduplication storage capacity usage. It is not recommended to switch these settings after data has been written to the DR. 17 7. Deselect Aligning backup file data blocks. This should be deselected since the DR Series system uses variable block deduplication. 8.
9. Select one or more virtual machines, data stores, resource pools, vApps, SCVMM clusters, etc. for backup. 10. Select the DR container share as the Backup Repository for this job and click Advanced. 11. Under Backup tab, make sure Incremental is selected.
12. On the Storage tab, do the following: a. Under Deduplication, check the Enable inline data deduplication box. b. Under Compression, set Level to None. c. Under Storage optimizations, set Optimize for to Local target.
Note about Advanced Settings: Between backup performance and deduplication savings, if overall space/storage savings is the focus, it is recommended to choose the options in Step 12 for all of the backup jobs. Note about Veeam deduplication: Normally Dell recommends turning off encryption, compression, and deduplication in most backup software. However, with Veeam, Dell recommends enabling deduplication.
4 Set up DR Series system native replication (set up and restore from a target container) 4.1 Build the replication relationship between the source and target DR Series systems 1. 21 Create a source container on the source DR Series system.
2. Create a target container on the target DR Series system. 3. On the source DR Series system, go to the Replication page, and then click Create.
4. Select the source container as the local container, and then enter the information for the target DR Series system. 5.
6. Click Create Replication 7. Verify that the replication relationship between the DR Series systems has been created.
4.2 Restore data from the target DR Series system Note: Before restoring from the target DR Series system, make sure that the replication session state is INSYNC on the DR Series system GUI Replication Statistics menu. Stop or Delete the replication session, and make sure that the target DR Series system container has the CIFS/NFS connection(s) enabled. 25 1. Add the target DR Series system container to the Veeam repository. For instructions, see Steps 1-7 in Set up Veeam on page 14. 2.
4. 26 Click Add VM and select From backup. Select the VM to be restored and click Add.
5. 27 After the restore job has been created, you can run the job and monitor it from the Backup & Replication menu.
5 Set up the DR Series system cleaner Performing scheduled disk space reclamation operations are recommended as a method for recovering disk space from system containers in which files were deleted as a result of deduplication. The cleaner runs during idle time. If your workflow does not have a sufficient amount of idle time on a daily basis, then you should consider scheduling the cleaner to force it to run during a scheduled time.
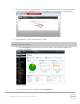
6 Monitoring deduplication, compression, and performance After backup jobs have run, the DR Series system tracks capacity, storage savings, and throughput on the DR Series system dashboard. This information is valuable in understanding the benefits of the DR Series system. Note: Deduplication ratios increase over time. It is not uncommon to see a 2-4x reduction (25-50% total savings) on the initial backup. As additional full backup jobs are completed, the ratios will increase.