
Manual


Table Of Contents
- Dell DX6104-CSN, DX6104-SCN, And DX6104-SN Systems Owner's Manual
- About Your System
- Using The System Setup And Boot Manager
- Installing System Components
- Recommended Tools
- Front Bezel (Optional)
- Opening And Closing The System
- Inside The System
- Cooling Shroud
- System Memory
- Hard Drives
- Optical Drive (Optional)
- Cooling Fans
- Internal USB Memory Key (Optional)
- Expansion Cards And Expansion-Card Risers
- iDRAC Ports Card (Optional)
- SD vFlash Card
- Internal Dual SD Module
- Internal SD Card
- Integrated Storage Controller Card
- Processors
- Power Supplies
- System Battery
- Hard Drive Backplane
- Control Panel Assembly
- Power Distribution Board Shroud
- Power Distribution Board
- System Board
- Troubleshooting Your System
- Safety First—For You And Your System
- Troubleshooting System Startup Failure
- Troubleshooting External Connections
- Troubleshooting The Video Subsystem
- Troubleshooting A USB Device
- Troubleshooting A Serial I/O Device
- Troubleshooting A NIC
- Troubleshooting A Wet System
- Troubleshooting A Damaged System
- Troubleshooting The System Battery
- Troubleshooting Power Supplies
- Troubleshooting Cooling Problems
- Troubleshooting Cooling Fans
- Troubleshooting System Memory
- Troubleshooting An Internal USB Key
- Troubleshooting An SD Card
- Troubleshooting An Optical Drive
- Troubleshooting A Hard Drive
- Troubleshooting A Storage Controller
- Troubleshooting Expansion Cards
- Troubleshooting Processors
- Using System Diagnostics
- Jumpers And Connectors
- Technical Specifications
- System Messages
- Getting Help
1
About Your System
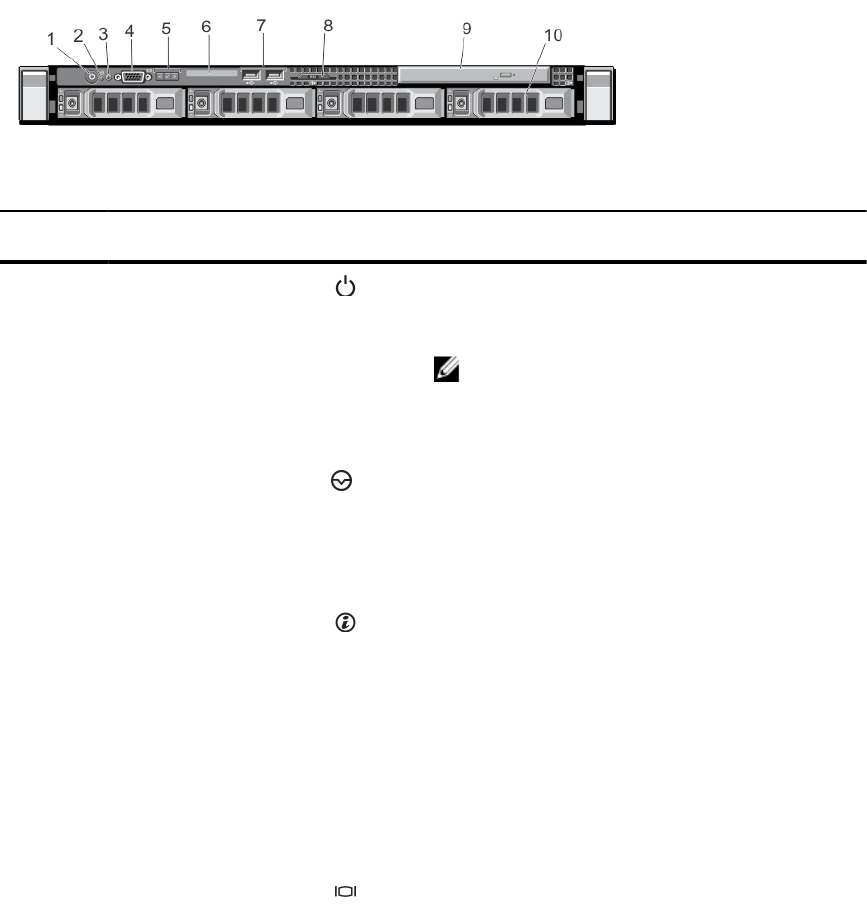
Front-Panel Features And Indicators
Figure 1. Front-Panel Features and Indicators
Item Indicator, Button, or
Connector
Icon Description
1 Power-on indicator, power
button
The power-on indicator lights when the system power is
on. The power button controls the power supply output to
the system.
NOTE: On ACPI-compliant operating systems, turning
off the system using the power button causes the
system to perform a graceful shutdown before power
to the system is turned off.
2 NMI button
Used to troubleshoot software and device driver errors
when running certain operating systems. This button can
be pressed using the end of a paper clip.
Use this button only if directed to do so by qualified
support personnel or by the operating system's
documentation.
3 System identification button The identification buttons on the front and back panels
can be used to locate a particular system within a rack.
When one of these buttons is pressed, the LCD panel on
the front and the system status indicator on the back
flashes until one of the buttons is pressed again.
Press to toggle the system ID on and off.
If the system stops responding during POST, press and
hold the system ID button for more than five seconds to
enter BIOS progress mode.
To reset iDRAC (if not disabled in F2 iDRAC setup) press
and hold the button for more than 15 seconds.
4 Video connector Allows you to connect a VGA display to the system.
9