
Users Guide
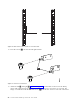
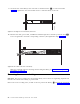


3. Place the screws ▌11▐ into the left and right brackets.
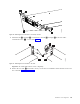
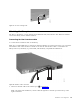
4. Attach the left ▌3▐ and right ▌4▐ (Figure 20 on page 25) front brackets to the front of the library
chassis with 2 flat-head screws ▌8▐ on each side. Use the top two screw holes on each side. The
flange of each bracket with the inserted screws (▌11▐) fits into the cutout on each side of the bezel.
a29z0015
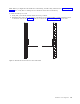
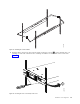
Figure 18. Rack mount screw locations for rear vertical rails
Figure 19. Screws for front brackets
24 Dell PowerVault TL1000 Tape Autoloader: User's Guide