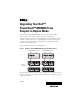
Upgrading Your Dell™ PowerVault™ MD3000i From Simplex to Duplex Mode The Dell PowerVault MD3000i RAID enclosure supports both duplex (dual-controller) and simplex (single-controller) configurations. A duplex configuration allows for full redundancy between RAID controller modules, non-I/O components, virtual disk paths, and physical disk paths. A simplex configuration offers no redundancy between RAID controller modules or physical disk paths. Figure 1 illustrates both types of configuration. Figure 1.
Adding a RAID Controller Module to a Simplex Configuration To upgrade your existing simplex storage array to a duplex storage array, perform the following steps: 1 Start MD Storage Manager. 2 Choose the storage array you are upgrading and click the Support tab. 3 Select Download Firmware. • If both the RAID controller module firmware and NVSRAM need to be applied, select Download RAID Controller Module Firmware.
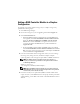
6 Connect the expansion enclosures (if present) to the RAID controller module you added in slot 1, as shown in Figure 2. NOTE: Wait for the enclosure status LED to turn blue before proceeding to the next step. 7 In MD Storage Manager, click the Tools tab (for the storage array you are upgrading). 8 Select Configure Ethernet Management Ports, then select Controller 1, Port 1 in the Ethernet port menu. 9 Select Specify configuration. 10 Set the IP address, subnet mask, and gateway for Controller 1, Port 1.
Figure 2. Newly Upgraded MD3000i with Second RAID Controller Added (With Expansion) MD3000i Storage Array (upgraded to duplex configuration) expansion enclosures (2) NOTE: Refer to the documentation on the MD3000i Resource CD for information on virtual disk load balancing and completing the iSCSI configuration. ____________________ Information in this document is subject to change without notice. © 2007 Dell Inc. All rights reserved. Printed in the U.S.A.
将 Dell™ PowerVault™ MD3000i 从单工模式升级到双工模式 Dell PowerVault MD3000i RAID 硬盘柜支持双工(双控制器)和单工 (单控制器)两种配置。 双工 配置允许 RAID 控制器模块、非 I/O 组件、虚拟磁盘路径和物理磁盘路 径之间的完全冗余.单工配置不提供 RAID 控制器模块或物理磁盘路径之间 的冗余。 图 1 说明了两种类型的配置。 图 1.
将 RAID 控制器模块添加到单工配置 要将现有单工存储阵列升级到双工存储阵列,请执行以下步骤: 1 启动 MD Storage Manager。 2 选择要升级的存储阵列并单击 Support (支持)选项卡。 3 选择 Download Firmware (下载固件)。 4 • 如果需要应用 RAID 控制器模块固件和 NVSRAM,则选择 Download RAID Controller Module Firmware (下载 RAID 控制器 模块固件)。选中 Transfer NVSRAM file with RAID controller module firmware (使用 RAID 控制器模块固件传输 NVSRAM 文件)方框并使用 Select File (选择文件)导航到从 support.dell.
8 选择 Configure Ethernet Management Ports (配置以太网管理端口), 然后在 Ethernet port (以太网端口)菜单中选择 Controller 1, Port 1 (控制器 1、端口 1)。 9 选择 Specify configuration (指定配置)。 10 设置控制器 1、端口 1 的 IP 地址、子网掩码和网关。 11 单击 New (新建)添加一个新的存储阵列。 12 在 Add New Storage Array (添加新存储阵列)窗口,选择 Manual (手动)然后单击 OK (确定)。 此时会打开 Add New Storage Array - Manual (添加新存储阵列 – 手动)窗口。 13 选择 Out-of-band management (带外管理)。 14 在 RAID Controller Module (host name or IP address) (RAID 控制器模 块 [ 主机名或 IP 地址 ])字段,输入存储设备中现有的两个 RAID 控制 器的 IP 地址。 单击 Add (添加
图 2. 添加第二个 RAID 控制器的新升级的 MD3000i (带扩充) MD3000i 存储阵列 (升级到双工配置) 扩充硬盘柜 (2) 注:请参阅位于 MD3000i Resource CD 上的说明文件,了解有关虚拟磁 盘负载平衡和完成 iSCSI 配置的信息。 ____________________ 本说明文件中的信息如有更改,恕不另行通知。 © 2007 Dell Inc. 版权所有,翻印必究。美国印制。 未经 Dell Inc. 书面许可,严禁以任何形式进行复制。 本文中使用的商标:Dell、 DELL 徽标和 PowerVault 是 Dell Inc. 的商标。 本说明文件中述及的其它商标和产品名称是指拥有相应商标和产品名称的公司或其制造的产品。 Dell Inc.
Mise à niveau d'un système Dell™ PowerVault™ MD3000i en mode simplex vers le mode duplex Le châssis RAID Dell PowerVault MD3000i prend en charge les configurations en duplex (deux contrôleurs) et en simplex (un seul contrôleur). Une configuration en duplex permet de bénéficier d'une redondance totale entre les modules contrôleurs RAID, les composants non impliqués dans les E/S, les chemins des disques virtuels et ceux des disques physiques.
Ajout d'un module contrôleur RAID à une configuration en simplex Pour passer d'une configuration en simplex à une configuration en duplex, procédez comme suit : 1 Démarrez MD Storage Manager. 2 Choisissez la baie de stockage à mettre à niveau et cliquez sur l'onglet Support. 3 Sélectionnez Download Firmware (Télécharger le micrologiciel).
5 Insérez le second module contrôleur RAID dans l'emplacement 1 (vide) du châssis RAID. Il peut s'agir d'un nouveau module contrôleur RAID ou d'un module de remplacement. Pour obtenir des informations sur les procédures d'insertion appropriées et les numéros d'emplacement, reportez-vous au document Dell™ PowerVault™ MD 3000i Hardware Owner’s Manual (Dell PowerVault MD 3000i - Manuel du propriétaire).
15 Définissez les options de mise en mémoire cache des disques virtuels. Dans chaque exemple ci-dessous, adresse_IP correspond à l'adresse du port de gestion du contrôleur RAID 0 : a Pour afficher la liste de tous les disques virtuels : SMcli adresse_IP -c “show allVirtualDisks;” b Exécutez la commande suivante pour chaque nom de disque virtuel affiché : SMcli adresse_IP -c “set virtualDisk[nom_disque_virtuel] mirrorCacheEnabled=true writeCacheEnabled=true readCacheEnabled=true;” Figure 2.
Erweitern des Speicherarrays Dell™ PowerVault™ MD3000i vom Simplex- auf den Duplexbetrieb Das Dell PowerVault MD3000i RAID-Gehäuse unterstützt sowohl Duplexkonfigurationen (mit zwei Controllern) als auch Simplexkonfigurationen (mit einem Controller). Duplex-Konfigurationen ermöglichen vollständige Redundanz zwischen den RAID-Controllermodulen, den Nicht-E/A-Komponenten sowie den Pfaden für virtuelle Laufwerke und physische Datenträger.
Hinzufügen eines RAID-Controllermoduls zu einer Simplexkonfiguration So erweitern Sie einen vorhandenen Simplex-Speicherarray zu einem DuplexSpeicherarray: 1 Starten Sie MD Storage Manager. 2 Wählen Sie den zu erweiternden Speicherarray aus, und klicken Sie auf die Registerkarte Support. 3 Wählen Sie die Option Download Firmware (Firmware herunterladen).
5 Setzen Sie das zweite (neue oder auszutauschende) RAID-Controllermodul in den leeren Steckplatz (Steckplatz 1) des RAID-Gehäuses ein. Informationen zum richtigen Einsetzen der Module und zu den Steckplatzbezeichnungen finden Sie im Hardware-Benutzerhandbuch für Dell™ PowerVault™ MD 3000i. 6 Schließen Sie ggf. vorhandene Erweiterungsgehäuse an das neu hinzugefügte RAID-Controllermodul in Steckplatz 1 an (siehe Abbildung 2).
15 Passen Sie die Cachespeicher-Optionen für virtuelle Laufwerke an (in den nachstehenden Beispielen ist für IP_Adresse immer die Adresse der Verwaltungsschnittstelle des RAID-Controllermoduls 0 anzugeben): a Zeigen Sie eine Liste aller virtuellen Laufwerke an: SMcli IP_Adresse -c “show allVirtualDisks;” b Führen Sie für jeden angezeigten virtuellen Laufwerknamen den folgenden Befehl aus: SMcli IP_Adresse -c “set virtualDisk[virtual_disk_name] mirrorCacheEnabled=true writeCacheEnabled=true readCacheEnabl
Dell™ PowerVault™ MD3000i を一重モードから二重モードに アップグレードする方法 Dell PowerVault MD3000i RAID エンクロージャは、二重構成(デュアルコ ントローラ)と一重構成(シングルコントローラ)の両方をサポートして います。 二重構成を使用すると、RAID コントローラモジュール、非 I/O コンポーネ ント、仮想ディスクのパス、および物理ディスクのパスの間に完全な冗長 性を設定することができます。一重構成では、RAID コントローラモジュー ルまたは物理ディスクパスの間に冗長性はありません。 両方のタイプの構成を図 1 に示します。 図 1 一重と二重の MD3000i RAID ストレージアレイ(拡張構成) 一重の MD3000i ストレージアレイ スロット 0 スロット 1 二重の MD3000i ストレージアレイ スロット 0 スロット 1 拡張エンクロージャ(2) 本書では、既存のストレージアレイをオンラインにしたままでストレージ アレイを一重構成から二重構成にアップグレードする手順について説明し ます。 2007 年 7 月
RAID コントローラモジュールを一重構成に 追加する方法 既存の一重ストレージアレイを二重ストレージアレイにアップグレードす るには、以下の手順を実行します。 1 MD Storage Manager を起動します。 2 アップグレードするストレージアレイを選択し、サポート タブをク リックします。 3 Download Firmware(ファームウェアのダウンロード)を選択します。 • RAID コントローラモジュールのファームウェアと NVSRAM の両方を適用する必要がある場合は、Download RAID Controller Module Firmware(RAID コントローラモジュール ファームウェアのダウンロード)を選択します。 Transfer NVSRAM file with RAID controller module firmware (RAID コントローラモジュールのファームウェアと共に NVSRAM ファイルを転送する)ボックスを選択し、Select File(ファイル の選択)を使用して、support.dell.
5 RAID エンクロージャの空きスロット(スロット 1)に 2 台目の (新しいまたは交換用の)RAID コントローラモジュールを挿入します。 正しい挿入の手順とスロットのラベル表示については、Dell™ PowerVault™ MD 3000i の『ハードウェアオーナーズマニュアル』 を参照してください。 6 拡張エンクロージャがある場合は、スロット 1 に追加した RAID コン トローラモジュールに接続します( を参照)図 2。 メモ:エンクロージャステータス LED が青色に変わるのを確認し たら、次の手順に進みます。 7 MD Storage Manager で、(アップグレードするストレージアレイの) Tools(ツール)タブをクリックします。 8 Configure Ethernet Management Ports(イーサネット管理ポー トの設定)を選択し、Ethernet port(イーサネットポート)メ ニューで Controller 1, Port 1 を選択します。 9 Specify configuration(構成の指定)を選択します。 10 コントローラ
15 次の手順で、仮想ディスクのキャッシュオプションを調整します (下記の各例で、IP アドレス は RAID コントローラ 0 の管理ポートア ドレスです)。 a すべての仮想ディスクのリストを表示します。 SMcli IP アドレス -c "show allVirtualDisks;" b 表示される各仮想ディスク名について、次のコマンドを実行します。 SMcli IP アドレス -c "gset virtualDisk [ 仮想ディスク名 ] mirrorCacheEnabled=true writeCacheEnabled=true readCacheEnabled=true;" 図 2 2 個目の RAID コントローラを追加してアップグレードした MD3000i (拡張構成) 二重構成にアップグレードした MD3000i ストレージアレイ 拡張エンクロージャ(2) メモ:仮想ディスクの負荷分散と iSCSI 構成の完成については、 『MD3000i Resource CD』 に収録されているマニュアルを参照して ください。 ____________________ 本書の内容は予告な
단일 모드에서 이중 모드로 Dell™ PowerVault™ MD3000i 업그레이드 Dell PowerVault MD3000i RAID 인클로저는 이중(듀얼 컨트롤러) 및 단일 (단일 컨트롤러) 구성을 모두 지원합니다. 이중 구성은 RAID 컨트롤러 모듈, 비I/O 구성 요소, 가상 디스크 경로 및 물리 적 디스크 경로 간의 전체 중복을 허용합니다. 단일 구성은 RAID 컨트롤러 모듈 또는 물리적 디스크 경로 간의 중복을 제공하지 않습니다. 그림 1은 구성 종류를 둘 다 보여줍니다. 그림 1. 단일 대 이중 MD3000i RAID 스토리지 배열 ( 확장 ) 단일 MD3000i 스토리지 배열 슬롯 0 슬롯 1 이중 MD3000i 스토리지 배열 슬롯 0 슬롯 1 확장 인클로저 (2) 본 설명서에서는 기존의 스토리지 배열을 오프라인으로 전환하지 않고 스토 리지 배열을 단일 구성에서 이중 구성으로 업그레이드하는 데 사용되는 단 계에 대해 설명하고 있습니다.
단일 구성에 RAID 컨트롤러 모듈 추가 기존의 단일 스토리지 배열을 이중 스토리지 배열로 업그레이드하려면 다음 단계를 수행하십시오. 1 MD 스토리지 관리자를 시작합니다 . 2 업그레이드할 스토리지 배열을 선택하고 Support( 지원 ) 탭을 클릭 합니다 . 3 Download Firmware( 펌웨어 다운로드 ) 를 선택합니다 . • RAID 컨트롤러 모듈 펌웨어와 NVSRAM 을 모두 설치해야 할 경우 Download RAID Controller Module Firmware (RAID 컨트롤러 모 듈 펌웨어 다운로드 ) 를 선택합니다 . Transfer NVSRAM file with RAID controller module firmware (RAID 컨트롤러 모듈 펌웨어로 NVSRAM 파일 송신 ) 상자를 선택하고 Select File( 파일 선택 ) 을 사용하여 support.dell.com 에서 다운로드한 최신 버전의 이중 NVSRAM 펌웨어로 이동합니다 .
6 그림 2 에 표시된 대로 슬롯 1 에 추가한 RAID 컨트롤러 모듈에 확장 인 클로저 ( 있는 경우 ) 를 연결합니다 . 주 : 다음 단계로 진행하기 전에 인클로저 상태 LED 가 청색으로 바뀔 때 까지 기다립니다 . 7 MD 스토리지 관리자에서 Tools(도구) 탭(업그레이드할 스토리지 배열) 을 클릭합니다 . 8 Configure Ethernet Management Ports (Ethernet 관리 포트 구성 ) 을 선택한 다음 Controller 1, Port 1( 컨트롤러 1, 포트 1)(Ethernet port (Ethernet 포트 ) 메뉴에 위치 ) 을 선택합니다 . 9 Specify configuration( 구성 지정 ) 을 선택합니다 . 10 컨트롤러 1, 포트 1 에 대한 IP 주소 , 서브넷 마스크 및 게이트웨이를 설정합니다 . 11 New( 새로 만들기 ) 를 클릭하여 새 스토리지 배열을 추가합니다 .
15 가상 디스크 캐쉬 옵션을 조정합니다(아래의 예에서 IP_address는 RAID 컨트롤러 0 의 관리 포트 주소 ). a 모든 가상 디스크의 목록을 표시합니다 . SMcli IP_address -c "show allVirtualDisks;" b 표시되는 가상 디스크 이름마다 다음 명령을 실행합니다 . SMcli IP_address -c "set virtualDisk[virtual_disk_name] mirrorCacheEnabled=true writeCacheEnabled=true readCacheEnabled=true;" 그림 2. 두 번째 RAID 컨트롤러가 추가되어 새로 업그레이드된 MD3000i( 확장 ) MD3000i 스토리지 배열 ( 이중 구성으로 업그레이드 ) 확장 인클로저 (2) 주 : 가상 디스크 로드 밸런싱 및 iSCSI 구성 완료에 대한 내용은 MD3000i Resource CD 의 설명서를 참조하십시오 .
Actualización de Dell™ PowerVault™ MD3000i del modo símplex al modo dúplex El alojamiento RAID Dell PowerVault MD3000i admite configuraciones dúplex (dos controladoras) y símplex (una controladora). Una configuración dúplex permite la redundancia completa entre módulos de controladora RAID, componentes que no son de E/S, rutas de discos virtuales y rutas de discos físicos. Una configuración símplex no ofrece redundancia entre módulos de controladora RAID o rutas de discos físicos.
Adición de un módulo de controladora RAID a una configuración símplex Para actualizar la matriz de almacenamiento símplex existente a una matriz de almacenamiento dúplex, realice los pasos siguientes: 1 Inicie MD Storage Manager. 2 Seleccione la matriz de almacenamiento que quiere actualizar y haga clic en la ficha Support (Configuración). 3 Seleccione Download Firmware (Descargar firmware).
5 Inserte el segundo módulo de controladora RAID (nuevo o de repuesto) en la ranura vacía (ranura 1) del alojamiento RAID. Para obtener información sobre el procedimiento correcto de inserción y el etiquetado de ranuras, consulte Dell™ PowerVault™ MD 3000i - Manual del propietario del hardware. 6 Conecte los alojamientos de expansión (si los hay) al módulo de controladora RAID que ha añadido en la ranura 1, tal como se muestra en la figura 2.
15 Ajuste las opciones de almacenamiento en caché de los discos virtuales (en los ejemplos siguientes, dirección_IP es la dirección del puerto de administración de la controladora RAID 0): Visualice una lista de todos los discos virtuales: a SMcli IP_dirección -c “show allVirtualDisks;” Para cada nombre de disco virtual mostrado, ejecute el comando siguiente: b SMcli IP_dirección -c “set virtualDisk[nombre_disco_virtual] mirrorCacheEnabled=true writeCacheEnabled=true readCacheEnabled=true;” Figura 2.