
Users Guide
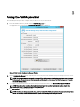
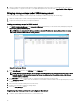
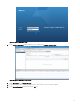
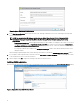
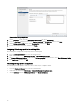
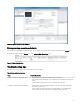


Figure 6. vSphere New Storage Provider Screen
6. In the New Storage Provider window, type the name, URL, and login credentials to the server containing the VASA provider
that you installed earlier.
NOTE: You can paste the URL that you copied when you clicked Copy Provider URL to Clipboard in VASA
Conguration Manager. Ensure that the URL in the New Storage Provider window matches the following
requirements:
• /vasa/services/vasaService must be appended following your port number (for example, if the location of your server
containing the VASA provider is https://kswa-vasa3-prov: 8443, the value in the URL eld must be: https://kswa-
vasa3-prov:8443/vasa/ services/vasaService where https species an SSL connection and 8443 is the default port
number for the VASA provider.
• If you specify a dierent port number in the Conguration Manager window other than the default, ensure to use a
valid port number.
When entering a login ID and password, ensure that they match what you used in the VASA Conguration Manager window.
7. If you require a vendor-signed security certicate, select the Use Vendor Provider Certicate check box and type the location
of the certicate. Else, do not select the check box.
8. When complete, click OK to register the VASA provider with your vCenter Server.
Verifying VASA registration
After successfully registering the VASA provider, your managed storage arrays are displayed in the Storage Provider Details window.
Figure 7. vSphere Web Client VASA Provider Window
12