Dell PowerVault Speicher-Array der MD-Series VMware Storage Replication Adapter (SRA) Version 5.
Anmerkungen, Vorsichtshinweise und Warnungen ANMERKUNG: Eine ANMERKUNG liefert wichtige Informationen, mit denen Sie den Computer besser einsetzen können. VORSICHT: Ein VORSICHTSHINWEIS macht darauf aufmerksam, dass bei Nichtbefolgung von Anweisungen eine Beschädigung der Hardware oder ein Verlust von Daten droht, und zeigt auf, wie derartige Probleme vermieden werden können.
Inhaltsverzeichnis 1 Datenwiederherstellung mit VMware und Dell Speicher-Arrays der MD-Series........... 5 Überblick über SRM..................................................................................................................................................5 SRA – Überblick........................................................................................................................................................6 2 Einrichten Ihrer Umgebung..........................................
5 Testen und Ausführen von Wiederherstellungsplänen......................................................29 Testen von Wiederherstellungsplänen...................................................................................................................29 Ausführen von Wiederherstellungsplänen...................................................................................................... 31 6 Failback-Verfahren......................................................................................
Datenwiederherstellung mit VMware und Dell Speicher-Arrays der MD-Series 1 In der Bemühung um Konsolidierung und eine effizientere Nutzung der Serverressourcen werden mehrere Anwendungen, die früher in einer Umgebung mit dedizierten physischen Servern ausgeführt wurden, in virtuelle Rechner (VMs) oder virtuelle Server in einer VMware ESX-basierten virtuellen Infrastruktur migriert.
Abbildung 1. SRM-Architektur SRA – Überblick Der MD-spezifische Storage Replication Adapter (SRA) interagiert mit SRM bei Erkennungs-, Replizierungs- und ggf. Failover-Vorgängen auf die Speicher-Arrays zwischen Wiederherstellungsstandorten. SRA interagiert außerdem mit den Speicher-Arrays, um Test-Failover-Kapazitäten auf dem SRM bereitzustellen.
Einrichten Ihrer Umgebung 2 Dieser Abschnitt beschreibt die Ersteinrichtungsanforderungen für die Verwendung von VMware vCenter Site Recovery Manager (SRM) und den Speicher-Array-basierten Storage Replication Adapter (SRA) Version 5.1 der Dell MD-Series.
Aktivierung der Remote-Replikation und der Snapshot-Erweiterungsfunktion Für SRA 5.
Unter Verwendung der gleichen Schutzanforderungen zeigt die Abbildung „Replikation mehrerer virtueller Laufwerke“, dass die erstellten mehrfachen virtuellen Laufwerke und nur die virtuellen Laufwerke, die Schutz erfordern, repliziert werden. In der Folge wird das Netzwerk mit weniger Daten belastet, und es wird die Fähigkeit erhöht, ggf. einzelne Failovers von VM1 und VM4 zu kontrollieren. Abbildung 3.
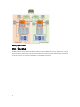
Host-zu-Speicher-Array-Konfiguration Um eine optimale Leistung und ein ordnungsgemäßes Multi-Pathing für die Konfiguration zu gewährleisten, müssen das Switch-Fabric und die iSCSI-Verbindung, die die geschützten und Wiederherstellungs-Host-Standorte mit den SpeicherArrays verbinden, korrekt konfiguriert sein. Das folgende Diagramm zeigt eine Basiskonfiguration, die eine vollständige Redundanz bietet: Abbildung 4.
Einbauen der Komponenten der Wiederherstellungslösung 3 Die in diesem Handbuch beschriebene Wiederherstellungslösung basiert auf dem Konzept eines geschützten Hauptstandorts (Host-Server oder virtueller Rechner), der an einen identisch konfigurierten Wiederherstellungsstandort angeschlossen und bereit ist, dessen Funktion zu übernehmen, wenn er nicht verfügbar ist.
ANMERKUNG: Jede dieser Aufgaben muss sowohl auf dem geschützten als auch auf dem Wiederherstellungsstandort separat ausgeführt werden. 1. Installieren Sie einen unterstützten Datenbank-Server, und konfigurieren Sie die 32-Bit-ODBC-Verbindungen (Open Data Base Connectivity). 2. Installieren Sie vCenter Server 5.0. 3. Installieren Sie vSphere Client 5.0. 4. Installieren Sie SRM 5.0. 5. Installieren Sie das SRM-Plug-in (in vSphere). 6. Installieren Sie SRA 5.1 auf beiden vCenter SRM-Servern. 7.
Installieren von SRM auf dem geschützten und dem Wiederherstellungsstandort Installieren Sie SRM sowohl auf dem geschützten als auch auf dem Wiederherstellungsstandort. Informationen zur Installation finden Sie im VMware Site Recovery Manager 5.0 Administration Guide (VMware Site Recovery Manager 5.0-Administratorhandbuch). Installieren des vCenter SRM-Plug-in 1. Sobald SRM installiert ist, starten Sie vSphere Client, und verbinden Sie sich mit dem installierten vCenter Server. 2.
Herunterladen und Installieren des Storage Replication Adapter der MD-Series SRA ist als selbstextrahierende, selbstinstallierende Datei verfügbar, die Sie über die Seite „Treiber und Download“ auf dell.com/support herunterladen können. So laden Sie SRA herunter: 1. Gehen Sie auf dell.com/support, und wählen Sie den Link Treiber und Download aus. 2. Verwenden Sie den Dell Produktwähler, um Ihr Speicher-Array-Modell der MD-Series zu ermitteln.
Abbildung 6. Anzeigen der services.
Konfigurieren der Wiederherstellungslösung 4 Vergewissern Sie sich vor dem Konfigurieren Ihrer Wiederherstellungslösung, dass die folgenden Komponenten erfolgreich auf dem geschützten Standort und dem Wiederherstellungsstandort installiert wurden: • der unterstützte Datenbank-Server mit 32-Bit-ODBC mit ordnungsgemäßer Konfiguration • vCenter Server 5.0/vSphere Client 5.0 • Site Recovery Manager (SRM) 5.
ANMERKUNG: Im beispielhaften Bildschirm oben zeigt der Fensterbereich „Standorte“ die geschützten (190.160.120.15) und die Wiederherstellungsstandorte (190.160.120.16), die Sie im Rahmen der Installation von vCenter eingerichtet haben. Führen Sie die Schritte im Abschnitt unten erst durch, wenn diese Installationen abgeschlossen sind und in der vSphere-Ansicht angezeigt werden.
• Erstellen eines Wiederherstellungsplans (am Wiederherstellungsstandort) Verbinden von Wiederherstellungs- und geschützten Standorten Gehen Sie wie folgt vor, um den geschützten Standort und den Wiederherstellungsstandort zu verbinden: 1. Starten Sie vSphere Client, und stellen Sie eine Verbindung mit vCenter Server auf dem geschützten Standort her. 2. Starten Sie Site Recovery Manager, indem Sie über die vSphere-Startseite auf das Symbol Standortwiederherstellung klicken. 3.
Abbildung 9. Ansicht der Ressourcenzuordnung Das Fenster mit der Zuordnungsauswahl wird angezeigt. Erweitern Sie die Inventarelemente, und navigieren Sie zur der Ressource auf dem Wiederherstellungsstandort, die Sie der Ressource auf dem geschützten Standort zuordnen möchten. Abbildung 10.
4. Klicken Sie auf OK, um die Zuordnung abzuschließen. 5. Wiederholen Sie ggf. diese Schritte für die Registerkarte Ordnerzuordnungen und die Registerkarte Netzwerkzuordnungen. Nachdem diese Schritte abgeschlossen sind, haben Sie 1-zu-1-Zuordnungen zwischen Sie dem geschützten Standort und dem Wiederherstellungsstandort für die Ressourcen aufgebaut.
Abbildung 12. Platzhalterdatenspeicher 4. Klicken Sie auf OK, um die Auswahl zu schließen.
Abbildung 13. Array-Manager hinzufügen 2. 3. Geben Sie den Anzeigenamen für das Speicher-Array auf dem geschützten Standort an. Klicken Sie anschließend auf Weiter. Im Abschnitt Verbindungsparameter für Speicher-Arrays: a) Geben Sie unter IP Addr 1 die IP-Adresse des RAID-Controllers 0 für das Speicher-Array der MD-Series ein. b) Geben Sie unter IP Addr 2 die IP-Adresse des RAID-Controllers 1 für das Speicher-Array der MD-Series ein. 4.
Abbildung 14. Array-Manager-Parameter 6. Klicken Sie auf Weiter, um die Informationen zu validieren und die Speicher-Arrays zu erkennen. 7. Klicken Sie auf OK, um die Konfiguration des Array-Managers am geschützten Standort abzuschließen. 8. Wiederholen Sie diese Schritte für den Wiederherstellungsstandort. Erneutes Einlesen und Aktivieren von SRAs Sobald die Speicher-Arrays auf dem geschützten Standort und den Standort für die Wiederherstellung ermittelt wurden: 1.
Abbildung 15. Array-Manager – Ansicht 2. Wählen Sie den geschützten Standort aus, und klicken Sie dann auf SRAs erneut scannen. 3. Wählen Sie den Wiederherstellungsstandort aus, und klicken Sie dann auf SRAs erneut scannen. 4. Wählen Sie entweder das geschützte oder das Wiederherstellungs-Laufwerk in der Ansicht Array-Manager aus. 5. Klicken Sie auf die Registerkarte Array-Paare. 6.
Abbildung 16. Erstellen von Schutzgruppen 3. Wählen Sie unter Schutzgruppentyp die Option Array-basierte Replikation (SAN) aus. 4. Wählen Sie einen oder mehrere Datenspeichergruppen aus der Liste aus, und klicken Sie dann auf Weiter. 5. Geben Sie einen Namen und optional eine Beschreibung für die Schutzgruppe ein, und klicken Sie dann auf Weiter. 6. Klicken Sie auf Fertig stellen, um die Schutzgruppe zu erstellen.
Abbildung 17. Erstellen eines Wiederherstellungsplans Abbildung 18.
3. Wählen Sie im Fenster Schutzgruppen auswählen die Schutzgruppen für den Wiederherstellungsplan aus. 4. Klicken Sie auf Weiter. 5. Wählen Sie unter Netzwerkwerke testen ein Netzwerk für den Wiederherstellungsstandort aus, mit dem sich die virtuellen Rechner während der Tests der Wiederherstellungspläne verbinden. 6. Klicken Sie auf Weiter. 7. Geben Sie einen Namen und eine optionale Beschreibung für den Wiederherstellungsplan ein, und klicken Sie dann auf Weiter. 8.
Testen und Ausführen von Wiederherstellungsplänen 5 Testen von Wiederherstellungsplänen Nach der Erstellung eines Wiederherstellungsplans müssen Sie stets durch einen Test sicherstellen, dass er wie vorgesehen funktioniert. 1. Klicken Sie über die Ansicht Wiederherstellungspläne auf die Registerkarte Zusammenfassung. 2. Wählen Sie einen Wiederherstellungsplan im linken Bereich aus, und klicken Sie auf Testen. 3.
Abbildung 21. Fortschritt des Wiederherstellungsplans Sobald die virtuellen Rechner eingeschaltet sind und der Betriebssystemstatus erkannt wurde, wird der Test-FailoverPlan angehalten, und es wird ein gelbes Banner angezeigt. Um die Funktionalität der ausgefallenen virtuellen Rechner zu überprüfen, wählen Sie die Ansicht Host und Cluster aus, indem Sie auf die Tastenkombination Strg+Umschalt-H drücken.
Abbildung 22. Wiederherstellungsplan – Verlaufsanzeige Ausführen von Wiederherstellungsplänen Das Ausführen eines Wiederherstellungsplans funktioniert ähnlich wie das Testen eines Wiederherstellungsplans.
Abbildung 23. Warnung zum Ausführen des Wiederherstellungsplans 3. Wählen Sie unter Wiederherstellungstyp entweder Geplante Migration oder Notfallwiederherstellung aus. ANMERKUNG: Wenn Sie die Option „Notfallwiederherstellung“ auswählen, wird eine Wiederherstellung erzwungen, daher sollte diese Option nur verwendet werden, wenn ein Standort vollständig verloren gegangen ist. Die Option „Geplante Migration“ führt dazu, dass die Wiederherstellung bei Problemen angehalten wird. 4.
Failback-Verfahren 6 Um ein Failback von virtuellen Maschinen vom Wiederherstellungsstandort auf den ursprünglich geschützten Standort durchzuführen, muss das gleiche Verfahren für die Konfiguration von Array-Managers, für Inventarzuordnungen und für das Erstellen von Wiederherstellungsplänen und Schutzgruppen auf dem gegenüberliegenden vCenter Server-Standort durchgeführt werden. 1.
Fehlerbehebung und verschiedene Probleme 7 Dieser Abschnitt enthält allgemeine Informationen zur Fehlerbehebung und beschreibt verschiedene Probleme, die während der Installation auftreten könnten.
Recovery Manager\Logs. Fehler, die von der SRA registriert wurden, sind am Anfang der Zeile mit [# x] gekennzeichnet, wobei x für eine Zahl steht. Abbildung 26. SRM-Protokolldatei Dieser Fehler weist darauf hin, dass ein virtuelles Laufwerk ohne LUN-Nummer vorhanden ist. Weitere Überprüfungen der MDSM zeigen Folgendes: Abbildung 27. MDSM-Zuordnungen – Ansicht Die Ansicht Zuordnungen zeigt eine definierte Host-Gruppe, der virtuelle Laufwerke zugeordnet sind, jedoch keine Hosts.
Referenzinformationen 8 Kontaktaufnahme mit Dell ANMERKUNG: Dell bietet verschiedene Optionen für Online- und Telefonsupport an. Wenn Sie über keine aktive Internetverbindung verfügen, so finden Sie Kontaktinformationen auf der Eingangsrechnung, dem Lieferschein, der Rechnung oder im Dell Produktkatalog. Die Verfügbarkeit ist abhängig von Land und Produkt und einige Dienste sind in Ihrem Gebiet möglicherweise nicht verfügbar.
Benutzerhandbuc h Bietet Informationen zu Systemfunktionen, zur Fehlerbehebung am System und zur Installation oder zum Austausch von Systemkomponenten. Bereitstellungsha ndbuch Liefert Informationen zur Bereitstellung von Speicher-Controllern, Systemanforderungen, der Speicher-Array-Organisation und von Dienstprogrammen.