Dell PowerVault MD Series Speicher-Arrays Speicherreplikationsadapter (SRA) – Handbuch für bewährte Verfahren (Client)
Anmerkungen, Vorsichtshinweise und Warnungen ANMERKUNG: Eine ANMERKUNG liefert wichtige Informationen, mit denen Sie den Computer besser einsetzen können. VORSICHT: Ein VORSICHTSHINWEIS macht darauf aufmerksam, dass bei Nichtbefolgung von Anweisungen eine Beschädigung der Hardware oder ein Verlust von Daten droht, und zeigt auf, wie derartige Probleme vermieden werden können.
Inhaltsverzeichnis 1 Installieren und Konfigurieren von Storage Replication Adapter (SRA) 4 SRA wird heruntergeladen.................................................................................................................... 4 Installationsverfahren............................................................................................................................ 4 Kennwortgeschützte Speicher-Arrays..............................................................................................
Installieren und Konfigurieren von Storage Replication Adapter (SRA) 1 SRA wird heruntergeladen Der Dell SRA der MD-Serie wird in Verbindung mit VMware Site Recovery Manager (SRM) verwendet, um Rechenzentrums-Failover zwischen separaten vCenter Server-Umgebungen zu vereinfachen. Um den SRA zu verwenden, laden Sie die neueste Version des von der Seite Treiber und Downloads unter Dell.com/support herunter.
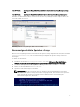
Bei x64-Hosts C:\Program Files (x86)\VMware\VMware vCenter Site Recovery Manager\storage \sra Bei x86-Hosts C:\Program Files\VMware\VMware vCenter Site Recovery Manager\storage\sra Nachdem Sie SRA installiert haben, verwenden Sie Site Recovery Manager auf dem vSphere-Client, um erneut nach SRAs zu suchen. Abbildung 2.
NVSRAM-Einstellungen Für SRM-Failover-Tests müssen die NVSRAM-Standardeinstellungen auf dem MD-Speicher-Array geändert werden. Während eines Test-Failovers werden Snapshots auf dem Speicher-Array am Wiederherstellungsstandort erstellt, der im Anschluss daran der Standard-Host-Gruppe und der ESXoder ESXi-Host-Gruppe zugeordnet wird. Vor dem Abschluss der folgenden Aufgaben müssen die RAID-Controller neu gestartet werden.
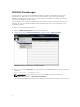
Abbildung 5. Aktuelle NVSRAM-Einstellungen überprüfen 4. Um die NVSRAM-Einstellung für Ihren primären RAID-Controller [0] zu ändern, führen Sie den folgenden Befehl aus. set controller[0] NVSRAMByte[0x3b]=2;HTTP/1 Abbildung 6. NVSRAM-Einstellungen auf dem primären RAID-Controller ändern 5.
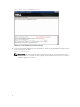
show controller[0] NVSRAMByte[0x3b]; Abbildung 7. Neue NVSRAM-Einstellungen bestätigen 6. Setzen Sie das primäre RAID-Controller-Modul zurück, um die neuen NVSRAM-Einstellungen in den Controller-Speicher zu laden: reset controller[0]; ANMERKUNG: Die Ausführung des Befehls zum Zurücksetzen des Controllers dauert einige Minuten. Führen Sie so lange keine E/A-Vorgänge auf dem RAID-Controller aus, bis der Befehl erfolgreich abgeschlossen wurde.
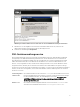
Abbildung 8. Primären RAID-Controller zum Laden der neuen NVSRAM-Einstellungen zurücksetzen 7. Wiederholen Sie die Aufgaben 3 bis 6 auf dem sekundären RAID-Controller, indem Sie im dargestellten Beispiel für die Befehlssyntax [1] durch [0] ersetzen. 8. Schließen Sie das Dialogfeld Skripteditor. SRA-Geräteverwaltungsservice Der Vorgang überwacht und synchronisiert die Kommunikation zwischen dem MD SRA und das MD Storage Arrays.
Ändern der Servereinstellungen in der Datei SraConfigurationData.xml Im Folgenden wird der Teil der Datei SraConfigurationData.xml dargestellt, der für die ServiceKonfiguration relevant ist: localhost 1701 100 Legt fest, auf welchem Host die Win32-Initialisierungsdatei NesSvc ausgeführt wird. Der derzeit einzige unterstützte Wert lautet localhost.
Asynchrone Remote-Replikation 2 Diese Funktion führt eine Remote-Replikation über Point-in-Time (PiT)-Snapshots aus und wird sowohl auf Fibre Channel- als auch auf iSCSI-Speicher-Arrays der MD-Series unterstützt. iSCSI-basierte Remote-Replikation Mit zusätzlicher Unterstützung der Remote-Replikation über das iSCSI-Protokoll können nun größere Replikationsdistanzen überwunden werden.
keine Änderungen innerhalb der Remote-Replikationsgruppe erkannt werden. Wenn jedoch Änderungen erkannt werden, wird eine Synchronisierung angefordert. Als Auswirkung treten möglicherweise ein Ausfall des Prozesses oder ein stark verlangsamter Fortschritt der SRM-Workflows auf.
Abbildung 9. Erweiterte Einstellungen für Site Recovery Manager 2. Klicken Sie auf „Speicher“, und legen Sie die folgenden Werte fest: • storage.commandTimeout = 900 • storageProvider.hostRescanRepeatCnt = 2 • storageProvider.hostRescanTimeoutSec = 900 3. Klicken Sie auf OK, um Ihre Änderungen zu speichern. 4. Klicken Sie auf storageProvider, und legen Sie die folgenden Werte fest: storageProvider.
Dimensionierung des SnapshotRepositorys 3 Eine neue Funktion der Firmware-Version 07.83.xx.xx ist die Möglichkeit, Point-in-Time-Snapshots zu erstellen. Mit dieser Funktion haben Sie die Möglichkeit, Snapshots auf frühere Point-in-TimeSpeicherzustände zurückzurollen und die Datenänderungen zwischen den Snapshot-Abbildern zu optimieren. Diese Funktion nutzt zwei unabhängige Repositorys, um die Verfolgung der Änderungen am Basis-Volume zu vereinfachen.
Abbildung 11. MDSM-Volume-Snapshot-Ansicht Verwendung von Snapshots durch SRA Der MD-Series-SRA nutzt die Point-in-Time-Snapshots, wenn die Funktion auf dem betreffenden Speicher-Array aktiviert ist. Während eines Test-Failovers erstellt der SRA eine Snapshot-Gruppe, ein Snapshot-Abbild und ein Snapshot-Volume auf dem Speicher-Array am Wiederherstellungsstandort für alle Volumes, die in den getesteten Schutzgruppen enthalten sind.
Größe und des Status der Repositorys klicken Sie im linken Fensterbereich auf Alle logischen Objekte. Im Arbeitsbereich wählen Sie aus dem Dropdown-Menü Objekttyp Repositories. Abbildung 12. MDSM-Volume-Snapshot-Ansicht Um den Repository-Speicherplatz, den Modus oder die Zeitstempel anzuzeigen, wählen Sie aus dem Dropdown-Menü Volumes oder Snapshot-Gruppen.
Wie Sie Hilfe bekommen 4 Dokumentationsmatrix Die Dokumentationsmatrix enthält Informationen über Dokumente, in denen Sie Informationen zum Einrichten und Verwalten des Systems finden. Dell Dokumentation • • • • • • Rufen Sie für die Dokumentation von PowerEdge und PowerVault die Seite Dell.com/support auf und geben Sie die Service-Tag-Nummer ein, um Ihre Systemdokumentation zu erhalten. Die Dokumente zur Virtualisierung finden Sie unter Dell.com/virtualizationsolutions.
möglicherweise nicht zur Verfügung. So erreichen Sie den Vertrieb, den Technischen Support und den Kundendienst von Dell: 1. Rufen Sie die Website dell.com/support auf. 2. Wählen Sie Ihre Supportkategorie. 3. Wählen Sie das Land bzw. die Region in der Drop-Down-Liste Land oder Region auswählen am unteren Seitenrand aus. 4. Klicken Sie je nach Bedarf auf den entsprechenden Service- oder Support-Link.