
Deployment Guide
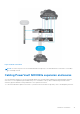
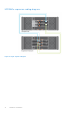
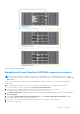

Table Of Contents
- Dell EMC PowerVault MD3860f Series Storage Arrays Deployment Guide
- Introduction
- Hardware installation
- Planning the storage configuration
- Connecting the storage array
- Configuring Fibre Channel with Dell EMC MD Series storage arrays
- Configuring Fibre Channel on SAN attached storage arrays
- Other information you may need
- Installing supported Fibre Channel HBAs
- Using Fibre Channel switch zoning
- Cabling storage array
- SAN-attached cabling
- Cabling PowerVault MD3060e expansion enclosures
- Installing MD Storage Manager
- Post installation tasks
- Uninstalling MD Storage Manager
- Load balancing
- Appendix — Working with SFP modules and fiber optic cables
- Appendix — Hardware cabling best practices
- Getting help

Installing host bus adapters and drivers
1. Install the host bus adapters (HBAs).
2. Connect the cables.
3. Install the HBA drivers and the operating system HBA patches/hotfixes.
4. Ensure that the recommended HBA settings are applied.
Graphical installation (recommended)
The MD Storage Manager configures, manages, and monitors the storage array. To install the MD storage manager:
1. Insert the PowerVault MD Series resource media.
Depending on your operating system, the installer may launch automatically. If the installer does not launch automatically,
navigate to the root directory of the installation media (or downloaded installer image) and run the md_launcher.exe file.
For Linux-based systems, navigate to the root of the resource media and run the autorun file.
NOTE: By default, Red Hat Enterprise Linux mounts the resource media with the –noexec mount option which does
not allow you to run executable files. To change this setting, see the Readme file in the root directory of the installation
media.
2. Select Install MD Storage Software.
3. Read and accept the license agreement.
4. Select one of the following installation options from the Install Set menu:
● Full (recommended) — Installs the MD Storage Manager (client) software, host-based storage agent, multipath driver,
and hardware providers.
● Host Only — Installs the host-based storage agent and multipath drivers. See Installing MD Storage Manager.
● Management — Installs the management software and hardware providers.
● Custom — Allows you to select specific components.
NOTE:
If you install the MD Storage Manager on a management station that is not connected to a network or server,
only the Management Station option is available.
5. Choose whether to start the event monitor service manually or automatically, when the host server reboots.
NOTE: This option is applicable only to Windows client software installation.
6. Confirm the installation location and click Install.
7. If prompted, reboot the host server after the installation completes.
8. Start MD Storage Manager and discover the array(s).
NOTE:
If Dynamic Host Configuration Protocol (DHCP) is not used on the network where the PowerVault MD storage
array’s management ports are connected, it is recommended that you enable IPv6 on the management station to
discover the storage array(s).
NOTE: If automatic discovery does not find the new array, use the manual option and provide the default management
ports IP addresses RAID Controller 0 MGMT (port 0) : 192.168.128.101 or RAID Controller 1 MGMT (port 0):
192.168.128.102 using the same subnet or same VLAN for the MD Storage Manager management station.
9. If applicable, activate any premium features purchased with your storage array. If you purchased premium features, see the
printed activation card shipped with your storage array.
NOTE:
The MD Storage Manager installer automatically installs the required drivers, firmware, and operating system
patches/hotfixes to operate your storage array. These drivers and firmware are also available at dell.com/support. In
addition, see the Support Matrix at dell.com/powervaultmanuals for any additional settings and/or software required
for your specific storage array.
20 Installing MD Storage Manager