Dell EMC PowerVault MD3860f シリーズ スト レージ アレイ 導入ガイド February 2018 Rev.
メモ、注意、警告 メモ: 製品を使いやすくするための重要な情報を説明しています。 注意: ハードウェアの損傷やデータの損失の可能性を示し、その危険を回避するための方法を説明しています。 警告: 物的損害、けが、または死亡の原因となる可能性があることを示しています。 © 2012 - 2018 Dell Inc. またはその子会社。無断転載を禁じます。Dell、EMC、およびその他の商標は、Dell Inc.
目次 章 1: はじめに..................................................................................................................................5 システム要件........................................................................................................................................................................ 5 ストレージアレイについて................................................................................................................................................ 5 関連マニュアル.........................
Linux からの MD Storage Manager のアンインストール............................................................................................25 章 6: Load balancing(負荷バランシング)....................................................................................... 26 負荷分散ポリシー...............................................................................................................................................................26 サブセット付きラウンドロビン...........................................................................
1 はじめに 本ガイドには、Dell EMC PowerVault MD3860f ストレージアレイ導入についての情報が記載されています。導入には以下の手順が含 まれます。 ● ハードウェアの取り付け ● Modular Disk Storage Manager (MD Storage Manager)のインストール ● 初期システム設定 その他、システム要件、ストレージアレイの構成、ユーティリティに関する情報が記載されています。 メモ: 製品マニュアルの詳細については、「関連マニュアル」を参照してください。 管理者は、MD Storage Manager を使用して、ストレージアレイを最も使いやすい状態に設定し、監視することができます。 PowerVault MD シリーズのリソースメディアに含まれる MD Storage Manager のバージョンは、PowerVault MD3860f シリーズとその 他の PowerVault MD シリーズのストレージアレイ両方の管理に使用することができます。MD Storage Manager は、Microsoft Windows および Linux の両オペ
ィスクグループはストレージアレイの未設定容量内に作成されます。仮想ディスクはディスクグループの空き容量内に作成されま す。 未設定容量は、ディスクグループまたは DDP にまだ割り当てられていない物理ディスクで構成されます。未設定の容量を使用して 仮想ディスクを作成すると、ディスクグループが自動的に作成されます。ディスクグループ内の唯一の仮想ディスクが削除される と、そのディスクグループも削除されます。空き容量とは、どの仮想ディスクにも割り当てられていないディスクグループ内の容 量です。 データは、RAID テクノロジを使用してストレージアレイ内の物理ディスクに書き込まれます。RAID レベルは、物理ディスクにデー タが書き込まれる方法を定義します。異なる RAID レベルによって、異なるレベルのアクセス性、冗長性、および容量が提供され ます。お使いのストレージアレイにある各ディスクグループと仮想ディスクには、特定の RAID レベルを設定することができます。 RAID の使用およびストレージソリューション内でのデータ管理の詳細については、Dell.
2 ハードウェアの取り付け 本ガイドを使用する前に、次の手順を確認するようにしてください。 ● 『Dell PowerVault MD3460/MD3860i/MD3860f Storage Arrays Getting Started Guide』(Dell PowerVault MD3460/MD3860i/ MD3860f ストレージアレイ - はじめに) — ストレージアレイに同梱の『Getting Started Guide』(はじめに)には、システムの初 期セットアップの設定に関する情報が記載されています。 ● 『Dell PowerVault MD Series Storage Arrays Administrator's Guide』(Dell PowerVault MD シリーズストレージアレイ管理者ガイド) — 管理者ガイドには、ストレージアレイを設定する前に理解する必要がある重要な概念についての情報が記載されています。 詳細については、dell.
Dell EMC MD シリーズストレージアレイでの Fibre Channel の設定 本項には、ホストサーバーとストレージアレイ間における Fibre Channel 通信の設定についての情報が記載されています。ラック構 成、電源ケーブル配線、および推奨される取り扱い手順などの基本的なセットアップ情報については、Dell.com/powervaultmanuals で、お使いのストレージアレイ向けの『Getting Started Guide』(はじめに)を参照してください。 SAN 接続ストレージアレイでの Fibre Channel の設定 ホストサーバーは、サポートされている Fibre Channel スイッチを使用して、ダイレクトアタッチまたはストレージエリアネットワ ーク(SAN)経由でストレージアレイに接続する必要があります。 メモ: サポートされる Fibre Channel ハードウェアの詳細については、Dell.
お使いのホストサーバーに HBA がすでに取り付けられている場合は、『Dell EMC PowerVault MD Series Support Matrix』(Dell EMC PowerVault MD シリーズサポートマトリクス)でその HBA がサポートされていることを確認してください。HBA がリストされてい ない場合は、ストレージアレイへの接続には使用しないでください。 注意: サポートされていないホストサーバー HBA にストレージアレイを接続したり、適切ではない HBA ドライバまたはファー ムウェアをインストールすると、データへのアクセスが不安定になったり、アクセスできなくなる原因になる場合があります。 ホストサーバーへの Fibre Channel HBA の取り付け ホストサーバーへの HBA の物理的な取り付けと、サポートされるドライバおよびファームウェアのロードの手順は、HBA ハードウ ェアに付属のマニュアルを参照してください。 メモ: 取り付け中には、製造元固有のタイムアウトおよび / またはノード時間の値を入力する必要があります。お使いの HBA に関する情報は、Dell.
図 1.
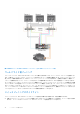
● WWN ポートゾーニングが推奨されます。ハードゾーニングもサポートされますが、LUN マスキングは WWN 識別子を使用しま す。WWN ポートとハードゾーニングされたポートは、同じゾーンに混在させることができます。 ● マルチポート HBA がサポートされています。マルチポート HBA 内の各ポートは、1 つのイニシエータを表します。各イニシエー タは単一の論理スイッチゾーンに接続される必要があります。 ● 単一の物理ホストサーバーから単一の RAID コントローラに対して確立できるパス(ポート対ポートセグメント)は 4 つまでで す。 ● 1 つのゾーンは複数のターゲットを含み、複数のストレージアレイにわたって存在できます(単一のイニシエータが複数のターゲ ットをポイントできます)。 メモ: トラブルシューティングを簡易化するため、ゾーンに単一のイニシエータと単一のターゲットを割り当てることができ ます。 ● リモートレプリケーションプレミアム機能がアクティブ化されている場合、各レプリケーションポートに個別のゾーンが必要で す。リモートレプリケーションに関連するデータトラフィックのみがそのゾーンを通過
図 2. 複数パスを使用してストレージアレイに接続されている 3 台の SAN 接続ホストサーバー 表 1.
表 1.
表 2.
図 4.
MD3060e 拡張のケーブル配線図 図 5.
図 6. デュアル拡張のダイアグラム 新しい PowerVault MD3060e 拡張エンクロージャでの拡張 メモ: MD3060e 拡張エンクロージャのホットプラグは推奨されません。アレイエンクロージャの電源を入れる前に、すべての MD3060e 拡張エンクロージャに電源を入れてください。PowerVault MD シリーズに役立つビデオ、およびその他リソースにつ いては、dell.com/PVresources を参照してください。 新しい PowerVault MD3060e 拡張エンクロージャを PowerVault MD3860f シリーズストレージアレイに接続するには、次の手順を実 行してください。 1. 拡張エンクロージャを追加する前に、ストレージアレイソフトウェアがインストールされ、最新バージョンであることを確認し ます。 詳細については、dell.com/powervaultmanuals の『Support Matrix』(サポートマトリクス)を参照してください。 2.
5. ストレージアレイに対するすべての I/O 処理を停止し、ストレージアレイに接続されている対象となるホストシステムの電源を 切ります。 6. ストレージアレイの電源を切ります。 7. 影響を受けるシステム内にある拡張エンクロージャの電源を切ります。 8. 拡張エンクロージャをストレージアレイにケーブルで接続します。正しいケーブル配線図については、本ガイド前半にある 「PowerVault MD3060e 拡張エンクロージャのケーブル配線」の項を参照してください。 9. 拡張エンクロージャの電源を入れ、エンクロージャのステータス LED が青色になるまで待ちます。 10. ストレージアレイの電源を入れ、ステータス LED が装置の準備ができたことを示すまで待ちます。 ● 電源が入っている場合は、電源インジケータライトが緑色に点灯します。 ● サービスアクション必須インジケータライトが橙色に点灯した場合、PowerVault Modular Disk Storage Manager を使用してエ ラーを表示することができます。 11.
3 MD Storage Manager のインストール Dell PowerVault MD シリーズのリソースメディアには、Linux および Microsoft Windows 両方のオペレーティングシステムのソフトウ ェアとドライバが含まれています。 メディアのルートには、ソフトウェアへの変更、アップデート、修正、パッチ、および Linux と Windows オペレーティングシステ ムの両方に適用されるその他の重要なデータが説明されている readme.txt ファイルが含まれています。readme.
ホストバスアダプタおよびドライバのインストール 1. ホストバスアダプタ(HBA)のインストール 2. ケーブルを接続します。 3. HBA ドライバ、およびオペレーティングシステムの HBA パッチ / ホットフィックスをインストールします。 4. 推奨 HBA 設定が適用されていることを確認してください。 グラフィカルインストール(推奨) MD Storage Manager で、ストレージアレイを設定、管理、監視します。MD Storage Manager をインストールするには、次の手順に 従います。 1. PowerVault MD シリーズリソースメディアを挿入します。 オペレーティングシステムによって異なりますが、インストーラは自動的に起動することがあります。インストーラが自動的に 起動しない場合は、インストールメディアのルートディレクトリ(またはダウンロードしたインストーライメージ)に移動し、 md_launcher.
コンソールインストール メモ: コンソールインストールは、グラフィカル環境を実行していない Linux システムにのみ適用されます。 リソースメディアのルートにある autorun スクリプトは、グラフィカル環境が実行されていない場合にこれを検知し、インストーラ をテキストベースモードで自動的に開始します。このモードでは、グラフィカルインストールと同じオプションが選択できます。 サイレントインストール Windows でのサイレントインストール Windows システムでサイレントインストールを実行するには、次の手順に従います。 1. インストールメディアまたはイメージの windows フォルダにある custom_silent.properties ファイルを、ホストサーバー上の 書き込み可能な場所にコピーします。 2. custom_silent.properties ファイルを修正し、使用する機能、モデル、およびインストールのオプションを反映した後、ファイ ルを保存します。 3. custom_silent.
4 インストール後のタスク Dell PowerVault ストレージアレイを初めて使用する際には、次の順序で初期設定を行います。この作業には、MD Storage Manager を使用します。 1. 帯域外管理には、IP アドレス、サブネットワークマスク(サブネットマスク)、およびゲートウェイを含め、各 RAID コントロー ラモジュールにつきネットワーク構成を設定する必要があります。 メモ: DHCP サーバーを使用してネットワーク構成を設定できます。 2.
初期セットアップタスク 1. 検出された最初のストレージアレイの名前が、EMW の デバイス タブに表示されます。 ローカルネットワーク上で検出されたすべてのストレージアレイのリストを表示するには、EMW の デバイス タブにある 検出済 みストレージアレイ を展開します。 2. 新しく取り付けられた PowerVault MD3860f シリーズストレージアレイのデフォルト名は、名前なし となっています。MD Storage Manager に別の名前が表示された場合は、名前の横にある下矢印ボタンをクリックして、ドロップダウンリストから 名 前なし をクリックし、アレイの名前を変更します。 3. 検出されたアレイをダブルクリックしてアレイの管理ウィンドウを開き、アレイの設定を変更します。 4. 初期セットアップタスクの実行 をクリックして、残っているインストール後のタスクの概要とリンクを確認します。 アレイを設定する準備が整いました。Dell.
5 MD Storage Manager のアンインストール トピック: • • • • Windows からの MD Storage Manager のアンインストール Windows Server GUI バージョンからの MD Storage Manager のアンインストール Windows Server Core バージョンからの MD Storage Manager のアンインストール Linux からの MD Storage Manager のアンインストール Windows からの MD Storage Manager のアンインストー ル Microsoft Windows Server から Modular Disk Storage Manager をアンインストールするには、次の手順を実行します。 1. コントロールパネル から プログラムの追加または削除 をダブルクリックします。 2. プログラムの一覧から Dell MD Storage ソフトウェア を選択します。 3. 変更と削除 をクリックします。 アンインストール完了 ウィンドウが表示されます。 4.
3. アンインストール ウィンドウで 次へ をクリックし、画面の指示に従います。 4. はい を選択してシステムを再起動し、完了 をクリックします。 Linux からの MD Storage Manager のアンインストール デフォルトでは、PowerVault MD Storage Manager は、/opt/dell/mdstoragemanager ディレクトリにインストールされていま す。インストール中に別のディレクトリを使用した場合は、そのディレクトリに移動してからアンインストールを開始します。 1. インストールディレクトリから、Dell MD Storage ソフトウェアのアンインストール ディレクトリを開きます。 2. Uninstall Dell MD Storage Software.exe ファイルを実行します。 3. アンインストール ウィンドウで 次へ をクリックし、画面の指示に従います。 ソフトウェアのアンインストール中に、アンインストール ウィンドウが表示されます。アンインストール作業が完了すると、ア ンインストール完了 ウィンドウが表示されます。 4.
6 Load balancing(負荷バランシング) トピック: • • • 負荷分散ポリシー Linux での負荷バランスポリシーの設定 VMware での負荷バランスポリシーの設定 負荷分散ポリシー マルチパスドライバは、特定の RAID コントローラモジュール経由の仮想ディスクへの I/O パスを選択します。処理する新たな I/O をマルチパスドライバが受信すると、ドライバは、仮想ディスクを所有する現在の RAID コントローラモジュールへのパスを見つけ ようとします。仮想ディスクを所有する現在の RAID コントローラモジュールへのパスを見つけられない場合、マルチパスドライバ は、仮想ディスクの所有権を 2 番目の RAID コントローラモジュールへ移行させます。仮想ディクスを所有する RAID コントローラ モジュールへのパスが複数ある場合は、負荷分散ポリシーを選択して、どのパスが I/O をプロセスするかを決定することができま す。複数の負荷分散ポリシー設定用オプションにより、混在ホストインタフェースの設定時における I/O パフォーマンスの最適化が 可能になります。 メモ: 負荷バランスポリ
Linux での負荷バランスポリシーの設定 Linux では、ラウンドロビンベースの負荷バランシングのみサポートされています。詳細については、 サブセット付きラウンドロビ ン 、p.
7 付録 - SFP モジュールおよび光ファイバケーブ ルでの作業 各ストレージコントローラには、最大 4 つの FC ホストポートがあります。ホストポートをホストまたはスイッチに接続するのに SFP(Small-Form-Factor Pluggable)モジュールが使用されています。SFP モジュールをポートに挿入し、その後、光ファイバケーブ ルを SFP モジュールに挿入します。光ファイバケーブルのもう一端は、ホストの FC HBA かスイッチのいずれかの光学インタフェ ースコネクタに接続します。SFP モジュールはレーザー製品です。 メモ: データ処理環境では、クラス 1 以上の出力レベルのレーザー製品を有するシステムリンクで送信する機材が許可されてい ます。開いているケースや光ファイバケーブルの端をのぞいたりしないでください。 トピック: • • SFP モジュールの使用ガイドライン 光ファイバケーブルの使用ガイドライン SFP モジュールの使用ガイドライン ストレージアレイには、SFP モジュールが必要です。SFP モジュールは、電子信号を、RAID コントローラモジュールへの FC 送信に
図 7. SFP モジュールの取り付けと取り外し 1. FC 入力スロット(4) 3. 光ファイバケーブル 2. SFP+ トランシーバ 4. ゲート SFP モジュールの取り外し SFP モジュールを取り外すには、次の手順を実行します。 1. SFP モジュールから FC ケーブルを取り外します。「ファイバチャネルケーブルの取り外し」を参照してください。 メモ: ケーブルまたは SFP モジュールの損傷を避けるため、SFP モジュールを取り外す前に FC ケーブルを外します。 2. SFP モジュールのラッチのロックを解除します。ワイヤタブが付いている SFP モジュールの場合は、ワイヤラッチを外側に引 いて SFP モジュールのロックを解除します。 3. SFP モジュールのラッチを解除した状態で、SFP モジュールを取り出します。ワイヤタブ付きの SFP モジュールでは、ワイヤラ ッチをつかんで、SFP モジュールをポートから引き抜きます。 4. SFP モジュールとホストポートに保護キャップを取り付けます。 5.
「 Guidelines For Using Fibre Optic Cables」(光ファイバケーブルの使用ガイドライン)を参照してから、FC ケーブルを取り付けてく ださい。 FC ケーブルを取り付けるには、次の手順を実行してください。 1. 該当する場合、SFP モジュールから保護キャップを取り外し、将来使用するために保管しておきます。 2. ケーブルの一端から、2 つの保護キャップを取り外し、将来使用するために保管しておきます。 3. ストレージアレイに取り付けられている SFP モジュールにケーブルを挿入します。ケーブルコネクタには、正しく取り付けられ るように溝が付いています。コネクタを持って、所定の位置にカチッと収まるまでケーブルを押し込んでください。 4. もう一方のケーブル末端から、2 つの保護キャップを取り外し、将来使用するために保管しておきます。 5.
8 付録 - ハードウェア配線のベストプラクティス トピック: • • • • 静電気に敏感な部品の取り扱い リモートレプリケーションのためのホスト配線 性能を高める配線 ケーブルのラベル付け 静電気に敏感な部品の取り扱い 静電気によって、メモリーモジュール、システムボード、その他の静電気に敏感な部品を損傷することがあります。部品への損傷を 防ぐために、以下の注意に従ってください。 すべての部品を静電気防止梱包材に移して保管します。 部品を静電気防止パッケージから取り出す前に、それらの部品をアースされた表面に置きます。 アースされた表面には、静電気消散マットまたはアースされた作業台が含まれます。 適切にアースをしてから、静電気に敏感な部品を扱うようにします。身体をアースするには、アース用のリストストラップやブ ーツストラップを着用します。 ● 部品を扱うときは、端をつかむようにして、はんだ接合部や、ピン、プリントされている回路を触らないようにします。 ● 導電性のフィールド交換用工具を使用します。 ● ● ● ● リモートレプリケーションのためのホスト配線 リモートレプリケーションのプレミアム機能によ
コンポーネントに不具合が発生した場合、ケーブルを切断し、不具合のあるコンポーネントを交換してから、ケーブルを再度接続し ます。ケーブルに詳細なラベル付けをすることによって、コンポーネントの交換作業がより簡単になります。 既存の構成に新しい拡張エンクロージャを追加する場合、ケーブルに正しくラベル付けをすると、新しいエンクロージャの取り付け 場所の識別に役立ちます。 32 付録 - ハードウェア配線のベストプラクティス
9 困ったときは トピック: • • デルへのお問い合わせ Dell EMC システムサービスタグの位置 デルへのお問い合わせ デルでは、オンラインまたは電話によるサポートとサービスのオプションを複数提供しています。アクティブなインターネット接続 がない場合は、ご購入時の納品書、出荷伝票、請求書、またはデル製品カタログで連絡先をご確認いただけます。これらのサービ スは国および製品によって異なり、お住まいの地域では一部のサービスがご利用いただけない場合があります。デルのセールス、 テクニカルサポート、またはカスタマーサービスへは、次の手順でお問い合わせいただけます。 1. Dell.com/support にアクセスしてください。 2. お住まいの国を、ページ右下隅のドロップダウンメニューから選択します。 3. カスタマイズされたサポートを利用するには、次の手順に従います。 a. Enter your Service Tag(サービスタグの入力)フィールドに、お使いのシステムのサービスタグを入力します。 b.