Dell FluidFS NAS Solutions NX3600/NX3610 배포 안내서
주, 주의 및 경고 노트: "주"는 컴퓨터를 보다 효율적으로 사용하는 데 도움을 주는 중요 정보를 제공합니다. 주의: "주의"는 하드웨어 손상이나 데이터 손실의 가능성을 설명하며, 이러한 문제를 방지할 수 있는 방법을 알려줍니다. 경고: "경고"는 재산상의 피해나 심각한 부상 또는 사망을 유발할 수 있는 위험이 있음을 알려줍니다. © 2013 Dell Inc. 본 설명서에 사용된 상표인 Dell™, Dell 로고, Dell Boomi™, Dell Precision™, OptiPlex™, Latitude™, PowerEdge™, PowerVault™, PowerConnect™, OpenManage,™ EqualLogic™, Compellent™, KACE™, FlexAddress™, Force10™ 및 Vostro™는 Dell Inc.의 상표입니 다.
목차 주, 주의 및 경고............................................................................................................................2 장 1: PowerVault NX3600/NX3610 NAS 어플라이언스 개요................................................5 지원되는 하드웨어.................................................................................................................................................5 지원되는 소프트웨어..................................................................................................................
호스트 그룹에 가상 디스크 추가........................................................................................................................27 NAS Manager 웹 인터페이스 액세스..................................................................................................................28 장 5: NAS Manager 구성 마법사 실행...................................................................................29 DNS 구성.................................................................................................................
1 PowerVault NX3600/NX3610 NAS 어플라이언스 개요 PowerVault MD32x0i 및 MD36x0i iSCSI 배포와 함께 작동하는 Dell PowerVault NX3600 및 NX3610 NAS 어플라이언스 는 블록 및 파일 데이터에 대한 액세스 권한과 함께 통합 스토리지 솔루션을 제공하는 데 도움이 됩니다. PowerVault NX3600 시리즈는 Dell FluidFS(Fluid File System)를 사용하여 SAN 또는 응용 프로그램 중단 시간 없이 성 능과 용량을 확장할 수 있습니다. 지원되는 하드웨어 다음 하드웨어 필수 조건은 솔루션 배포에 필요합니다. • 케이블 연결 – 1Gb 의 경우 Cat 5E 이상, 10Gb 의 경우 Cat 6A 이상 • 관리 스테이션 – 랩톱 또는 워크스테이션 표 1.
소유자 매뉴얼 시스템 기능에 대한 정보를 제공하고 시스템 문제 해결 방법 및 시스템 구성 요소 설치 또는 교체 방법을 설명합니다. 관리자 안내서 시스템의 구성 및 관리에 관한 정보를 제공합니다. CLI 참조 안내서 내보내기, 공유, 볼륨 및 계정 같은 NAS 클러스터 솔루션 엔터티를 보고, 편집하고, 추가 하고, 삭제하고, 활성화하고, 비활성화하고, 설정하기 위한 명령 집합에 대한 정보를 제 공합니다. 시스템 플레이 스매트 하드웨어를 설정하고 Dell FluidFS NAS 솔루션에 소프트웨어를 설치하는 방법에 대한 정 보를 제공합니다. 리소스 미디어 운영 체제, 시스템 관리 소프트웨어, 시스템 업데이트 및 시스템과 함께 구입한 시스템 구성 요소와 관련된 설명서 및 도구를 비롯하여 시스템을 구성 및 관리하는 데 필요한 설 명서 및 도구를 제공하는 모든 미디어가 시스템과 함께 제공됩니다.
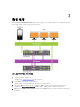
2 환경 설정 다음은 PowerVault NX3600/NX3610 NAS 어플라이언스를 설정하는 데 필요한 단계입니다. 각 단계에 대한 자세한 내용은 아래 절차에 언급된 관련 섹션을 참조하십시오. 그림 1 . NAS 어플라이언스 – 하드웨어 개요 1. 스위치 토폴로지를 선택합니다. 자세한 내용은 스위치 토폴로지 선택을 참조하십시오. 2. 랙에서 NAS 컨트롤러를 설정을 완료합니다. 자세한 내용은 시스템과 함께 제공되는 랙 설치 문서를 참조하십시오. 3. 필요한 경우 MD 스토리지 어레이 설정을 완료하고 NAS 컨트롤러에 스토리지 어레이를 연결합니다. 자세한 내용은 dell.com/support/manuals 의 MD 스토리지 어레이별 배포 안내서를 참조하십시오. 4. NAS 컨트롤러와 MD 스토리지 어레이를 관리 스테이션, SAN 네트워크 및 클라이언트 네트워크에 케이블로 연결합니다.
5. 관리 스테이션을 NAS 컨트롤러의 클라이언트 연결과 같은 스위치에 연결합니다. 특정 토폴로지를 케이블로 연결하는 방법에 대한 자세한 내용은 케이블 연결 개요을 참조하십시오. 6. PowerVault FluidFS NAS 설치 워크시트를 완료합니다. 자세한 내용은 PowerVault FluidFS NAS 설치 워크시트을 참조하십시오. 7. 관리 스테이션의 구성을 완료합니다. 자세한 내용은 관리 스테이션 준비을 참조하십시오. 8. IPv6 이 활성화되어 있는 관리 스테이션에서 NAS IDU 를 설치하고 실행합니다. 자세한 내용은 PowerVault NAS IDU 실행을 참조하십시오. 9. MDSM 을 사용하여 MD 스토리지 어레이를 설정합니다. 자세한 내용은 MD 스토리지 솔루션 설치을 참조하십시오. 10. NAS Manager 구성 마법사를 실행합니다. 자세한 내용은 NAS Manager 구성 마법사을 참조하십시오.
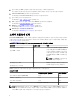
케이블 연결 개요 다음 그림은 전용 SAN – HA(고가용성) 솔루션을 케이블로 연결하는 방법에 대한 개요를 제공합니다. 비 HA 토폴 로지 중 하나를 선택한 경우 스위치 A 및 B 사이를 분할하는 대신 케이블이 단일 스위치 A 로 이동합니다. 예를 들어, 2 개의 클라이언트 스위치를 사용하지 않는 경우 모든 클라이언트 연결 케이블이 클라이언트 스위치 A 로 이동합니다. 사용 가능한 다른 토폴로지에 대한 케이블 연결 그림은 문서 뒤쪽에 자세히 나와 있습니다. 그림 2 .
그림 3 . PowerVault MD 네트워크 연결 전용 SAN 고가용성(권장) LAN 또는 HA 용 중복 스위치가 있는 클라이언트 트래픽에서 SAN 트래픽을 분리하는 것이 좋습니다. 모든 클라 이언트 케이블이 중복 클라이언트 스위치 사이에서 분할되며, SAN/내부 네트워크 케이블이 중복 SAN 스위치 사 이에서 분할됩니다. MD 컨트롤러 관리 포트는 중복 클라이언트 스위치 사이에서 분할됩니다. 노트: 모든 HA 구성에서 SAN 스위치를 스태킹, 지연(링크 집계) 또는 트렁킹해야 합니다.
그림 4 . 고가용성 옵션의 전용 SAN 솔루션 노트: MD32x0i 스토리지 배열에는 각 컨트롤러에 4 개의 iSCSI 데이터 포트를 가지고 있습니다. FluidFS NAS 시스템과 동일한 서브넷에 포트 2 및 3 을 구성하지 마십시오. 포트를 다른 클라이언트용으로 동일한 스위 치에 연결할 수 있지만 다른 서브넷에 구성되어야 합니다. 노트: NAS 컨트롤러 및 MD 시스템을 케이블로 연결하는 방법에 대한 자세한 내용은 케이블 연결 개요을 참 조하십시오. 비중복 옵션의 전용 SAN 솔루션 비중복 옵션의 전용 SAN 솔루션은 중복 스위치 없이 클라이언트 트래픽에서 SAN 트래픽을 분리합니다. 모든 클 라이언트 케이블은 클라이언트 스위치에 연결되고 SAN/내부 네트워크 케이블은 SAN 스위치에 연결됩니다. 주의: 이 구성에서는 스위치가 단일 실패 지점이 됩니다. 노트: 가상 LAN 을 사용하여 SAN 과 클라이언트 서브넷을 분리하는 것이 좋습니다.
그림 5 . 비중복 옵션의 전용 SAN 솔루션 노트: NAS 컨트롤러 및 MD 시스템을 케이블로 연결하는 방법에 대한 자세한 내용은 케이블 연결 개요을 참 조하십시오. 일체형 고가용성 옵션 일체형 고가용성 옵션에서 중복 스위치는 스태킹되며 SAN/내부 및 클라이언트 네트워크 트래픽을 모두 호스팅 합니다. SAN/내부 및 클라이언트 케이블은 중복 스위치 사이에서 분할됩니다. 노트: 가상 LAN 을 사용하여 SAN 과 클라이언트 서브넷을 분리하는 것이 좋습니다. 노트: 스위치는 스태킹, 지연(링크 집게) 또는 트렁킹됩니다.
그림 6 . 일체형 고가용성 옵션 노트: NAS 컨트롤러 및 MD 시스템을 케이블로 연결하는 방법에 대한 자세한 내용은 케이블 연결 개요을 참 조하십시오. 일체형 비중복 옵션 일체형 비중복성 옵션에서 SAN/내부 및 클라이언트 케이블은 동일한 스위치에 연결됩니다. 주의: 이 구성에서는 스위치가 단일 실패 지점입니다. 노트: 가상 LAN 을 사용하여 SAN 과 클라이언트 서브넷을 분리하는 것이 좋습니다.
그림 7 . 일체형 비중복 옵션 노트: NAS 컨트롤러 및 MD 시스템을 케이블로 연결하는 방법에 대한 자세한 내용은 케이블 연결 개요을 참 조하십시오. 관리 스테이션 준비 관리 스테이션은 NAS 클러스터 솔루션을 관리 및 구성하는 데 필요합니다. NAS 클러스터 솔루션은 CLI 또는 Dell PowerVault NAS Manager 를 사용해 액세스할 수 있습니다. 노트: CLI 또는 NAS Manager 에 로그온할 수 있습니다. CLI 및 NAS Manager 에 동시에 로그인하려 시도하지 않는 것이 좋습니다. 관리 스테이션에 대한 최소 요구 사항은 다음과 같습니다. • IPv6 이 활성화되어 있어야 합니다. • NAS IDU(초기 배포 유틸리티)가 설치되어 있어야 합니다. 노트: 최신 버전의 Dell NAS IDU 는 dell.com/support 에서 다운로드하고 설치할 수 있습니다.
NAS IDU 실행 3 Dell NAS IDU(초기 배포 유틸리티)는 네트워크 구성을 설정하고 컨트롤러를 연결하는 단계를 안내합니다. 또한 PowerVault MD32x0i/MD36x0i 스토리지 어플라이언스에 시스템을 연결하는 과정을 시작합니다. NAS IDU 를 실행하기 전에 다음을 확인하십시오. • 이 유틸리티를 실행하기 전에 PowerVault FluidFS NAS 설치 워크시트를 작성하여 컨트롤러에 대한 네트 워크 구성과 IP 주소를 확인합니다. 자세한 내용은 PowerVault FluidFS NAS 설치 워크시트을 참조하십시 오. • NAS IDU 는 IPv6 이 활성화되어 있는 관리 스테이션에서 설치 및 실행됩니다. 유틸리티는 링크-로컬 IPv6 주소를 통해 컨트롤러를 구성하고 컨트롤러에 연결합니다. 초기 설치와 구성이 완료된 후에는 클라이언 트 네트워크에서 IPv6 을 비활성화할 수 있습니다. 노트: SAN/내부 스위치에서 IPv6 을 활성화된 상태로 유지해야 합니다.
NAS Initial Deployment Utility Screen(NAS 초기 배포 유틸리티 화면)이 표시됩니다. 2. Next(다음)를 클릭합니다. NAS Discovery(NAS 검색) 화면이 표시됩니다. – 모든 구성되지 않은 NAS 어플라이언스가 NAS Discovery(NAS 검색) 화면에 표시됩니다. 알맞은 NAS 어플라이언스 모델을 선택하고 8 단계로 갑니다. 3. – 구성되지 않은 NAS 컨트롤러가 자동으로 검색되지 않으면 3 단계로 갑니다. NAS Discovery(NAS 검색) 화면에서, Next(다음)를 클릭합니다. 4. 모니터와 키보드를 구성되지 않은 컨트롤러에 연결합니다. MAC Controller Discovery(MAC 컨트롤러 검색) 화면이 표시됩니다. Controller MAC Address(컨트롤러 MAC 주소)가 모니터에 표시됩니다. 5.
15. 비어 있는 경우 Controllers(컨트롤러), IPMI 및 Subnet Mask(서브넷 마스크)의 IP 주소를 입력합니다. 16. Next(다음)를 클릭합니다. Internal interconnect network(내부 상호 연결 네트워크) 화면이 표시됩니다. 17. 비어 있는 경우 Controllers(컨트롤러), Winbind 및 Subnet Mask(서브넷 마스크)의 IP 주소를 입력합니다. NAS iSCSI network(NAS iSCSI 네트워크) 화면이 표시됩니다. 18. 다음에 대한 IP 주소를 입력합니다. – SAN 네트워크 A – SAN 네트워크 B – 서브넷 마스크 SAN 네트워크 A 및 B 의 경우 첫 번째 IP 주소를 입력하고 SAN 네트워크 IP 주소를 입력하면 IP Range for Controllers(컨트롤러에 대한 IP 범위)가 업데이트됩니다. 19.
MD 스토리지 솔루션 설치 4 이 섹션의 지침을 따르기 전에 사용하려는 토폴로지에 맞게 PowerVault MD32x0i/MD36x0i 스토리지 어레이의 초 기 구성(iSCSI 이름 지정, 할당 및 관리 포트 IP)을 검색하고 완료했는지 확인합니다. 이 섹션에서는 NAS 클러스터 솔루션에 필요한 호스트 그룹과 가상 디스크를 구성하기 위한 단계를 제공합니다. 가상 디스크 생성과 같은 작업과 관련한 추가 정보는 PowerVault MDSM(Modular Disk Storage Manager) 도움말 또 는 dell.com/support/manuals 의 Dell PowerVault MD32x0i/MD36x0i 소유자 매뉴얼을 참조하십시오. 주의: PowerVault MD(모듈식 디스크) 스토리지 어레이를 정확하게 준비하는 것은 NAS 솔루션을 성공적으 로 구성하는 데 있어 중요합니다.
노트: NX3600 은 구성된 4 개의 포트 중 2 개에 연결됩니다. MD 스토리지 어레이에서 점보 프레임 활성화 MD 스토리지 어레이의 모든 iSCSI 포트에서 점보 프레임을 활성화하려면 다음 단계를 따르십시오. 1. PowerVault MDSM 에서 Hardware(하드웨어) 탭을 선택합니다. 2. 관련 컨트롤러를 마우스 오른쪽 단추로 클릭합니다. 3. Configure iSCSI Ports → (iSCSI 포트 구성)를 선택합니다. Configure iSCSI Ports(iSCSI 포트 구성) 화면이 표시됩니다. 4. Advanced Port Settings(고급 포트 설정)를 클릭합니다. Advanced Port Settings(고급 포트 설정) 화면이 표시됩니다. 5. Enable jumbo frames(점보 프레임 활성화)를 선택합니다. 6. MTU 크기에 9000 을 입력합니다. 7. MD 스토리지 어레이의 각 iSCSI 포트에 대해 점보 프레임을 활성화합니다.
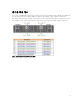
충분한 시간이 있는 이상 핫 스페어와 함께 읽기 및 쓰기 요청을 실행할 수 없게 되기 전 에 3 개의 동시 디스크 드라이브 오류가 발생할 수 있습니다. 하나의 디스크 그룹(RAID 1/10), 하나의 핫 스페어 공백 이 옵션은 2 개의 가상 디스크와 하나의 핫 스페어가 있는 하나의 RAID 1/10 디스크 그룹 으로 구성됩니다. 단일 RAID 1/10 디스크 그룹은 11 개의 2TB 하드 드라이브로 이루어져 있습니다. RAID 1/10 에서 사용 가능한 용량이 디스크 그룹에 있는 실제 디스크의 반이므 로 가상 디스크에 사용할 수 있는 총 공간은 10TB 입니다. NAS 클러스터에는 크기가 같은 가상 디스크의 쌍이 필요합니다. 따라서 디스크 그룹은 2 개의 5TB 가상 디스크로 분리되 어 사용 가능한 모든 공간을 동일하게 활용합니다. 이제 10TB 의 공간을 NAS 클러스터를 위해 할당할 수 있습니다.
높은 가용성 RAID 5 디스크 그룹은 단일 디스크 오류가 발생한 후에 모든 가상 디스크에 대한 읽기 및 쓰기 요청을 계속해서 실행할 수 있습니다. 오류 사이에서 재구성할 수 있는 충분한 시간 이 있는 이상 핫 스페어와 함께 읽기 및 쓰기 요청을 실행할 수 없게 되기 전에 3 개의 디 스크 드라이브 오류가 발생할 수 있습니다. 2 개의 디스크 그룹(RAID 6), 0 개의 핫 스페어 공백 이 옵션은 각 그룹에 하나의 가상 디스크가 있고 핫 스페어가 없는 2 개의 RAID 6 디스크 그룹으로 구성됩니다. 각 RAID 6 디스크 그룹은 6 개의 2TB 하드 드라이브로 이루어져 있 습니다. RAID 6 에서 2 개의 하드 디스크가 패리티를 위해 할당되므로 각 디스크 그룹에 서 사용할 수 있는 공간은 8TB 입니다. NAS 클러스터에는 크기가 같은 가상 디스크의 쌍 이 필요합니다. 따라서 각 디스크는 하나의 8TB 가상 디스크로 분리되어 해당 디스크 그 룹에서 사용할 수 있는 모든 공간을 활용합니다.
하나의 디스크 그룹(RAID 5), 하나의 핫 스페어 주의: 실제 디스크의 큰 용량과 개수로 인해 이 옵션에 대한 제한은 재구성 시간입니다. 2 개의 디스크가 동 시에 실패하면 데이터 손실이 발생할 수 있습니다. 공백 이 옵션은 2 개의 가상 디스크와 하나의 핫 스페어가 있는 하나의 RAID 5 디스크 그룹으 로 구성됩니다. 디스크 그룹은 총 크기가 20TB 인 11 개의 2TB 실제 디스크로 이루어져 있 습니다. NAS 클러스터에는 크기가 같은 가상 디스크의 쌍이 필요합니다. 따라서 디스크 그룹은 2 개의 10TB 가상 디스크로 분리되어 디스크 그룹에서 사용할 수 있는 모든 공간 을 동일하게 활용합니다. 20TB 의 공간을 NAS 클러스터에 할당할 수 있습니다. 높은 가용성 RAID 5 디스크 그룹은 단일 디스크 오류가 발생한 후에 모든 가상 디스크에 대한 읽기 및 쓰기 요청을 계속해서 실행할 수 있습니다.
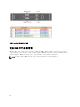
전 10.80.x6.47 에 있는 Physical(실제) 탭에서 동일한 실제 디스크 유형의 할당되지 않은 실제 디스크 를 하나 이상 선택하거나 할당되지 않은 실제 디스크를 마우스 오른쪽 단추로 클릭하고 팝업 메뉴에 서 Create Disk Group(디스크 그룹 생성)을 선택합니다. Introduction(Create Disk Group)(소개(디스크 그룹 생성)) 창이 표시됩니다. 4. Introduction(Create Disk Group)(소개(디스크 그룹 생성)) 창에서 Next(다음)를 클릭합니다. Disk Group Name & Physical Disk Selection(디스크 그룹 이름 및 물리 디스크 선택) 창이 표시됩니다. 5. Disk Group Name(디스크 그룹 이름)에 디스크 그룹의 이름을 입력합니다. 디스크 그룹과 디스크 그룹 이름의 번호를 기준으로 추가된 NAS 클러스터의 이름을 사용하는 것이 좋습니 다. 예를 들면 NX3600-Disk-Group-0 과 같습니다.
6. Physical Disk selection(물리 디스크 선택)에서 Manual(수동)을 선택하고 Next(다음)를 클릭합니다. RAID Level and Capacity(RAID 레벨 및 용량) 화면이 표시됩니다. 7. RAID Level and Capacity(RAID 레벨 및 용량) 창의 RAID level(RAID 레벨) 목록에서 해당 RAID 레벨을 선택합니 다. RAID 레벨 1/10, 5 또는 6 을 선택할 수 있습니다. 선택한 RAID 레벨에 따라 선택한 RAID 레벨에 대해 사용할 수 있는 물리 디스크가 Unselected Physical Disks(선택하지 않은 물리 디스크) 표에 표시됩니다. 8. Unselected Physical Disks(선택하지 않은 물리 디스크) 표에서 관련 디스크 그룹 용량을 선택하고 Add(추가) 를 클릭합니다.
버전 10.84.x6.25 이상의 경우 PowerVault MDSM 버전 10.84.x6.25 이상을 사용하여 가상 디스크를 생성하려면 다음 단계를 따르십시오. 1. PowerVault MDSM 을 시작합니다. 2. Logical(논리) 탭의 생성한 디스크 그룹에서 Free Capacity(사용 가능한 용량)를 마우스 오른쪽 단추로 클릭하 고 Create Virtual Disk(가상 디스크 생성)를 선택합니다. Create Virtual Disk: Specify Parameters(가상 디스크 생성: 매개 변수 지정) 화면이 표시됩니다. 3. New virtual disk capacity(새 가상 디스크 용량) 창에 가상 디스크의 크기를 입력합니다. Introduction(Create Disk Group)(도입 (디스크 그룹 생성)) 화면이 표시됩니다. 노트: 가상 디스크의 크기는 사용 가능한 용량과 같거나 이보다 작아야 합니다. 4.
6. OK(확인)를 클릭합니다. 매핑이 저장됩니다. Mappings(매핑) 탭에서 Topology(토폴로지) 창 및 Defined Mappings(정의된 매핑) 창이 매 핑을 반영할 수 있도록 업데이트됩니다. 호스트 생성 호스트 그룹에서 호스트를 생성하려면 다음 단계를 따르십시오. 1. PowerVault MDSM 에서 생성한 호스트 그룹을 마우스 오른쪽 단추로 클릭합니다. 2. Define → Host(호스트 정의)를 클릭합니다. Specify Host Name(Define Host)(호스트 이름 지정(호스트 정의)) 화면이 표시됩니다. 3. Host name(호스트 이름)에 새 호스트의 이름을 입력합니다. 4. Next(다음)를 클릭합니다. Specify Host Port Identifiers(Define Host)(호스트 포트 식별자 지정(호스트 정의)) 화면이 표시됩니다. 5.
8. Virtual Disk(가상 디스크) 목록에서 두 번째 가상 디스크를 선택합니다. 9. Add(추가)를 클릭합니다. 두 번째 가상 디스크가 추가되고 Logical unit number(LUN)(0–255)(논리 단위 번호(LUN)(0-255))) 목록이 채워집 니다. 10. Close(닫기)를 클릭합니다. NAS Manager 웹 인터페이스 액세스 NAS Manager 웹 인터페이스에 액세스하려면 다음 단계를 따르십시오. 1. 인터넷 브라우저의 NAS IDU 에서 지정한 NAS 관리 VIP 주소를 입력합니다. 노트: PowerVault NAS 클러스터 솔루션을 설치하거나 시스템을 업그레이드한 후에 Security Alert(보안 경고) 창이 표시됩니다. Yes(예)를 클릭하면 현재 세션이 활성화됩니다. View Certificate(인증서 보기)를 클릭하면 향후 모든 세션이 활성화됩니다. Security Alert(보안 경고) 창이 표시됩니다. 2.
NAS Manager 구성 마법사 실행 5 NAS Manager 구성 마법사는 PowerVault NAS 클러스터 솔루션 구성을 완료하고 환경에 솔루션을 통합하는 마지 막 단계입니다. 파일 시스템을 포맷하고 시작하는 것 외에도 DNS, 시간 관리, 사용자 식별, 인증 매개 변수 및 모 니터링 옵션을 설정할 수 있습니다. 탐색 창에서 다른 페이지를 선택해 언제든지 마법사에서 나갈 수 있습니다. 탐색 창에서 구성 마법사의 모든 페 이지에 액세스할 수도 있습니다. 따라서 탐색 창에서 해당 페이지에 액세스하면 전체 마법사를 실행할 필요 없 이 시스템의 구성 매개 변수를 직접 수정할 수 있습니다. 노트: NAS IDU 에서 Finish(마침)를 클릭하면 NAS Manager 에서 Start Configuration Wizard(구성 시작 마법사) 가 자동으로 열립니다. DNS 구성 DNS 를 구성하려면 다음 단계를 따르십시오. 1. PowerVault NAS Manager 를 시작합니다. 2.
SMTP 구성 노트: 클러스터 솔루션에 문제가 발생할 경우 전자 메일 경고를 위해 SMTP 서버를 구성하는 것이 좋습니 다. SMTP 를 구성하려면 다음 단계를 따르십시오. 1. Configuration Wizard(E-mail Configuration) step 3 of 14(구성 마법사(전자 메일 구성) 3/14 단계) 화면에서 Add SMTP server(SMTP 서버 추가)를 클릭합니다. Configuration Wizard(Add SMTP server) step 3 of 14(구성 마법사(SMTP 서버 추가) 3/14 단계)가 표시됩니다. 2. Mail server or relay(메일 서버 또는 릴레이)에서 SMTP 서버 주소를 추가합니다. 3. Description(설명)에 SMTP 서버에 대한 설명을 입력하고 Save Changes(변경 사항 저장)를 클릭합니다. 노트: SMTP 서버에서 인증이 필요한 경우 사용자 이름 및 암호를 입력해 SMTP 서버에 액세스합니다.
NAS 클러스터에 할당된 LUN 의 총 크기와 개수에 따라 이 단계를 완료하는 데 몇 분 정도 걸릴 수 있습니다. 파일 시스템이 포맷되었음을 확인하는 메시지가 표시됩니다. 3. Next(다음)를 클릭합니다. Configuration Wizard(System Stop/Start) step 6 of 14(구성 마법사(시스템 중지/시작) 6/14 단계) 화면이 표시됩 니다. 현재 파일 시스템을 시작하도록 선택하거나 이 단계를 건너뛰고 나중에 시작하도록 선택할 수 있습니다. 파 일과 공유를 지원하기 위해서는 파일 시스템을 시작해야 합니다. 4. 파일 시스템을 시작하려면 Next(다음)를 클릭합니다. Configuration Wizard(Change Passwords) step 7 of 14(구성 마법사(암호 변경) 7/14 단계) 화면이 표시됩니다. 관리 암호 생성 및 변경 기본적으로 로컬 CIFS 관리자 암호는 무작위로 추출되며 미리 설정해야만 CIFS 공유를 관리할 수 있습니다.
1. Configuration Wizard(CIFS Protocol Configuration) step 9 of 14(구성 마법사(CIFS 프로토콜 구성) 9/14 단계) 화면 에서 Allow clients to access files via the CIFS protocol(CIFS 프로토콜을 통해 클라이언트가 파일에 액세스할 수 있도록 허용)을 활성화하고 System description(시스템 설명)에 해당되는 설명을 입력합니다. 2. Authentic users' identity via Active Directory and local users database(Active Directory 및 로컬 사용자 데이터베 이스를 통해 사용자의 ID 인증)를 선택하여 Active Directory 보안 모드를 구성합니다.
a) b) c) d) e) f) 3. NAS 볼륨 NAS 볼륨 할당 공간 사용된 공간이 한도에 도달할 경우 경고 관리자에게 이메일 이벤트 보내기 액세스 시간 세분성 파일 액세스 보안 스타일 Save Changes(변경 사항 저장)를 클릭합니다. 새 NAS 볼륨이 추가됩니다. 노트: 이 절차를 반복해 더 많은 NAS 볼륨을 정의합니다. 4. Next(다음)를 클릭합니다. Configuration Wizard(Add CIFS Shares) step 13 of 14 (구성 마법사(CIFS 공유 추가) 13/14 단계) 화면이 표시됩니 다. CIFS 공유 생성 CIFS 공유를 생성하려면 다음 단계를 따르십시오. 1. Configuration Wizard (Add CIFS Shares) step 13 of 14(구성 마법사(CIFS 공유 추가) 13/14 단계) 화면의 NAS Volume(NAS 볼륨) 목록에서 CIFS 공유를 추가할 볼륨을 선택합니다. 2.
6. – 특정 넷그룹의 모든 클라이언트 컴퓨터 Save Changes(변경 사항 저장)를 클릭합니다. 기존 NFS 내보내기가 있는 Configuration Wizard(NFS export) step 14 of 14(구성 마법사(NFS 내보내기) 14/14 단 계) 화면이 표시됩니다. 7. 더 많은 NFS 내보내기를 추가하려면 Add(추가)를 클릭하고 이 절차를 반복합니다. 8. Next(다음)를 클릭합니다. 시스템 Configuration Wizard(구성 마법사)가 완료됩니다. 추가 클라이언트 VIP 구성 노트: 클라이언트가 FluidFS 클러스터로 이동하도록 라우팅된 경우 포트마다 하나의 클라이언트 VIP 가 필 요합니다. 각 어플라이언스에는 최대 4 개의 VIP 가 포함될 수 있습니다. 클라이언트 네트워크가 FluidFS 클 러스터로 이동하도록 라우팅되지 않은 경우에는 하나의 클라이언트 VIP 만 필요합니다. 추가 클라이언트 VIP 를 구성하려면 다음 단계를 따르십시오. 1.
PowerVault FluidFS NAS 설치 워크시트 6 PowerVault FluidFS NAS 의 레이아웃을 기록하려면 워크시트를 작성하십시오. NAS IDU 에서 네트워크 구성 단계 를 수행하는 동안에 이 워크시트를 사용하십시오.
기본 클라이언트 네트워크 컨트롤러 0, 관리 IP: 컨트롤러 1, 관리 IP: 상호 연결(사설) 네트워크 개인 등급 C 서브넷 선택 ○ 10.255.254.x ○ 172.31.254.x ○ 192.168.254.x ○___.___.___.
7 지원 받기 Dell 사에 문의하기 노트: Dell 은 다양한 온라인 및 전화 기반 지원과 서비스 옵션을 제공합니다. 인터넷에 연결되어 있지 않은 경우 구매 송장, 포장 명세서, 청구서 또는 Dell 제품 카탈로그에서 연락처 정보를 확인할 수 있습니다. 가용 성은 국가 및 제품에 따라 다르며, 해당 지역에서 일부 서비스를 이용하지 못할 수도 있습니다. 판매, 기술 지원 또는 고객 서비스 문제에 대해 Dell 에 문의하려면 다음을 수행하십시오. 1. dell.com/contactdell 로 이동합니다. 2. 대화형 세계 지도에서 해당 국가 또는 지역을 선택합니다. 3. 선택한 국가 아래에서 적절한 언어를 선택합니다. 4. 사업 부문을 선택합니다. 지역을 선택하면 선택한 지역에 해당하는 국가가 표시됩니다. 선택한 사업 부문에 대한 기본 지원 페이지가 표시됩니다. 5. 필요에 따라 적절한 옵션을 선택합니다.