
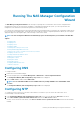
Deployment Guide
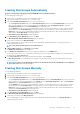


Creating and Changing Admin Passwords
By default, the Local CIFS Administrator password is randomized and needs to be set before CIFS shares can be managed. It is highly
recommended that you change the local admin password.
NOTE: To change the admin password or the CIFS Administrator password, you must enter the default admin password.
The default admin password is Stor@ge!.
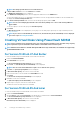
In the
Configuration Wizard (Change Passwords) step 7 of 14, click Next. The Configuration Wizard (System Identity) step 8
of 14 screen is displayed.
Joining The File System To A Windows Active
Directory Domain
To join the file system to a Windows Active Directory domain, enter a cluster name. If the cluster is a member of a Microsoft windows
network, enter a NetBIOS name and the domain it belongs to.
1. In the Configuration Wizard (System Identity) step 8 of 14 screen, select The system is a member in a Microsoft Windows
network to connect the file system to a Windows active directory.
2. Enter appropriate values for the following:
a) System NetBIOS name
b) Domain
c) User name
d) Password
NOTE:
The credentials you enter for User name and Password must have domain administrator rights to join the
domain.
3. Click Next.
The following message is displayed: Saving changes will cause CIFS clients to be disconnected. Do you wish to continue?
4. Click OK.
The Configuration Wizard (CIFS Protocol Configuration) step 9 of 14 screen is displayed.
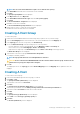
Configuring The CIFS Protocol
If you want to create CIFS shares, the Allow CIFS Access check box must be checked. To prevent CIFS access, the check box must be
unchecked. Enter a system description; this is the name that is displayed in windows explorer title:
1. In the Configuration Wizard (CIFS Protocol Configuration) step 9 of 14 screen, enable Allow clients to access files via the
CIFS protocol and enter an appropriate description in System description.
2. Select Authentic users' identity via Active Directory and local users database to configure the Active Directory security mode.
If Active Directory authentication is not needed, select Authenticate users' identity via local users database.
3. Click Next.
The Configuration Wizard (Identity Management Database) step 10 of 14 screen is displayed.
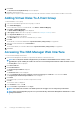
Providing UNIX Identity Database Values
The NAS solution supports NIS and LDAP for UNIX user identity management. To provide UNIX identity database values:
1. In the Configuration Wizard (Identity Management Database) step 10 of 14 screen, select the appropriate UNIX identity
database. If NIS and LDAP are not used in the environment, select Users are not defined in an external user database.
2. Click Next.
The Configuration Wizard (Cross-protocol User Mapping) step 11 of 14 screen is displayed.
Mapping Users Automatically
To automatically map users in Active Directory to users in the UNIX user repository:
Running The NAS Manager Configuration Wizard
27