
Deployment Guide

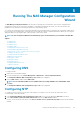


Running The NAS Manager Configuration
Wizard
The NAS Manager Configuration Wizard is the final step in completing the PowerVault NAS cluster solution configuration and
integrating the solution into the environment. In addition to formatting and starting the file system, you can set up the DNS, time
management, user identification, authentication parameters, and monitoring options.
You can leave the wizard at any time by selecting another page from the navigation pane. Every page in the configuration wizard can also
be accessed from the navigation pane. This means that you can modify the system's configuration parameters directly, by accessing the
appropriate page from the navigation pane, without having to run the entire wizard.
NOTE:
The Start Configuration Wizard in the NAS Manager opens automatically when you click Finish in the NAS IDU.
Topics:
• Configuring DNS
• Configuring NTP
• Configuring SMTP
• Configuring SNMP
• Formatting And Starting The File System
• Creating and Changing Admin Passwords
• Joining The File System To A Windows Active Directory Domain
• Configuring The CIFS Protocol
• Providing UNIX Identity Database Values
• Mapping Users Automatically
• Creating NAS Volumes
• Creating CIFS Shares
• Creating NFS Exports
• Configuring Additional Client VIPs
• Troubleshooting LUNs
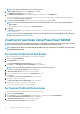
Configuring DNS
To configure the DNS:
1. Launch the PowerVault NAS Manager.
2. From the navigation pane, select Cluster Management > Maintenance > Start Configuration Wizard.
The Configuration Wizard (DNS Configuration) step 1 of 14 screen is displayed.
3. Enter the DNS server IP address and the DNS suffix.
NOTE:
You can add additional DNS servers and DNS suffixes by clicking Add DNS server and Add DNS suffix.
4. Click Next.
The Configuration Wizard (Time Configuration) step 2 of 14 screen is displayed.
Configuring NTP
To configure NTP enter a time zone for the NAS solution and choose whether to sync the cluster time with an NTP server
(recommended) or enter time manually.
1. In the Configuration Wizard (Time Configuration) step 2 of 14 screen, select the appropriate Time zone from the list.
2. Select Time should be synchronized with an NTP server and enter the NTP server IP address.
If no NTP servers exist in the environment, select There is no NTP server to synchronize time with and enter the time and date
manually.
5
Running The NAS Manager Configuration Wizard 25