Dell FluidFS NAS Solutions NX3600 / NX3610 導入ガイド
メモ、注意、警告 メモ: コンピュータを使いやすくするための重要な情報を説明しています。 注意: ハードウェアの損傷やデータの損失の可能性を示し、その問題を回避するための方法を説明しています。 メモ: 物的損害、けが、または死亡の原因となる可能性があることを示しています。 © 2013 Dell Inc. 本書に使用されている商標:Dell™、Dell のロゴ、Dell Boomi™、Dell Precision™、OptiPlex™、Latitude™、PowerEdge™、PowerVault™、 PowerConnect™、OpenManage™、EqualLogic™、Compellent™、KACE™、FlexAddress™、Force10™ および Vostro™ は Dell Inc. の商標 です。Intel®、Pentium®、Xeon®、Core® および Celeron® は米国およびその他の国における Intel Corporation の登録商標です。AMD® は Advanced Micro Devices, Inc.
目次 1 PowerVault NX3600/NX3610 NAS アプライアンス概要.....................................................................5 対応ハードウェア.................................................................................................................................................................5 対応ソフトウェア................................................................................................................................................................ 5 その他の情報..................................................
ユーザーの自動マッピング...............................................................................................................................................29 NAS ボリュームの作成......................................................................................................................................................29 CIFS 共有の作成.................................................................................................................................................................30 NFS エクスポートの作成..
1 PowerVault NX3600/NX3610 NAS アプライア ンス概要 PowerVault MD32x0i および MD36x0i iSCSI 展開と連携する Dell PowerVault NX3600 および NX3610 NAS アプライアンスは、ブロッ クおよびファイルデータへのアクセスを持つ統合ソリューションを提供します。PowerVault NX3600 シリーズは、SAN またはアプ リケーションのダウンタイムを生じることなくパフォーマンスと容量両方の拡張を可能にするために、Dell Fluid File System (FluidFS)を使用します。 トピック: 対応ハードウェア 対応ソフトウェア その他の情報 • • • 対応ハードウェア お使いのソリューションの展開には、次のハードウェア前提条件が必要です。 • • ケーブル – 1 Gb 用には Cat 5E またはそれ以上、10 Gb には Cat 6A またはそれ以上。 管理ステーション – ノートブックまたはワークステーション。 表 1.
『Administrator’s システムの設定および管理についての情報を提供します。 Guide』(管理者ガイ ド) 『CLI Reference NAS クラスタソリューションエンティティ(エクスポート、共有、ボリューム、およびアカウントなど)を Guide』(CLI リファ 表示、編集、追加、削除、有効化、無効化、および設定するためのコマンド一式に関する情報を提供しま レンスガイド) す。 『System お使いの Dell FluidFS NAS ソリューションにおけるハードウェアのセットアップ、およびソフトウェアのイン Placemat』(システ ストール方法についての情報を提供します。 ムプレースマット) 『Resource Media』 システムに付属のメディアには、OS、システム管理ソフトウェア、システムアップデート、およびシステム (リソースメディ と同時に購入されたシステムコンポーネントに関するものを含め、システムの設定と管理用のマニュアルと ア) ツールが収録されています。 6 PowerVault NX3600/NX3610 NAS アプライアンス概要
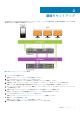
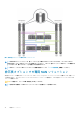
2 環境のセットアップ 次の手順は PowerVault NX3600/NX3610 NAS アプライアンスのセットアップに必要な手順です。各手順の詳細については、下記手 順に挙げられている関連する項を参照してください。 図 1. NAS アプライアンス – ハードウェア概要 1. スイッチトポロジを選択します。 詳細については、「スイッチトポロジの選択」を参照してください。 2. ラック内での NAS コントローラのセットアップを完了します。 詳細については、お使いのシステムに同梱のラック取り付けマニュアルを参照してください。 3. 必要に応じて MD ストレージアレイのセットアップを完了し、ストレージアレイを NAS コントローラに接続します。 詳細については、dell.com/support/manuals でその MD ストレージアレイ特有の展開ガイドを参照してください。 4. NAS コントローラと MD ストレージアレイの、管理ステーション、SAN ネットワーク、およびクライアントネットワークとのケ ーブル配線を完了します。 5.
詳細については、「PowerVault NAS IDU の実行」を参照してください。 9. MDSM を使用して MD ストレージアレイをセットアップします。 詳細については、「MD ストレージソリューションのセットアップ」を参照してください。 10. NAS Manager 設定ウィザードを実行します。 詳細については、「NAS Manager 設定ウィザード」を参照してください。 トピック: • • • • • • • スイッチトポロジの選択 ケーブル配線概要 専用 SAN 高可用性(推奨) 非冗長オプションでの専用 SAN ソリューション オールインワン高可用性オプション オールインワン非冗長オプション 管理ステーションの準備 スイッチトポロジの選択 PowerVault NX3600/NX3610 は複数のスイッチトポロジをサポートしています。お使いの環境に最も適したトポロジを選択し、そ のトポロジに応じてソリューションのケーブル配線を行ってください。各トポロジのケーブル要件の詳細については、「ケーブル配 線概要」を参照してください。 表 2.
例えば、2 つのクライアントスイッチを使用しない場合、すべてのクライアント接続ケーブルはクライアントスイッチ A に配線さ れます。使用可能なその他のトポロジ用のケーブル配線図は、本マニュアルで後ほど詳しく説明します。 図 2. NX3600/NX3610 コントローラネットワーク接続 図 3.
図 4.
図 5.
図 6.
図 7. オールインワン非冗長オプション メモ: NAS コントローラと MD システムのケーブル配線の詳細については、「ケーブル配線概要」を参照してください。 管理ステーションの準備 管理ステーションには NAS クラスタソリューションの管理および設定が必要です。CLI または Dell PowerVault NAS Manager のい ずれかを使用して NAS クラスタソリューションにアクセスすることができます。 メモ: CLI または NAS Manager のいずれかにログオンすることが可能です。推奨事項として、CLI および NAS Manager の両 方に同時にログオンしないようにしてください。 管理ステーションの最小要件は、次のとおりです。 • • IPv6 が有効化されていること。 NAS Initial Deployment Utility (IDU)(NAS 初期導入ユーティリティ)がインストールされていること。 メモ: 最新バージョンの Dell NAS IDU は dell.
3 NAS IDU の実行 Dell NAS Initial Deployment Utility(IDU)は、ネットワーク構成をセットアップして、コントローラをペアにするために必要な手 順をガイドします。また、システムと PowerVault MD32x0i/MD36x0i ストレージアプライアンスをペアリングするプロセスも開始 します。 NAS IDU を実行する前に、次を確認してください。 • • このユーティリティを実行する前に、ネットワーク構成とお使いのコントローラの IP アドレス割り当てを決定するための、 PowerVault FluidFS NAS セットアップワークシートへの記入が終わっていること。詳細については、「PowerVault FluidFS NAS セ ットアップワークシート」を参照してください。 IPv6 が有効化された管理ステーションに NAS IDU がインストールされており、実行されていること。このユーティリティはリン クローカル IPv6 アドレスを介してお使いのコントローラに接続し、設定を行います。IPv6 は、初期インストールと設定完了後 にクライアントネットワ
• • NAS Discovery(NAS 検出) 画面にすべての未設定の NAS アプライアンスが表示されます。 適切な NAS アプライアンス モデルを選択して、手順 8 に進みます。 未設定の NAS コントローラが自動的に検出されない場合は、手順 3 に進みます。 3. NAS Discovery(NAS 検出) 画面で Next(次へ) をクリックします。 MAC Controller Discovery(MAC コントローラ検出) 画面が表示されます。 4. モニタおよびキーボードを未設定のコントローラに接続します。 モニタに Controller MAC Address(コントローラ MAC アドレス)が表示されます。 5. MAC Controller Discovery(MAC コントローラ検出) 画面の MAC Address(MAC アドレス) に、未設定の NAS コントロー ラに接続されたモニタに表示される MAC アドレスを入力します。 6. Connect(接続) をクリックして、コントローラとの接続をテストします。 7.
20. Network MTU(ネットワーク MTU) リストから、適切な MTU を選択します。 メモ: このツールは 1500 MTU も許可しますが、SAN ネットワークには 9000 MTU が必要です。SAN で MTU 1500 が設定 されていない場合、NAS は 15% のパケット損失を報告します。 21. Next(次へ) をクリックします。 iSCSI Target Discovery(iSCSI ターゲットの検出) 画面が表示されます。 22. iSCSI Discovery Address for MD Array(MD アレイの iSCSI 検出アドレス)で、iSCSI ターゲット用に PowerVault MD アレイの iSCSI ポート IP アドレスのいずれかを入力します。 メモ: NX3610 は 2 台の MD ストレージアレイをサポートします。NAS IDU のバージョン 01.01.02.016 では、2 番目のアレ イが NX3610 クラスタに接続されていない場合、単一のストレージアレイの IP アドレスを 2 度入力してください。 23.
4 MD ストレージソリューションのセットアップ 本項の手順を行う前に、使用するトポロジに応じて PowerVault MD32x0i/MD36x0i ストレージアレイが検出されており、初期設定 (命名、iSCSI の割り当て、管理ポート IP の設定)が完了していることを確認してください。 本項は、NAS クラスタソリューションに必要なホストグループおよび仮想ディスクを設定するための手順を説明します。仮想ディ スクの作成などのタスクについて追加情報は、dell.
MD トポロジ お使いの PowerVault MD32x0i アレイは、2 台のコントローラに渡って 8 個の iSCSI ポートを備えています。MD32x0i アレイは、お 使いのソリューション向けに NAS およびブロックの両方に対応するよう設定することができます。MD32x0i コントローラには 4 個の iSCSI データポートがあります。ポートの設定時には次にご留意ください。 • • 4 個の iSCSI ホストポートそれぞれが、異なる個別のサブネットを使用するように設定されている必要があります。 4 個の iSCSI ホストポートのうちの 2 個は、他のホストによる追加のブロックレベルの iSCSI アクセス用に使用することができ ます。 メモ: NX3600 は、設定された 4 個のポートのうち 2 個に接続します。 MD ストレージアレイでのジャンボフレームの有効化 MD ストレージアレイ上のすべての iSCSI ポートでジャンボフレームを有効化するには、次の手順を実行します。 1. PowerVault MDSM で、Hardware(ハードウェア)タブを選択します。 2.
高可用性 RAID 6 ディスクグループは、2 台のディスクに障害が同時発生した後も、すべての仮想ディスクに対して引 き続き読み取りおよび書き込み要求を実行することができます。障害発生の間にホットスペアで再構築を 行うための十分な時間がある限り、読み取りおよび書き取り要求を実行できなくなるまでに、3 台のディス クドライブの同時障害に耐えることが可能です。 ディスクグループ(RAID 1/10)×1、ホットスペア ×1 容量 このオプションは、2 つの仮想ディスクと単一のホットスペアを持つひとつの RAID 1/10 ディスクグループで 構成されます。単一の RAID 1/10 ディスクグループは、11 台の 2 TB ハードドライブで成り立っています。 RAID 1/10 では、ディスクグループ内にある物理ディスクの半分が使用可能容量であるため、仮想ディスクに 使用できる容量の合計は 10 TB になります。NAS クラスタには、同じサイズの仮想ディスクのペアが必要で す。従って、ディスクグループは使用可能容量すべてを均等に活用する 2 つの 5 TB 仮想ディスクに分割さ れます。NAS クラスタに
高可用性 RAID 5 ディスクグループは、単一のディスクに障害が発生した後も、すべての仮想ディスクに対して引き続 き読み取りおよび書き込み要求を実行することができます。障害発生の間にホットスペアで再構築を行う ための十分な時間がある限り、読み取りおよび書き取り要求を実行できなくなるまでに、3 台のディスクド ライブ障害に耐えることが可能です。 ディスクグループ(RAID 6)×2、ホットスペアなし 容量 このオプションは、それぞれに単一の仮想ディスクを持つ 2 つの RAID 6 ディスクグループで構成され、ホッ トスペアはありません。各 RAID 6 ディスクグループは、6 台の 2 TB ハードドライブで成り立っています。 RAID 6 では、パリティ用に 2 台のハードディスクが割り当てられるため、各ディスクグループ内の使用可能 容量は 8 TB です。NAS クラスタには、同じサイズの仮想ディスクのペアが必要です。従って、各ディスク グループは、ディスクグループ内の使用可能容量すべてを活用する単一の 8 TB 仮想ディスクに分割されま す。NAS クラスタに割り当てるための容量は 16 TB
高可用性 RAID 5 ディスクグループは、単一のディスクに障害が発生した後も、すべての仮想ディスクに対して引き続 き読み取りおよび書き込み要求を実行することができます。障害発生の間にホットスペアで再構築を行う ための十分な時間がある限り、読み取りおよび書き取り要求を実行できなくなるまでに、2 台のディスクド ライブ障害に耐えることが可能です。 ディスクグループの作成 ディスクグループは、PowerVault MDSM を使用して自動または手動のいずれかで作成することができます。 ディスクグループの自動作成 メモ: 次の手順は PowerVault MDSM バージョン 10.84.x6.25 以降に適用されます。 ディスクグループを自動作成するには、次の手順を実行します。 1. 管理ステーションで PowerVault MDSM ソフトウェアを起動します。 2. お使いの NAS ストレージに使用する MD ストレージアレイを選択します。 3.
8. Select Capacity(容量の選択)表で、希望のディスクグループ容量を選択し、Finish(終了)をクリックします。 Disk Group Created(作成されたディスクグループ) 画面が表示されます。ディスクグループを 2 つ使用する場合は、手順を 繰り返して「仮想ディスクの作成」に進みます。 メモ: Disk Group Created(作成されたディスクグループ)画面で Yes(はい)を選択すると、Introduction(Create Disk Group)(はじめに(ディスクグループの作成) )画面が表示されます。「仮想ディスクの作成」の手順 4 に進みます。 ディスクグループの手動作成 ディスクグループを手動で作成するには、次の手順を実行します。 1. 管理ステーションで PowerVault MDSM ソフトウェアを起動します。 2. お使いの NAS ストレージに使用する MD ストレージアレイを選択します。 3.
バージョン 10.80.x6.47 およびそれ以前のバージョン向け PowerVault MDSM バージョン 10.80.x6.47 およびそれ以前のバージョンで仮想ディスクを作成するには、次の手順を実行します。 1. PowerVault MDSM を起動します。 2. トップメニューで Virtual Disk(仮想ディスク)をクリックします。 Create Virtual Disk: Specify Parameters(仮想ディスクの作成:パラメータの指定)画面が表示されます。 3. Create(作成)をクリックします。Introduction(Create Virtual Disk) (はじめに(仮想ディスクの作成))画面が表示されま す。 メモ: 仮想ディスクのサイズは、空き容量と同等かまたはそれ以下である必要があります。 4. Next(次へ)をクリックします。Specify Capacity/Name(容量 / 名前の指定)画面が表示されます。 5. New virtual disk capacity(新規仮想ディスクの容量)で、仮想ディスクのサイズを入力します。 6.
• • • PowerVault MDSM のバージョン 10.80.x6.47 では Mappings(マッピング) > Define(定義) > Host Group(ホストグルー プ)タブと選択します。 現在のバージョンでは Host Mappings(ホストマッピング) > Define(定義) > Host Group(ホストグループ)と選択し ます。 ストレージアレイまたは Default Group(デフォルトグループ)を右クリックし、ポップアップメニューから Define(定義) > Host Group(ホストグループ)を選択します。 Define Host Group(ホストグループの定義)画面が表示されます。 5.
7. Add(追加)をクリックします。 選択した仮想ディスクが追加され、Logical unit number(LUN) (0–255) ((論理ユニット番号(LUN) (0 ~ 255))リストに データが投入されます 8. Virtual Disk(仮想ディスク)のリストから 2 番目の仮想ディスクを選択します。 9. Add(追加)をクリックします。 選択した 2 番目の仮想ディスクが追加され、Logical unit number(LUN)(0–255)((論理ユニット番号(LUN)(0 ~ 255)) リストにデータが投入されます。 10. Close(閉じる)をクリックします。 NAS Manager ウェブインタフェースへのアクセス NAS Manager ウェブインタフェースにアクセスするには、次の手順を実行します。 1.
5 NAS Manager 設定ウィザードの実行 NAS Manager 設定ウィザード は、PowerVault NAS クラスタソリューション設定を完了し、ソリューションを環境に統合するため に行う最後の手順です。ウィザードでは、ファイルシステムのフォーマットと開始に加え、DNS、時刻管理、ユーザー ID、認証パラ メータ、および監視オプションをセットアップできます。 ナビゲーションペインから別のページを選択することで、いつでもこのウィザードから別のページに移動できます。また、ナビゲー ションペインから設定ウィザードの各ページにアクセスすることが可能です。つまり、ウィザード全体を実行しなくても、ナビゲー ションペインから該当するページにアクセスしてシステムの設定パラメータを直接変更することができるということです。 メモ: NAS IDU で Finish(終了)をクリックすると、NAS Manager の Start Configuration Wizard(設定ウィザードの開始) が自動で開きます。 トピック: • • • • • • • • • • • • • • • DNS の設定 NTP の設
環境内に NTP サーバーが存在しない場合は、There is no NTP server to synchronize time with(時刻を同期させる NTP サー バーがない)を選択し、時刻と日付を手動で入力します。 メモ: NTP サーバーを使用する必要があります。クライアントと NAS クラスタが非同期状態になった時間が 5 分を越える と、クライアントはクラスタに接続できなくなります。 3. Next(次へ)をクリックします。 Configuration Wizard(E-mail Configuration)step 3 of 14(設定ウィザード(E-メール設定)手順 14 の 3)画面が表示され ます。 SMTP の設定 メモ: クラスタソリューションで問題が発生した場合のため、SMTP サーバーを E-メールアラート用に設定することを強く推奨 します。 SMTP を設定するには、次の手順を実行します。 1.
次のメッセージが表示されます。Are you sure you want to format the file system?(ファイルシステムをフォーマットしても よろしいですか?)というメッセージが表示されます。 2. OK をクリックします。 NAS クラスタに割り当てられた LUN の合計サイズと数によっては、この手順の完了に数分かかる場合があります。 ファイルシステムがフォーマットされたことを確認するメッセージが表示されます。 3. Next(次へ)をクリックします。 Configuration Wizard(System Stop/Start)step 6 of 14(設定ウィザード(システムの停止 / 開始)手順 14 の 6)画面が表 示されます。 この時点でファイルシステムを開始する、またはこの手順を省略して後で開始することを選択できます。ファイルおよび共有 を提供するには、ファイルシステムが開始される必要があります。 4.
1. Configuration Wizard(CIFS Protocol Configuration)step 9 of 14(設定ウィザード(CIFS プロトコル設定)手順 14 の 9) 画面で、Allow clients to access files via the CIFS protocol(クライアントに CIFS プロトコル経由でファイルへアクセスする ことを許可する)を有効化し、System description(システムの説明)に適切な説明を入力します。 2.
Configuration Wizard(Add CIFS Shares)step 13 of 14(設定ウィザード(CIFS 共有の追加)手順 14 の 13)画面が表示され ます。 CIFS 共有の作成 CIFS 共有を作成するには、次の手順を実行します。 1. Configuration Wizard(Add CIFS Shares)step 13 of 14(設定ウィザード(CIFS 共有の追加)手順 14 の 13)画面で、NAS Volume(NAS ボリューム)リストから CIFS 共有に追加するボリュームを選択します。 2. General-access share(一般アクセス共有)または CIFS 共有(ユーザーベースのディレクトリツリーを含む)のどちらかを選択 し、適切な情報を入力します。 メモ: 共有フォルダが作成されていない場合は、CIFS 共有を追加することはできません。 3.
2. Primary(プライマリ) サブネットをクリックします。 Add/Edit Subnet(サブネットの追加 / 編集) 画面が表示されます。 3. 必要に応じて VIP address(VIP アドレス) に、追加のクライアント VIP アドレスを加えます。 メモ: 4 つ以上の VIP が必要な場合、Add VIP(VIP の追加) をクリックします。 4. Save Changes(変更の保存)をクリックします。 LUN のトラブルシューティング LUN がすべてのコントローラに対して使用可能であることを確実にするには、次を確認します。 1. PowerVault MD Storage Manager(MDSM)に正しい NAS コントローラ IQN が入力されていること。 メモ: よくある問題に IQN 前後のスペースがあります。コントローラの IQN を表示するには、NAS コマンドラインからコ マンド system maintenance luns configuration iscsi-view を入力します。 2. すべてのホストが MDSM のホストグループの一部であること。 3.
6 PowerVault FluidFS NAS セットアップワークシ ート ワークシートに記入して、お使いの PowerVault FluidFS NAS のレイアウトを記録します。このワークシートは、NAS IDU のネット ワーク設定手順を実行するときに使用してください。 スイッチ要件のチェックリスト クライアント / プライマリネットワーク SAN ネットワーク ジャンボフレーム有効(9216 MTU) 推奨 必須 PortFast 有効 必須 必須 フロー制御有効 推奨 必須 IPv6 が有効 必須(初期展開中) 必須 NAS アプライアンスの数 MD-Series アレイの数 ネットワークのタイプ ○1 ○1 ○2 ○ ルーティング ○2 ○ フラット NAS アプライアンス 0 サービスタグ: NAS アプライアンス 1 サービスタグ: NAS クラスタ名: プライマリクライアントネットワーク NAS 管理 VIP: クライアントアクセス VIP: ゲートウェイ: サブネットマスク: NAS アプライアンス 0 コ
NAS iSCSI ネットワーク ネットワーク MTU ○ 9000(ジャンボフレーム) サブネットマスク: SAN ネットワーク A NAS アプライアンス 0、コントローラ 0 IP: NAS アプライアンス 1、コントローラ 2 IP: NAS アプライアンス 0、コントローラ 1 IP: NAS アプライアンス 1、コントローラ 3 IP: SAN ネットワーク B NAS アプライアンス 0、コントローラ 0 IP: NAS アプライアンス 1、コントローラ 2 IP: NAS アプライアンス 0、コントローラ 1 IP: NAS アプライアンス 1、コントローラ 3 IP: MD-Series iSCSI ネットワーク(iSCSI ターゲット検出アドレス) ネットワーク MTU ○ 9000(ジャンボフレーム) サブネットマスク: SAN ネットワーク A MD アレイ 0 MD アレイ 1 コントローラ 0、ポート 0 iSCSI IP: コントローラ 0、ポート 0 iSCSI IP: SAN ネットワーク B MD アレイ 0 MD アレイ 1 コントロー
7 困ったときは トピック: • • デルへのお問い合わせ マニュアルのフィードバック デルへのお問い合わせ メモ: デルでは、オンラインおよび電話ベースのサポートとサービスオプションをいくつかご用意しています。アクティブなイ ンターネット接続がない場合は、 ご購入時の納品書、出荷伝票、請求書、またはデル製品カタログで連絡先をご確認いただけ ます。これらのサービスは国および製品によって異なり、お住まいの地域では一部のサービスがご利用いただけない場合があ ります。 デルのセールス、テクニカルサポート、またはカスタマーサービスへは、次の手順でお問い合わせいただけます。 1. dell.com/contactdell にアクセスします。 2. インタラクティブな世界地図からお住まいの国または地域を選択します。 地域を選択すると、選択した地域内の国が表示されます。 3. 選択した国の下にある適切な言語を選択します。 4. 管轄の営業セグメントを選択します。 選択したセグメントのメインサポートページが表示されます。 5.