Dell™ PowerVault™ 500 Systems Getting Started With Your System Guide de mise en route Primeiros passos com o sistema Procedimientos iniciales con el sistema
Dell™ PowerVault™ 500 Systems Getting Started With Your System Model EMS01
Notes, Notices, and Cautions NOTE: A NOTE indicates important information that helps you make better use of your system. NOTICE: A NOTICE indicates either potential damage to hardware or loss of data and tells you how to avoid the problem. CAUTION: A CAUTION indicates a potential for property damage, personal injury, or death. ____________________ Information in this document is subject to change without notice. © 2007 Dell Inc. All rights reserved.
Contents System Features . . . . . . . . . . . . . . . . . . . . . . Supported Operating Systems . . . . . . . . . . . . . . . 5 7 Other Information You May Need . . . . . . . . . . . . . 7 Obtaining Technical Assistance . . . . . . . . . . . . . 7 . . . . . . . . . . . . . . 8 Installation and Configuration Install the Rails and System in a Rack . . . . . . . . Connect the Keyboard, Mouse, and Monitor Connect the Power . . . . . . . . . . . . . . . . . 8 9 10 . . . . . 11 . . . . . .
4 Contents
System Features The major hardware and software features of your system include: • One or two Dual-Core Intel® Xeon® Processors 5000 Sequence. • Support for symmetric multiprocessing (SMP), which is available on systems with two Intel Xeon processors. SMP greatly improves overall system performance by dividing processor operations between independent processors. To take advantage of this feature, you must use an operating system that supports multiprocessing.
The system board includes the following features: • One of the following left riser card options: – A left riser card that has one full-length PCIe x8 lane slot and one full-length PCIe x4 lane slot. OR – A left riser card that has two full-length PCI-X 3.3-V, 64-bit,133-MHz slots on separate PCI-X buses (capable of throttling back to support legacy PCI add-in cards). • A center riser card that has one half-length PCIe x8 lane slot.
• Front-panel connectors include a video and two USB connectors. • Front-panel 1x5 LCD for system ID and error messaging. • System ID button on the front and back panels. For more information about specific features, see "Technical Specifications" on page 13.
Installation and Configuration CAUTION: Before performing the following procedure, read and follow the safety instructions and important regulatory information in your Product Information Guide. This section describes the steps to set up your system for the first time. Unpack your system and identify each item. Keep all shipping materials in case you need them later.
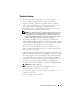
Connect the Keyboard, Mouse, and Monitor Connect the keyboard, mouse, and monitor (optional). The connectors on the back of your system have icons indicating which cable to plug into each connector. Be sure to tighten the screws (if any) on the monitor's cable connector.
Connect the Power Connect the monitor (optional) and system power, and connect the system’s power cable(s) to the system. If your system has an expansion card with a video output connector, do not connect the monitor to system’s integrated video connector. Instead, connect the monitor cable to the connector on the expansion card. Plug the other end of the cable into a grounded electrical outlet or a separate power source such as an uninterrupted power supply (UPS) or a power distribution unit (PDU).
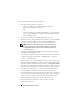
Install the Power Cord Retention Bracket Attach the power cord retention bracket on the right bend of the power supply handle. Bend the system power cable into a loop as shown in the illustration and attach to the bracket’s cable clasp. Repeat the procedure for the second power supply. Plug the other end of the power cables into a grounded electrical outlet or a separate power source such as an uninterrupted power supply (UPS) or a power distribution unit (PDU).
Turn on the System Turn on the system and monitor (optional). Press the power button on the system and the monitor. The power indicators should light. Adjust the monitor's controls until the displayed image is satisfactory. Install the Bezel Install the bezel (optional).
Complete the 0perating System Setup If you purchased a preinstalled operating system, see the operating system documentation that ships with your system. To install an operating system for the first time, see the Quick Installation Guide. Be sure the operating system is installed before installing hardware or software not purchased with the system. Technical Specifications Processor Processor type One or two Dual-Core Intel Xeon Processors 5000 Sequence.
Drives Hard drives up to six 3.5-inch, internal hotpluggable SAS or SATA hard drives without optional media bay, OR up to four 3.5-inch internal hotpluggable SAS or SATA hard drives with optional media bay Diskette drive one optional 3.5-inch, 1.44-MB external optional USB 3.5-inch, 1.44-MB Optical drive one optional slimline IDE CD, DVD, or combination CD-RW/DVD NOTE: DVD devices are data only.
Power AC power supply (per power supply) Wattage 750 W Voltage 85–264 VAC, autoranging, 47–63 Hz Heat dissipation 2697 BTU/hr maximum Maximum inrush current Under typical line conditions and over the entire system ambient operating range, the inrush current may reach 55 A per power supply for 10 ms or less. Batteries System battery CR 2032 3.0-V lithium ion coin cell RAID battery (optional) 4.1-V lithium ion Physical Rack Height 8.656 cm (3.40 in) Width 44.7 cm (17.6 in) Depth 75.68 cm (29.
Environmental NOTE: For additional information about environmental measurements for specific system configurations, see www.dell.com/environmental_datasheets.
Systèmes Dell™ PowerVault™ 500 Guide de mise en route Modèle EMS01
Remarques, avis et précautions REMARQUE : Une REMARQUE indique des informations importantes qui peuvent vous aider à mieux utiliser votre système. AVIS : un AVIS vous avertit d'un risque de dommage matériel ou de perte de données et vous indique comment éviter le problème. PRÉCAUTION : le message ATTENTION indique une situation potentiellement dangereuse qui, si elle n'est pas évitée, peut provoquer une détérioration du matériel ou des blessures pouvant entraîner la mort.
Sommaire Caractéristiques du système . . . . . . . . . . . . . . . . . . . . . . 23 . . . . . . . . . . . . . . . 24 Systèmes d'exploitation pris en charge Autres informations utiles . . . . . . . . . 24 . . . . . . . . . . . . . . 25 Obtention d'une assistance technique Installation et configuration Installation des rails et du système dans un rack . . . . . . . . . . . . Connexion du clavier, de la souris et du moniteur . . . . . . . . . . . . . . . . . . 25 . . . . . . . . .
20 Sommaire
Caractéristiques du système Les caractéristiques principales du système sont les suivantes : • Un ou deux processeurs double cœur Intel® Xeon® 5000. • Prise en charge du SMP (Symmetric Multiprocessing [multi-traitement symétrique]), disponible sur les systèmes dotés de deux processeurs Intel Xeon. Le SMP améliore considérablement les performances du système en partageant les tâches des processeurs entre des processeurs indépendants.
• Un détecteur d'intrusion dans le châssis qui transmet une alerte au logiciel de gestion des systèmes approprié en cas d'ouverture du capot de l'ordinateur. • Jusqu'à deux blocs d'alimentation de 750 W enfichables à chaud dans une configuration redondante 1+1 (facultative). • Quatre ventilateurs système enfichables à chaud.
• Un sous-système vidéo compatible VGA intégré avec un contrôleur vidéo PCI ATI ES1000 à 33 MHz. Ce sous-système contient 16 Mo de mémoire vidéo SDRAM DDR (non extensible). La définition maximale prise en charge est de 1600 x 1200 avec 64 000 couleurs. Les graphiques True-color sont pris en charge dans les définitions suivantes : 640 x 480, 800 x 600, 1024 x 768, 1152 x 864 et 1280 x 1024. Lorsque la carte d'accès à distance en option est installée, la définition vidéo est de 1280 X 1024.
Autres informations utiles PRÉCAUTION : Le document Product Information Guide (Guide d'informations sur le produit) contient d'importantes informations se rapportant à la sécurité et aux réglementations. Les informations sur la garantie se trouvent soit dans ce document, soit à part. • Le document Instructions d'installation du rack ou le Guide d'installation du rack fournis avec la solution rack décrivent l'installation du système.
Installation et configuration PRÉCAUTION : avant d'exécuter la procédure suivante, lisez les consignes de sécurité et les informations importantes sur les réglementations figurant dans le Guide d'informations sur le produit. Veillez à les respecter scrupuleusement. Cette section décrit les étapes à exécuter lors de la configuration initiale du système. Sortez le système de son emballage et identifiez chaque élément. Conservez les matériaux d'emballage au cas où vous en auriez besoin ultérieurement.
Connexion du clavier, de la souris et du moniteur Connectez le clavier, la souris et le moniteur (facultatif). À l'arrière du système, de petites icônes indiquent quel câble doit être inséré dans chaque connecteur. N'oubliez pas de serrer les vis situées sur le connecteur du câble du moniteur, s'il en est équipé.
Branchez les câbles d'alimentation Insérez les cordons d'alimentation du moniteur (facultatif) et du système dans les connecteurs correspondants. Si le système est équipé d'une carte d'extension dotée d'un connecteur de sortie vidéo, ne connectez pas le moniteur sur le connecteur vidéo intégré du système mais sur celui de la carte d'extension.
Fixez le support du câble d'alimentation Fixez le support du cordon sur la partie droite de la poignée du bloc d'alimentation. Faites une boucle comme indiqué dans l'illustration et insérez le cordon d'alimentation dans le clip du support. Recommencez cette procédure pour le second bloc d'alimentation. Branchez ensuite l'autre extrémité des cordons sur une prise de courant mise à la terre ou sur une source d'alimentation autonome (onduleur ou unité de distribution de l'alimentation).
Mise sous tension du système Mettez le système sous tension, ainsi que le moniteur, si nécessaire. Appuyez sur le bouton d'alimentation du système et sur celui du moniteur. Les voyants d'alimentation doivent s'allumer. Réglez le moniteur jusqu'à ce que l'image soit correctement affichée. Installez le cadre Installez le cadre (facultatif).
Finalisation de l'installation du système d'exploitation Si vous avez acheté un système d'exploitation préinstallé, consultez tout d'abord la documentation correspondante, qui vous a été fournie avec le système. Si vous installez un système d'exploitation pour la première fois, consultez le document Quick Installation Guide (Guide d'installation rapide). Veillez à installer le système d'exploitation avant tout élément matériel ou logiciel acheté séparément.
Mémoire Architecture Barrettes FB-DIMM (Fully Buffered DIMM) à 533 ou 667 MHz (selon disponibilité) Supports de module de mémoire Huit à 240 broches Modules de mémoire compatibles 256 Mo, 512 Mo, 1 Go, 2 Go ou 4 Go RAM minimale 512 Mo (deux modules de 256 Mo) RAM maximale 32 Go Lecteurs Disques durs Jusqu'à 6 disques durs SAS ou SATA internes de 3,5 pouces (enfichables à chaud), sans la baie de média en option OU Jusqu'à 4 disques durs SAS ou SATA internes de 3,5 pouces (enfichables à chaud), ave
Connecteurs À l'arrière NIC Deux connecteurs RJ-45 (pour NIC 1 Gb intégrés) Série Connecteur DTE à 9 broches, compatible 16550 USB Deux connecteurs à 4 broches, compatibles USB 2.0 Vidéo VGA, 15 broches À l'avant Vidéo VGA, 15 broches USB Deux connecteurs à 4 broches, compatibles USB 2.
Alimentation Bloc d'alimentation CA (selon la tension en vigueur) Puissance 750 W Tension 85-264 VCA avec sélection automatique de la tension, 47-63 Hz Dissipation thermique 2697 BTU/heure maximum Appel de courant maximal Dans des conditions de lignes typiques et dans toute la gamme ambiante de fonctionnement du système, l'appel de courant peut atteindre 55 A par bloc d'alimentation pendant un maximum de 10 ms.
Caractéristiques d'exploitation REMARQUE : pour plus d'informations concernant les mesures d'exploitation liées à différentes configurations spécifiques, rendez-vous sur le site www.dell.com/environmental_datasheets. Température En fonctionnement De 10° à 35°C (50° à 95°F) avec un gradient de température maximal de 10°C par heure. Stockage De -40° à 65°C (-40° à 149°F) avec un gradient de température maximal de 20°C par heure.
Sistemas Dell™ PowerVault™ 500 Primeiros passos com o sistema Modelo EMS01
Notas, avisos e advertências NOTA: NOTA fornece informações importantes para ajudar você a usar melhor o computador. AVISO: AVISO indica possíveis danos ao hardware ou a possibilidade de perda de dados e ensina como evitar o problema. ADVERTÊNCIA: ADVERTÊNCIA indica um potencial de danos à propriedade, de lesões corporais ou até de morte. ____________________ As informações contidas neste documento estão sujeitas a alterações sem aviso prévio. © 2007 Dell Inc. Todos os direitos reservados.
Conteúdo Recursos do sistema . . . . . . . . . . . . . . . . . . . . . . . . . . . . . 41 . . . . . . . . . . . . . . . . 42 Sistemas operacionais admitidos Outras informações úteis . . . . . . . . . . . . 42 . . . . . . . . . . . . . . . 43 Como obter assistência técnica Instalação e configuração Instale os trilhos e o sistema no rack . . . . . . . . . . . . 44 45 Instale o suporte de retenção do cabo de alimentação . . . . . . . . . . . . . . 46 . . . . . . . . . . . . . . . . 47 . . .
38 Conteúdo
Recursos do sistema As principais características de hardware e software do sistema incluem: • Um ou dois processadores Intel® Xeon® Dual Core Série 5000. • Suporte para multiprocessamento simétrico (SMP), disponível nos sistemas com dois processadores Intel Xeon. O SMP melhora enormemente o desempenho geral do sistema dividindo as operações do processador entre processadores independentes. Para tirar vantagem desse recurso, utilize um sistema operacional que suporte o multiprocessamento.
• Uma chave de violação de chassi que sinaliza ao software de gerenciamento de sistemas adequado quando a tampa superior é aberta. • Até duas fontes de alimentação de 750 W com conexão automática, em uma configuração redundante 1+1 opcional. • Quatro ventiladores de sistema com conexão automática.
• Um subsistema de vídeo compatível com o padrão VGA, com um controlador de vídeo PCI ATI ES1000 de 33 MHz. O subsistema de vídeo contém 16 MB de memória de vídeo DDR SDRAM (não atualizável). A resolução máxima é de 1600 x 1200 com 64 mil cores e os gráficos do tipo true-color têm suporte nas seguintes resoluções: 640 x 480, 800 x 600, 1024 x 768, 1152 x 864 e 1280 x 1024. Quando o RAC opcional estiver instalado, a resolução de vídeo será de 1280 X 1024.
Outras informações úteis ADVERTÊNCIA: O Guia de informações do produto fornece informações importantes sobre segurança e regulamentação. As informações sobre garantia podem estar incluídas neste documento ou serem fornecidas como documento separado. • O documento Rack Installation Instructions (Instruções para montagem em rack) ou Rack Installation Guide (Guia para instalação em rack) incluído com a solução em rack descreve como instalar o sistema em racks.
Instalação e configuração ADVERTÊNCIA: Antes de executar o seguinte procedimento, leia e siga as instruções de segurança e as informações importantes de normalização contidas no Guia de informações do produto. Esta seção descreve as etapas para a configuração do sistema pela primeira vez. Remova o sistema da embalagem e identifique cada item. Guarde todos os materiais de envio caso sejam necessários mais tarde.
Conecte o teclado, o mouse e o monitor Conecte o teclado, o mouse e o monitor (opcional). Os conectores localizados na parte traseira do sistema possuem ícones indicando quais cabos devem ser ligados a cada conector. Certifique-se de apertar os parafusos (se houver algum) no conector do cabo do monitor.
Conecte à energia Conecte o monitor (opcional) e o sistema à fonte de energia e, em seguida, conecte o(s) cabo(s) de alimentação do sistema a este. Caso o sistema possua uma placa de expansão com conector para saída de vídeo, não conecte o monitor ao conector de vídeo integrado ao sistema. Em vez disso, conecte o cabo do monitor ao conector localizado na placa de expansão.
Instale o suporte de retenção do cabo de alimentação Conecte o suporte de retenção do cabo de alimentação na dobra direita da alça da fonte de alimentação. Dobre o cabo de alimentação do sistema em forma de laço conforme apresentado na ilustração e conecte-o ao colchete do cabo localizado no suporte. Repita o procedimento para a segunda fonte de alimentação.
Como ligar o sistema Ligue o sistema e o monitor (opcional). Pressione o botão liga/desliga do sistema e do monitor. As luzes indicadoras de força deverão se acender. Ajuste os controles do monitor até que a imagem exibida seja satisfatória. Instale o painel Instale a tampa frontal (opcional).
Conclua a configuração do sistema operacional Caso tenha adquirido um sistema operacional pré-instalado, consulte a respectiva documentação fornecida com o sistema. Para instalar um sistema operacional pela primeira vez, consulte o Guia de instalação rápida. Certifiquese de que o sistema operacional esteja instalado antes de instalar qualquer hardware ou software que não tenha sido adquirido com o sistema.
Memória Arquitetura Fully Buffered DIMMs (FBD) de 533 MHz ou 667 MHz (quando disponível) Soquetes dos módulos de memória Oito de 240 pinos Capacidades dos módulos de memória 256 MB, 512 MB, 1 GB, 2 GB ou 4 GB RAM mínima 512 MB (dois módulos de 256 MB) RAM máxima 32 GB Unidades Unidades de disco rígido Até seis unidades de disco rígido SAS ou SATA internas de 3,5 polegadas com conexão automática sem barramento de mídia opcional OU Até quatro unidades de disco rígido SAS ou SATA internas de 3,5 pol
Conectores Parte posterior Placa de rede Dois RJ-45 (para placas de rede integradas de 1 GB). Serial DTE de 9 pinos, compatível com 16550 USB Dois de 4 pinos, compatível com USB 2.0 Vídeo VGA de 15 pinos Parte frontal Vídeo VGA de 15 pinos USB Dois de 4 pinos, compatível com USB 2.
Energia Fonte de alimentação CA (por fonte de alimentação) Potência 750 W Tensão 85 VCA a 264 VCA, variação automática, 47 Hz a 63 Hz Dissipação de calor Máxima de 2697 BTU/h Corrente de entrada máxima Sob condições de linha típicas e dentro de todo o intervalo de temperatura ambiente de funcionamento do sistema, a corrente de entrada poderá atingir 55 A por fonte de alimentação por 10 ms ou menos.
Ambientais NOTA: Para obter informações adicionais sobre os valores ambientais para configurações de sistema específicas, visite o site www.dell.com/environmental_datasheets (em inglês).
Sistemas Dell™ PowerVault™ 500 Procedimientos iniciales con el sistema Modelo EMS01
Notas, avisos y precauciones NOTA: una NOTA proporciona información importante que le ayudará a utilizar mejor el sistema. AVISO: un AVISO indica la posibilidad de daños en el hardware o la pérdida de datos, e informa de cómo evitar el problema. PRECAUCIÓN: un mensaje de PRECAUCIÓN indica el riesgo de daños materiales, lesiones o incluso la muerte. ____________________ La información contenida en este documento puede modificarse sin previo aviso. © 2007 Dell Inc. Todos los derechos reservados.
Contenido Componentes del sistema . . . . . . . . . . . . . . . . . . . . . . . . . . . . . 59 . . . . . . . . . . . . . . . . . . 60 Sistemas operativos admitidos Otra información útil 57 . . . . . . . . . . . . 60 . . . . . . . . . . . . . . 61 Obtención de asistencia técnica Instalación y configuración . Instalación de los rieles y del sistema en un rack . . . . . . . . . . . . . . . . . . . . . Conexión de la alimentación 62 . . . . . . . . . . . .
56 Contenido
Componentes del sistema Los principales componentes de hardware y software del sistema son: • Uno o dos procesadores Intel® Xeon® de doble núcleo 5000 Sequence. • Compatibilidad con SMP (multiprocesamiento simétrico), disponible en sistemas con dos procesadores Intel Xeon. SMP mejora en gran medida el rendimiento global del sistema al repartir las operaciones del procesador entre procesadores independientes.
• Un interruptor de intrusión en el chasis que indica el software de administración de sistemas adecuado si se abre la cubierta superior. • Hasta dos fuentes de alimentación de 750 W de acoplamiento activo en una configuración redundante 1 + 1 opcional. • Cuatro ventiladores de acoplamiento activo para la refrigeración del sistema.
• Un subsistema de vídeo integrado compatible con VGA con una controladora de vídeo PCI ATI ES1000 a 33 MHz. Este subsistema de vídeo contiene 16 MB de memoria de vídeo SDRAM DDR (no ampliable). La resolución máxima es de 1 600 x 1 200 con 64 000 colores; se admiten gráficos de color verdadero en las resoluciones siguientes: 640 x 480, 800 x 600, 1 024 x 768, 1 152 x 864 y 1 280 x 1 024. Cuando se instala una RAC opcional, la resolución de vídeo es de 1 280 x 1 024.
Otra información útil PRECAUCIÓN: la Guía de información del producto contiene información importante sobre seguridad y normativas. La información sobre la garantía puede estar incluida en este documento o constar en un documento aparte. • En los documentos Instrucciones de instalación del rack o Guía de instalación del rack incluidos con el rack se describe cómo instalar el sistema en un rack.
Instalación y configuración PRECAUCIÓN: antes de realizar el procedimiento siguiente, lea y siga las instrucciones de seguridad y la información importante sobre normativas incluidas en la Guía de información del producto. En esta sección se describen los pasos para configurar el sistema por primera vez. Desembale el sistema e identifique cada elemento. Guarde el material de embalaje por si lo necesita más adelante.
Conexión del teclado, el ratón y el monitor Conecte el teclado, el ratón y el monitor (opcional). Los conectores de la parte posterior del sistema incluyen iconos que indican qué cable debe enchufarse en cada conector. Asegúrese de apretar los tornillos (si los hay) del conector del cable del monitor.
Conexión de la alimentación Conecte la alimentación del monitor (opcional) y del sistema, y conecte los cables de alimentación al sistema. Si el sistema tiene una tarjeta de expansión con un conector de salida de vídeo, no conecte el monitor al conector de vídeo integrado del sistema. En su lugar, conecte el cable del monitor al conector de la tarjeta de expansión.
Instalación del soporte de retención del cable de alimentación Fije el soporte de retención del cable de alimentación en el codo derecho del asa de la fuente de alimentación. Doble el cable de alimentación del sistema en forma de bucle, tal como se muestra en la ilustración, y fíjelo a la abrazadera correspondiente del soporte. Repita el procedimiento para la segunda fuente de alimentación.
Encendido del sistema Encienda el sistema y el monitor (opcional). Presione el botón de encendido del sistema y del monitor. Los indicadores luminosos de alimentación deberían encenderse. Ajuste los controles del monitor hasta que la imagen mostrada sea satisfactoria. Colocación del embellecedor Instale el embellecedor (opcional).
Finalización de la instalación del sistema operativo Si ha adquirido un sistema operativo preinstalado, consulte la documentación del sistema operativo que se suministra con el sistema. Para instalar un sistema operativo por primera vez, consulte la Guía de instalación rápida. Asegúrese de que el sistema operativo está instalado antes de instalar hardware o software no adquirido con el sistema.
Memoria Arquitectura Módulos DIMM con búfer completo (FBD) a 533 o 667 MHz (cuando estén disponibles) Zócalos de módulo de memoria Ocho de 240 patas Capacidades de módulo de memoria 256 MB, 512 MB, 1 GB, 2 GB o 4 GB RAM mínima 512 MB (dos módulos de 256 MB) RAM máxima 32 GB Unidades Unidades de disco duro Hasta seis unidades internas de disco duro de 3,5 pulgadas y acoplamiento activo, de tipo SAS o SATA, sin compartimiento para soportes opcional, O bien: Hasta cuatro unidades internas de disco d
Conectores Parte posterior NIC Dos RJ-45 (para NIC de 1 GB integradas) Serie 9 patas, DTE, compatible con 16550 USB Dos de 4 patas compatibles con USB 2.0 Vídeo VGA de 15 patas Parte frontal Vídeo VGA de 15 patas USB Dos de 4 patas compatibles con USB 2.
Alimentación Fuente de alimentación de CA (por fuente de alimentación) Potencia 750 W Voltaje 85-264 V CA, autoajustable, 47-63 Hz Disipación de calor 2 697 BTU/h (789,8 W) como máximo Corriente de conexión máxima En condiciones normales de línea y en todo el ambiente del rango operativo del sistema, la corriente de la conexión puede alcanzar los 55 A por cada fuente de alimentación durante 10 ms o menos.
Especificaciones ambientales NOTA: para obtener información adicional sobre medidas ambientales relativas a configuraciones de sistema específicas, visite la página web www.dell.com/environmental_datasheets.