Dell Precision 3431 Small Form Factor Setup and specifications guide Regulatory Model: D11S Regulatory Type: D11S004 December 2020 Rev.
Notes, cautions, and warnings NOTE: A NOTE indicates important information that helps you make better use of your product. CAUTION: A CAUTION indicates either potential damage to hardware or loss of data and tells you how to avoid the problem. WARNING: A WARNING indicates a potential for property damage, personal injury, or death. © 2021 Dell Inc. or its subsidiaries. All rights reserved. Dell, EMC, and other trademarks are trademarks of Dell Inc. or its subsidiaries.
Contents Chapter 1: Set up your computer................................................................................................... 5 Chapter 2: Chassis overview......................................................................................................... 8 Front view............................................................................................................................................................................. 8 Back view........................................
Wireless options........................................................................................................................................................... 27 Maintenance................................................................................................................................................................. 27 System logs......................................................................................................................................................
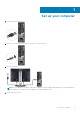
1 Set up your computer 1. Connect the keyboard and mouse. 2. Connect to your network using a cable, or connect to a wireless network. 3. Connect the display. NOTE: If you ordered your computer with a discrete graphics card, the HDMI and the display ports on the back panel of your computer are covered. Connect the display to the discrete graphics card. 4. Connect the power cable.
5. Press the power button. 6. Follow the instructions on the screen to finish Windows setup: a. Connect to a network. b. Sign-in to your Microsoft account or create a new account.
. Locate Dell apps. Table 1.
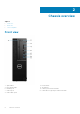
2 Chassis overview Topics: • • • Front view Back view Service tag label Front view 1. 3. 5. 7. 9. 8 Optical drive Drive activity light Headset port USB 2.0 port USB 3.1 Gen 1 port Chassis overview 2. 4. 6. 8. Power button SD card slot USB 2.0 port with PowerShare USB 3.
Back view 1. Line-out port 3. Serial port 5. DisplayPort/HDMI 2.0/VGA/USB Type-C Alt-Mode (optional) 7. Service tag label 9. USB 2.0 ports(supports SmartPower On) 11. Expansion card slots 13. Power supply diagnostic light 15. External Antenna Connectors(2) (Optional) 17. Padlock ring 2. PS/2 keyboard port 4. PS/2 mouse port 6. DisplayPort * 2 8. 10. 12. 14. 16. USB 3.
3 System specifications NOTE: Offerings may vary by region. The following specifications are only those required by law to ship with your computer. For more information about the configuration of your computer, go to Help and Support in your Windows operating system and select the option to view information about your computer.
Table 3. 9th Generation Intel Core Processor specifications Type UMA Graphics lntel Core Processor i3 - 9300 (4 Cores/8MB/4T/up to 4.3GHz/65W) Intel UHD Graphics 630 lntel Core Processor i5 - 9500 (6 Cores/9MB/6T/up to 4.4GHz/65W) Intel UHD Graphics 630 Intel Core Processor 5 - 9600 (6 Cores/9MB/6T/up to 4.6GHz/95W) Intel UHD Graphics 630 Intel Core Processor i7 - 9700 (8 Cores/12MB/8T/up to 4.9GHz/95W) Intel UHD Graphics 630 Intel Core Processor i9 - 9900 (8 Cores/16MB/16T/up to 5.
Table 5. Memory specifications (continued) ● 32 GB - 4 x 8 GB ● 64 GB - 4 x 16 GB Type ECC/Non-ECC memory Speed 2666 MHz NOTE: Pentium and i3 will run at 2400 MHz Storage Table 6. Storage specifications Type Form factor Interface Security option Capacity One NVMe Solid-State Drives(SSD) M.2 2280 PCIe 4, Up to 32 Gbps SED Up to 1 TB One Solid-State Optane M.2 2230 memory drive (SSD) PCIe, Up to 32 Gbps Two 2.5 inch Hard-Disk Drive (HDD) Approximately (2.760 x 3.959 x 0.
Care must be taken to match not only the drive vendor, capacity, and class, but also the specific model. Drives from the same vendor, with the same capacity, and even within the same class, can have very different performance characteristics for certain types of IO operations.
Video card Table 11. Video card specifications Controller Type CPU Dependency Intel UHD Graphics 630 UMA NVIDIA Quadro P1000 Graphics memory type Capacity External display support Maximum resolution ● Intel Core i3 Integrated 8300/8100 ● Intel Core i5 8600/8500 /8400 ● Intel Core i7 - 8700 ● Intel Xeon E Processor E-2174G/ E-2146G/ E-2124G Shared system memory DisplayPort/HDMI 1.4 4096 x 2304 Discrete N\A GDDR5 4 GB mDP/DisplayPort 5120 x 2880 NVIDIA Quadro P620 Discrete N\A GDDR5 2
Ports and connectors Table 14. Ports and connectors Memory card reader SD card reader Smart card reader Optional USB ● ● ● ● ● ● Security Noble wedge lock slot/Padlock Ring Audio ● Universal audio jack Video ● Display Port/HDMI 2.0b/VGA/USB Type C Display Port (optional) ● Two Display Ports Network adapter One RJ-45 connector Serial port One serial port (optional) PS/2 ● Mouse ● Keyboard One USB 2.0 port with PowerShare One USB 2.0 port (Front) One USB 3.
Table 16. Security (continued) Feature Description Chassis lock slot and loop support Standard Security Software Table 17.
Table 20. Chassis dimensions (continued) Depth (inches / centimeters) 11.50 / 29.2 Shipping weight (pounds / kilograms – includes packaging materials) 15.09 / 6.86 Table 21. Packaging parameters Height (inches / centimeters) 10.38 / 26.4 Width (inches / centimeters) 19.2 / 48.7 Depth (inches / centimeters) 15.5 / 39.4 Environmental NOTE: For more details on Dell environmental features, please go to the environmental attributes section. See your specific region for availability. Table 22.
4 System setup System setup enables you to manage your hardware and specify BIOS level options.
Navigation keys NOTE: For most of the System Setup options, changes that you make are recorded but do not take effect until you restart the system. Keys Navigation Up arrow Moves to the previous field. Down arrow Moves to the next field. Enter Selects a value in the selected field (if applicable) or follow the link in the field. Spacebar Expands or collapses a drop-down list, if applicable. Tab Moves to the next focus area. Esc Moves to the previous page until you view the main screen.
Table 24. General (continued) Option Description ● Processor Information: Displays Processor Type, Core Count, Processor ID, Current Clock Speed, Minimum Clock Speed, Maximum Clock Speed, Processor L2 Cache, Processor L3 Cache, HT Capable, and 64-Bit Technology. ● Device Information: Displays SATA-0, SATA 1, M.2 PCIe SSD-0, LOM MAC Address, Video Controller, Audio Controller, Wi-Fi Device, and Bluetooth Device.
Table 25. System Configuration (continued) Option Description ● ● ● ● ● SATA-0 (enabled by default) SATA-2 (enabled by default) SATA-3 (enabled by default) SATA-4 (enabled by default) M.2 PCIe SSD-0 (enabled by default) Smart Reporting This field controls whether hard drive errors for integrated drives are reported during system startup. The Enable Smart Reporting option is disabled by default.
Table 26. Video Option Description NOTE: If you do not select Auto, the on-board graphics device will be present and enabled. Security Table 27. Security Option Description Admin Password Allows you to set, change, and delete the admin password. System Password Allows you to set, change, and delete the system password. Internal HDD-0 Password Allows you to set, change, and delete the computer’s internal HDD. Strong Password This option lets you enable or disable strong passwords for the system.
Table 27. Security (continued) Option Description ● Disabled ● Permanently Disabled Chassis Intrusion This field controls the chassis intrusion feature. Choose any one of the option: ● Disabled (default) ● Enabled ● On-Silent OROM Keyboard Access This option determines weather users are able to enter Option ROM Configuration screens via hotkeys during boot. ● Enabled (Default) ● Disabled ● One Time Enable Admin Setup Lockout Allows you to prevent users from entering Setup when Admin password is set.
Table 28. Secure Boot (continued) Option Description NOTE: If you disable the Custom Mode, all the changes made will be erased and the keys will restore to default settings. Intel Software Guard Extensions options Table 29. Intel Software Guard Extensions Option Description Intel SGX Enable This field specifies you to provide a secured environment for running code/storing sensitive information in the context of the main OS.
Power management Table 31. Power Management Option Description AC Recovery Determines how the system responds when AC power is re-applied after a power loss. You can set the AC Recovery to: ● Power Off—Default ● Power On ● Last Power State This option is Power Off by default. Enable Intel Speed Shift Technology Allows you to enable or disable Intel Speed Shift Technology support. The option Enable Intel Speed Shift Technology is set by default.
Table 32. POST Behavior (continued) Option Description ● Minimal — The system boots quickly, unless the BIOS has been updated, memory changed, or the previous POST did not complete. ● Thorough — The system does not skip any steps in the boot process. ● Auto — This allows the operating system to control this setting (this works only when the operating system supports Simple Boot Flag). This option is set to Thorough by default. Extend BIOS POST Time This option creates an additional pre-boot delay.
Wireless options Table 35. Wireless Option Description Wireless Device Enable Allows you to enable or disable the internal wireless devices. The options are: ● WLAN/WiGig ● Bluetooth All the options are enabled by default. Maintenance Table 36. Maintenance Option Description Service Tag Displays the service tag of your computer. Asset Tag Allows you to create a system asset tag if an asset tag is not already set. This option is not set by default.
Advanced configuration Table 38. Advanced configuration Option Description ASPM Allows you to set the ASPM level. ● Auto (default) - There is handshaking between the device and PCI Express hub to determine the best ASPM mode supported by the device ● Disabled - ASPM power management is turned off at all time ● L1 Only - ASPM power management is set to use L1 Updating the BIOS in Windows It is recommended to update your BIOS (System Setup) when you replace the system board or if an update is available.
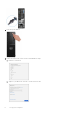
1. Download the BIOS update .EXE file to another system. 2. Copy the file e.g. O9010A12.EXE onto the bootable USB flash drive. 3. Insert the USB flash drive into the system that requires the BIOS update. 4. Restart the system and press F12 when the Dell splash logo appears to display the One Time Boot Menu. 5. Using arrow keys, select USB Storage Device and click Enter. 6. The system will boot to a Diag C:\> prompt. 7. Run the file by typing the full filename, for example, O9010A12.exe and press Enter. 8.
● Functional system battery to flash the BIOS Perform the following steps to execute the BIOS update flash process from the F12 menu: CAUTION: Do not power off the system during the BIOS update process. Powering off the system could make the system fail to boot. 1. From a power off state, insert the USB key where you copied the flash into a USB port of the system . 2.
4. Select the BIOS executable file and then press OK. Switch to correct catalogue of your external USB device by File system if you do not find the BIOS executable file.
5. Click Begin Flash Update, and then a warning message is displayed.
6. Click Yes. The systems restarts automatically and starts BIOS Flash.
7. Once complete, the system will reboot and the BIOS update process is completed. System and setup password Table 39. System and setup password Password type Description System password Password that you must enter to log on to your system. Setup password Password that you must enter to access and make changes to the BIOS settings of your computer. You can create a system password and a setup password to secure your computer.
Assigning a system setup password You can assign a new System or Admin Password only when the status is in Not Set. To enter the system setup, press F2 immediately after a power-on or reboot. 1. In the System BIOS or System Setup screen, select Security and press Enter. The Security screen is displayed. 2. Select System/Admin Password and create a password in the Enter the new password field. Use the following guidelines to assign the system password: ● ● ● ● A password can have up to 32 characters.
5 Software This chapter details the supported operating systems along with instructions on how to install the drivers. Topics: • • Operating system Downloading Windows drivers Operating system Table 40. Operating system Operating systems supported ● ● ● ● ● ● ● Windows 10 Home (64 bit) Windows 10 Professional (64 bit) Windows 10 Pro National Academic Windows 10 Home Ubuntu 16.04 LTS (64bit) NeoKylin 6.0 Red Hat Linux 7.5 Downloading Windows drivers 1. Turn on the . 2. Go to Dell.com/support. 3.
6 Getting help Topics: • Contacting Dell Contacting Dell NOTE: If you do not have an active Internet connection, you can find contact information on your purchase invoice, packing slip, bill, or Dell product catalog. Dell provides several online and telephone-based support and service options. Availability varies by country and product, and some services may not be available in your area. To contact Dell for sales, technical support, or customer service issues: 1. Go to Dell.com/support. 2.