Dell Precision 3541 Instrukcja serwisowa Model regulacji: P80G Typ regulacji: P80F003
Uwagi, przestrogi i ostrzeżenia UWAGA Napis UWAGA oznacza ważną wiadomość, która pomoże lepiej wykorzystać komputer. OSTRZEŻENIE Napis PRZESTROGA informuje o sytuacjach, w których występuje ryzyko uszkodzenia sprzętu lub utraty danych, i przedstawia sposoby uniknięcia problemu. PRZESTROGA Napis OSTRZEŻENIE informuje o sytuacjach, w których występuje ryzyko uszkodzenia sprzętu, obrażeń ciała lub śmierci. © 2019 Dell Inc. lub podmioty zależne. Wszelkie prawa zastrzeżone.
Spis treści 1 Serwisowanie komputera...............................................................................................................6 Instrukcje dotyczące bezpieczeństwa................................................................................................................................ 6 Przed przystąpieniem do serwisowania komputera.................................................................................................... 6 Zalecenia dotyczące bezpieczeństwa..............
Instalowanie złącza zasilania.........................................................................................................................................39 Dysk SSD.............................................................................................................................................................................. 40 Wymontowywanie dysku SSD.....................................................................................................................................
Instalowanie panelu wyświetlacza............................................................................................................................... 90 Zestaw podparcia dłoni....................................................................................................................................................... 92 Wymontowywanie zestawu podparcia dłoni i klawiatury..........................................................................................
1 Serwisowanie komputera Instrukcje dotyczące bezpieczeństwa Wymagania Aby uchronić komputer przed uszkodzeniem i zapewnić sobie bezpieczeństwo, należy przestrzegać następujących zaleceń dotyczących bezpieczeństwa. O ile nie wskazano inaczej, każda procedura opisana w tym dokumencie opiera się na założeniu, że są spełnione następujące warunki: • • Użytkownik zapoznał się z informacjami dotyczącymi bezpieczeństwa, jakie zostały dostarczone z komputerem.
Kroki 1. Przestrzegaj Instrukcji dotyczących bezpieczeństwa. 2. Sprawdź, czy powierzchnia robocza jest płaska i czysta, aby uniknąć porysowania komputera. 3. Wyłącz komputer. 4. Odłącz od komputera wszystkie kable sieciowe. OSTRZEŻENIE Kabel sieciowy należy odłączyć najpierw od komputera, a następnie od urządzenia sieciowego. 5. Odłącz komputer i wszystkie urządzenia peryferyjne od gniazdek elektrycznych. 6.
• • Katastrofalne — zdarzenia tego typu stanowią około 20 procent awarii związanych z wyładowaniami elektrostatycznymi. Uszkodzenie powoduje natychmiastową i całkowitą utratę funkcjonalności urządzenia. Przykładem katastrofalnej awarii może być moduł DIMM, który uległ wstrząsowi elektrostatycznemu i generuje błąd dotyczący braku testu POST lub braku sygnału wideo z sygnałem dźwiękowym oznaczającym niedziałającą pamięć.
• elektrostatyczne należy po wyjęciu z opakowania umieścić na powierzchni roboczej zabezpieczonej przed ładunkami elektrostatycznymi. Nie wolno kłaść części na zewnętrznej powierzchni torby antyelektrostatycznej, ponieważ tylko jej wnętrze jest ekranowane. Części należy zawsze trzymać w ręce albo umieścić na macie antystatycznej, w systemie lub wewnątrz torby antyelektrostatycznej.
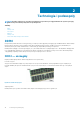
2 Technologia i podzespoły UWAGA Instrukcje podane w tej sekcji dotyczą komputerów z systemem operacyjnym Windows 10. System operacyjny Windows 10 jest instalowany fabrycznie na tym komputerze. Tematy: • • • • • • DDR4 Funkcje USB USB Type-C HDMI 1.4 Funkcje USB Zachowanie diody LED przycisku zasilania DDR4 Pamięć DDR4 (Double Data Rate czwartej generacji) jest szybszą technologią pamięci następującą po standardach DDR2 i DDR3.
Rysunek 2. Większa grubość Zakrzywiona krawędź Moduły DDR4 mają zakrzywioną krawędź, co ułatwia wkładanie ich do złącza i zmniejsza obciążenie płytki drukowanej podczas instalowania modułu. Rysunek 3. Zakrzywiona krawędź Błędy pamięci Błędy pamięci w komputerze wyświetlają nowy kod błędu ON-FLASH-FLASH lub ON-FLASH-ON. Jeśli wszystkie moduły pamięci ulegną awarii, wyświetlacz LCD nie włączy się.
• • • • • Większa maksymalna moc zasilania magistrali i większy pobór prądu dostosowany do urządzeń wymagających dużej mocy Nowe funkcje zarządzania zasilaniem Transmisja typu pełny dupleks i obsługa nowych typów transmisji danych Wsteczna zgodność z USB 2.0 Nowe złącza i kable Poniższe tematy zawierają odpowiedzi na najczęściej zadawane pytana dotyczące standardu USB 3.0/USB 3.1 pierwszej generacji. Szybkość Obecnie w najnowszej specyfikacji standardu USB 3.0/USB 3.
• • • • • • • • • • Zewnętrzne stacjonarne dyski twarde USB 3.0/USB 3.1 pierwszej generacji Przenośne dyski twarde USB 3.0/USB 3.1 pierwszej generacji Stacje dokujące i przejściówki do dysków USB 3.0/USB 3.1 pierwszej generacji Pamięci i czytniki USB 3.0/USB 3.1 pierwszej generacji Nośniki SSD USB 3.0/USB 3.1 pierwszej generacji Macierze RAID USB 3.0/USB 3.1 pierwszej generacji Multimedialne napędy dysków optycznych Urządzenia multimedialne Rozwiązania sieciowe Karty rozszerzeń i koncentratory USB 3.
zasilanie prądem stałym, wszystko w jednym kablu. Technologie Thunderbolt 1 i Thunderbolt 2 wykorzystują do łączenia się z urządzeniami peryferyjnymi to samo złącze miniDP (DisplayPort), podczas gdy technologia Thunderbolt 3 opiera się na złączu USB Type-C. Rysunek 4. Thunderbolt 1 i Thunderbolt 3 1. Thunderbolt 1 i Thunderbolt 2 (ze złączem miniDP) 2.
HDMI 1.4 W tym temacie opisano złącze HDMI 1.4 oraz jego funkcje i zalety. HDMI (High-Definition Multimedia Interface) to branżowy standard cyfrowej transmisji nieskompresowanego sygnału audio/wideo HDMI stanowi interfejs między zgodnymi źródłami cyfrowego dźwięku i obrazu — takimi jak odtwarzacz DVD lub odbiornik audio/wideo — a zgodnymi cyfrowymi urządzeniami audio/wideo, takimi jak telewizory cyfrowe. Interfejs HDMI jest przeznaczony dla telewizorów i odtwarzaczy DVD HDMI.
USB 3.0/USB 3.1 pierwszej generacji (SuperSpeed USB) Przez wiele lat standard USB 2.0 był stale rozpowszechniany jako jedyny właściwy standard interfejsu komputerów. Sprzedano ok. 6 miliardów urządzeń, jednak potrzeba większej szybkości wciąż istniała w związku z rosnącą szybkością obliczeniową urządzeń oraz większym zapotrzebowaniem na przepustowość. Odpowiedzią na potrzeby klientów jest standard USB 3.0/USB 3.1 pierwszej generacji, który teoretycznie zapewnia 10-krotnie większą szybkość niż poprzednik.
Zastosowania Złącze USB 3.0/USB 3.1 pierwszej generacji zapewnia urządzeniom większą przepustowość, zwiększając komfort korzystania z nich. Przesyłanie sygnału wideo przez złącze USB było dotychczas bardzo niewygodne (z uwagi na rozdzielczość, opóźnienia i kompresję), ale można sobie wyobrazić, że przy 5–10-krotnym zwiększeniu przepustowości rozwiązania wideo USB będą działać znacznie lepiej. Sygnał Single-link DVI wymaga przepustowości prawie 2 Gb/s.
• • • • • Domyślnie brak jest sygnału dźwiękowego. Można go włączyć w konfiguracji systemu BIOS. Limity czasu zabezpieczeń nie upływają, jeśli urządzenie zawiesi się w trakcie logowania. Logo firmy Dell: włącza się w ciągu 2 sekund od naciśnięcia przycisku zasilania. Pełne uruchomienie systemu: w ciągu 22 sekund od naciśnięcia przycisku zasilania.
• Tabela 3.
3 Główne elementy systemu 1. Pokrywa dolna 2.
3. Port zasilania prądem stałym 4. Zestaw radiatora 5. Wentylator radiatora 6. Moduły pamięci 7. Rama wewnętrzna 8. Gniazdo modułu pamięci 9. Klawiatura 10. Wspornik klawiatury 11. Akumulator 12. czytnik kart inteligentnych 13. Głośniki 14. Przyciski touchpada 15. Zestaw wyświetlacza 16. Zestaw podpórki na nadgarstek 17. Dysk SSD 18. Płytka termoprzewodząca SSD 19. Bateria pastylkowa 20. karta WWAN UWAGA Firma Dell udostępnia listę elementów i ich numery części w zakupionej oryginalnej konfiguracji systemu.
4 Demontowanie i montowanie pokrywa dolna Wymontowywanie pokrywy dolnej Wymagania 1. Wykonaj procedurę przedstawioną w sekcji Przed przystąpieniem do serwisowania komputera. Informacje na temat zadania Na ilustracji przedstawiono umiejscowienie i procedurę wymontowywania pokrywy dolnej.
Demontowanie i montowanie 23
Kroki 1. Wykręć pięć śrub (M2,5x6,3) i trzy śruby (M2,5x8) mocujące pokrywę dolną do komputera. 2. Podważ pokrywę dolną, zaczynając od prawego zawiasu i kontynuując wzdłuż jej brzegów. 3. Wyjmij pokrywę dolną z komputera. Instalowanie pokrywy dolnej Wymagania W przypadku wymiany elementów wyjmij stary element przed wykonaniem procedury instalacji. Informacje na temat zadania Na ilustracji przedstawiono umiejscowienie i procedurę instalacji pokrywy dolnej.
Demontowanie i montowanie 25
Kroki 1. Umieść pokrywę dolną na zestawie podparcia dłoni i klawiatury, a następnie wciśnij pokrywę dolną na swoje miejsce. 2. Wkręć pięć śrub (M2,5x6,3) i trzy śruby (M2,5x8) mocujące pokrywę dolną do komputera. Kolejne kroki 1. Wykonaj procedurę przedstawioną w sekcji Po zakończeniu serwisowania komputera. Akumulator Środki ostrożności dotyczące akumulatora litowojonowego OSTRZEŻENIE • Podczas obsługi akumulatora litowo-jonowego zachowaj ostrożność.
Kroki 1. Odłącz kabel akumulatora od płyty systemowej. 2. Wykręć śrubę (M2x6) mocującą akumulator do komputera. 3. Wyjmij akumulator z komputera. Instalowanie akumulatora Wymagania W przypadku wymiany elementów wyjmij stary element przed wykonaniem procedury instalacji. Informacje na temat zadania Na ilustracji przedstawiono umiejscowienie i procedurę instalacji akumulatora.
Kroki 1. Umieść akumulator na zestawie podparcia dłoni i klawiatury, a następnie dopasuj otwory na śruby w akumulatorze do otworów w zestawie podparcia dłoni i klawiatury. 2. Wkręć śrubę (M2x6) mocującą akumulator do komputera. 3. Podłącz kabel akumulatora do płyty systemowej. Kolejne kroki 1. Zainstaluj pokrywę dolną. 2. Wykonaj procedurę przedstawioną w sekcji Po zakończeniu serwisowania komputera. Moduły pamięci Wymontowywanie modułów pamięci Wymagania 1.
Kroki 1. Ostrożnie rozciągnij palcami zatrzaski zabezpieczające znajdujące się na końcach każdego gniazda modułu pamięci, aż moduł odskoczy. 2. Wyjmij moduł pamięci z gniazda na płycie systemowej. Instalowanie modułów pamięci Wymagania W przypadku wymiany elementów wyjmij stary element przed wykonaniem procedury instalacji. Informacje na temat zadania Na ilustracji przedstawiono umiejscowienie i procedurę instalacji modułu pamięci.
Kroki 1. Dopasuj wycięcie w module pamięci do wypustki w gnieździe. 2. Pewnie wsuń moduł pamięci do gniazda pod kątem. 3. Dociśnij moduł pamięci, aby go osadzić (charakterystyczne kliknięcie). UWAGA Jeśli nie usłyszysz kliknięcia, wyjmij moduł pamięci i zainstaluj go ponownie. Kolejne kroki 1. Zainstaluj akumulator. 2. Zainstaluj pokrywę dolną. 3. Wykonaj procedurę przedstawioną w sekcji Po zakończeniu serwisowania komputera. Karta sieci WLAN Wymontowywanie karty sieci WLAN Wymagania 1.
Kroki 1. Odszukaj kartę sieci WLAN w komputerze. 2. Wykręć jedną śrubę (M2x3) mocującą wspornik karty sieci WLAN. 3. Wyjmij wspornik karty sieci WLAN z komputera. 4. Odłącz kable sieci WLAN od modułu karty sieci WLAN. 5. Wysuń kartę WLAN z komputera. Instalowanie karty sieci WLAN Wymagania W przypadku wymiany elementów wyjmij stary element przed wykonaniem procedury instalacji. Informacje na temat zadania Na ilustracji przedstawiono umiejscowienie i procedurę instalacji karty sieci WLAN.
Kroki 1. Odszukaj gniazdo karty sieci WLAN w komputerze. 2. Umieść kartę sieci WLAN w gnieździe na płycie systemowej. 3. Podłącz kable do karty sieci WLAN. 4. Umieść metalowy wspornik na karcie sieci WLAN i przymocuj go za pomocą jednej śruby (M2x3). Kolejne kroki 1. Zainstaluj akumulator. 2. Zainstaluj pokrywę dolną. 3. Wykonaj procedurę przedstawioną w sekcji Po zakończeniu serwisowania komputera. Karta sieci WWAN Wymontowywanie karty sieci WWAN Wymagania 1.
Informacje na temat zadania Na ilustracji przedstawiono umiejscowienie i procedurę wymontowywania karty sieci WWAN. Kroki 1. Odszukaj kartę sieci WWAN w komputerze. 2. Wykręć jedną śrubę (M2x3) mocującą wspornik karty sieci WWAN do komputera. 3. Zdejmij metalowy wspornik karty sieci WWAN z komputera. 4. Odłącz kable karty sieci WWAN od modułu tej karty. 5. Wysuń kartę sieci WWAN z komputera.
Kroki 1. Odszukaj gniazdo karty sieci WWAN w komputerze. 2. Włóż kartę sieci WWAN do gniazda w komputerze. 3. Podłącz kable karty sieci WWAN do modułu tej karty. 4. Załóż metalowy wspornik na moduł karty sieci WWAN. 5. Wkręć jedną śrubę (M2x3) mocującą moduł do komputera. Kolejne kroki 1. Zainstaluj akumulator. 2. Zainstaluj pokrywę dolną. 3. Wykonaj procedurę przedstawioną w sekcji Po zakończeniu serwisowania komputera. Hard disk drive (Dysk twardy) Wymontowywanie dysku twardego Wymagania 1.
Informacje na temat zadania Na ilustracji przedstawiono umiejscowienie i procedurę wymontowywania dysku twardego. Kroki 1. Odszukaj dysk twardy w komputerze. 2. Odłącz kabel dysku twardego od płyty systemowej. 3. Wykręć cztery śruby (M2x2,7) mocujące dysk twardy do płyty systemowej. 4. Wyjmij dysk twardy z komputera. Instalowanie dysku twardego Wymagania W przypadku wymiany elementów wyjmij stary element przed wykonaniem procedury instalacji.
Kroki 1. Odszukaj wnękę na płytę systemową w komputerze. 2. Dopasuj i zainstaluj dysk twardy w komputerze. 3. Wkręć cztery śruby (M2x2,7) mocujące dysk twardy do komputera. 4. Podłącz kabel dysku twardego do złącza na płycie systemowej. Kolejne kroki 1. Zainstaluj akumulator. 2. Zainstaluj pokrywę dolną. 3. Wykonaj procedurę przedstawioną w sekcji Po zakończeniu serwisowania komputera. Bateria pastylkowa Wymontowywanie baterii pastylkowej Wymagania 1.
Kroki 1. Znajdź baterię pastylkową w komputerze. 2. Odłącz kabel baterii pastylkowej od płyty systemowej. 3. Wyjmij baterię pastylkową z komputera. Instalowanie baterii pastylkowej Wymagania W przypadku wymiany elementów wyjmij stary element przed wykonaniem procedury instalacji. Informacje na temat zadania Na ilustracji przedstawiono umiejscowienie i procedurę instalowania baterii pastylkowej.
Kroki 1. Znajdź gniazdo baterii pastylkowej w komputerze. 2. Przyklej baterię pastylkową do gniazda. 3. Podłącz kabel baterii pastylkowej do płyty systemowej. Kolejne kroki 1. Zainstaluj akumulator. 2. Zainstaluj pokrywę dolną. 3. Wykonaj procedurę przedstawioną w sekcji Po zakończeniu serwisowania komputera. Złącze zasilania prądem stałym Wymontowywanie złącza zasilania Wymagania 1. 2. 3. 4. Wykonaj procedurę przedstawioną w sekcji Przed przystąpieniem do serwisowania komputera. Wymontuj pokrywę dolną.
Kroki 1. Odszukaj złącze zasilania w komputerze. 2. Wykręć dwie śruby (M2x5) mocujące metalowy wspornik złącza zasilania. 3. Wyjmij metalowy wspornik złącza zasilania z komputera. 4. Odłącz kabel złącza zasilania prądem stałym od płyty systemowej. 5. Wymontuj złącze wejściowe zasilania z komputera. Instalowanie złącza zasilania Wymagania W przypadku wymiany elementów wyjmij stary element przed wykonaniem procedury instalacji.
Kroki 1. Znajdź gniazdo złącza zasilania w komputerze. 2. Umieść złącze zasilania w gnieździe komputera. 3. Podłącz kabel zasilania (DC-In) do płyty systemowej. 4. Umieść metalowy wspornik na złączu zasilacza. 5. Wkręć dwie śruby (M2x5) mocujące metalowy wspornik gniazda zasilacza do płyty systemowej. Kolejne kroki 1. 2. 3. 4. Zainstalujradiator (tylko konfiguracja z oddzielną kartą graficzną). Zainstaluj akumulator. Zainstaluj pokrywę dolną.
3. Wymontuj akumulator. Informacje na temat zadania Na ilustracji przedstawiono umiejscowienie i procedurę wymontowywania dysku SSD. Kroki 1. Odszukaj dysk SSD w komputerze. 2. Wykręć dwie śruby (M2x3) mocujące moduł SSD do komputera. 3. Zdejmij płytkę termoprzewodzącą z dysku SSD, a następnie wysuń dysk SSD z komputera. Instalowanie dysku SSD Wymagania W przypadku wymiany elementów wyjmij stary element przed wykonaniem procedury instalacji.
Kroki 1. Odszukaj gniazdo dysku SSD w komputerze. 2. Umieść dysk SSD w gnieździe. 3. Umieść płytkę termoprzewodzącą na module SSD. 4. Wkręć dwie śruby (M2x3) mocujące moduł SSD do komputera. Kolejne kroki 1. Zainstaluj akumulator. 2. Zainstaluj pokrywę dolną. 3. Wykonaj procedurę przedstawioną w sekcji Po zakończeniu serwisowania komputera. Rama wewnętrzna Wymontowywanie ramy wewnętrznej Wymagania 1. 2. 3. 4. 5. 6. 7. Wykonaj procedurę przedstawioną w sekcji Przed przystąpieniem do serwisowania komputera.
Kroki 1. Odszukaj płytę systemową w komputerze. 2. Wyjmij kable kart sieci WWAN i WLAN z zacisków. 3. Odłącz i wyjmij kabel głośnikowy.
4. Wykręć pięć śrub (M2x5) i sześć śrub (M2x3) mocujących ramę wewnętrzną do komputera. 5. Wyjmij ramę wewnętrzną z komputera. Instalowanie ramy wewnętrznej Wymagania W przypadku wymiany elementów wyjmij stary element przed wykonaniem procedury instalacji. Informacje na temat zadania Na ilustracji przedstawiono umiejscowienie i procedurę instalacji ramy wewnętrznej.
Kroki 1. Znajdź wnękę na ramę wewnętrzną w komputerze. 2. Dopasuj i umieść ramę wewnętrzną w komputerze. 3. Wkręć pięć śrub (M2x5) i sześć śrub (M2x3) mocujących ramę wewnętrzną do komputera.
4. Umieść kable kart sieci WWAN i WLAN w zaciskach ramy wewnętrznej. 5. Umieść kabel głośnikowy w zaciskach i podłącz go do płyty systemowej. Kolejne kroki 1. 2. 3. 4. 5. 6. 7. Zainstaluj kartę sieci WWAN. Zainstaluj kartę sieci WLAN. Zainstaluj dysk twardy Zainstaluj dysk SSD. Zainstaluj akumulator. Zainstaluj pokrywę dolną. Wykonaj procedurę przedstawioną w sekcji Po zakończeniu serwisowania komputera.
Kroki 1. Znajdź płytę przycisków tabliczki dotykowej w komputerze. 2. Otwórz zatrzask i odłącz kabel płyty czytnika kart Smart Card od płyty systemowej. 3. Otwórz zatrzask i odłącz kabel przycisków tabliczki dotykowej od złącza. 4. Wykręć dwie śruby (M2x3) mocujące wspornik przycisków tabliczki dotykowej do podparcia dłoni. 5. Wyjmij przyciski tabliczki dotykowej z komputera.
Kroki 1. Znajdź wnękę na przyciski tabliczki dotykowej w komputerze. 2. Dopasuj i umieść przyciski tabliczki dotykowej we wnęce w komputerze. 3. Podłącz kabel przycisków tabliczki dotykowej do złącza w komputerze i zamknij zatrzask. 4. Wkręć dwie śruby (M2x3) mocujące przyciski tabliczki dotykowej do komputera. 5. Podłącz kabel czytnika kart Smart Card do złącza i zamknij zatrzask. Kolejne kroki 1. 2. 3. 4. 5. 6. 7. 8. Zainstaluj ramę wewnętrzną. Zainstaluj kartę sieci WWAN. Zainstaluj kartę sieci WLAN.
4. 5. 6. 7. 8. Wymontuj dysk SSD. Wymontuj dysk twardy. Wymontuj kartę sieci WLAN. Wymontuj kartę sieci WWAN. Wymontuj ramę wewnętrzną. Informacje na temat zadania Na ilustracji przedstawiono umiejscowienie i procedurę wymontowywania płyty czytnika kart Smart Card. Kroki 1. Odszukaj płytę czytnika kart Smart Card w komputerze. 2. Otwórz zatrzask i odłącz kabel płyty czytnika kart Smart Card od płyty systemowej. 3. Wykręć cztery śruby (M2x3) mocujące płytę czytnika kart Smart Card do komputera. 4.
Instalowanie płyty czytnika kart Smart Card Wymagania W przypadku wymiany elementów wyjmij stary element przed wykonaniem procedury instalacji. Informacje na temat zadania Na ilustracji przedstawiono umiejscowienie i procedurę instalacji czytnika kart Smart Card. Kroki 1. Odszukaj gniazdo płyty czytnika kart Smart Card w komputerze. 2. Dopasuj i włóż płytę czytnika kart Smart Card do gniazda w komputerze. 3. Wkręć cztery śruby (M2x3) mocujące płytę czytnika kart Smart Card do komputera. 4.
4. 5. 6. 7. 8. Zainstaluj dysk twardy Zainstaluj dysk SSD. Zainstaluj akumulator. Zainstaluj pokrywę dolną. Wykonaj procedurę przedstawioną w sekcji Po zakończeniu serwisowania komputera. Przyciski tabliczki dotykowej Wymontowywanie przycisków tabliczki dotykowej Wymagania 1. 2. 3. 4. 5. 6. 7. 8. Wykonaj procedurę przedstawioną w sekcji Przed przystąpieniem do serwisowania komputera. Wymontuj pokrywę dolną. Wymontuj akumulator. Wymontuj dysk SSD. Wymontuj dysk twardy. Wymontuj kartę sieci WLAN.
3. Otwórz zatrzask i odłącz kabel przycisków tabliczki dotykowej od złącza. 4. Wykręć dwie śruby (M2x3) mocujące wspornik przycisków tabliczki dotykowej do podparcia dłoni. 5. Wyjmij przyciski tabliczki dotykowej z komputera. Instalowanie przycisków tabliczki dotykowej Wymagania W przypadku wymiany elementów wyjmij stary element przed wykonaniem procedury instalacji. Informacje na temat zadania Na ilustracji przedstawiono umiejscowienie i procedurę instalacji przycisków tabliczki dotykowej. Kroki 1.
8. Wykonaj procedurę przedstawioną w sekcji Po zakończeniu serwisowania komputera. Płyta wskaźników LED Wymontowywanie płyty wskaźników LED Wymagania 1. 2. 3. 4. 5. 6. 7. 8. Wykonaj procedurę przedstawioną w sekcji Przed przystąpieniem do serwisowania komputera. Wymontuj pokrywę dolną. Wymontuj akumulator. Wymontuj dysk SSD. Wymontuj dysk twardy. Wymontuj kartę sieci WLAN. Wymontuj kartę sieci WWAN. Wymontuj ramę wewnętrzną.
2. Otwórz zatrzask i odłącz kabel płyty wskaźników LED od płyty systemowej. 3. Odklej kabel płyty wskaźników LED. UWAGA Kabel płyty wskaźników LED jest przymocowany do komputera za pomocą paska samoprzylepnego. 4. Wykręć śrubę (M2x3) mocującą płytę wskaźników LED do komputera. 5. Wyjmij płytę wskaźników LED z komputera. Instalowanie płyty wskaźników LED Wymagania W przypadku wymiany elementów wyjmij stary element przed wykonaniem procedury instalacji.
Kolejne kroki 1. 2. 3. 4. 5. 6. 7. 8. Zainstaluj ramę wewnętrzną. Zainstaluj kartę sieci WWAN. Zainstaluj kartę sieci WLAN. Zainstaluj dysk twardy Zainstaluj dysk SSD. Zainstaluj akumulator. Zainstaluj pokrywę dolną. Wykonaj procedurę przedstawioną w sekcji Po zakończeniu serwisowania komputera. Głośniki Wymontowywanie głośników Wymagania 1. 2. 3. 4. 5. 6. 7. 8. 9. Wykonaj procedurę przedstawioną w sekcji Przed przystąpieniem do serwisowania komputera. Wymontuj pokrywę dolną. Wymontuj akumulator.
Kroki 1. Odszukaj głośniki w komputerze. 2. Wyjmij kable głośnikowe z zacisków w komputerze. 3. Wyjmij głośniki z komputera. Instalowanie głośników Wymagania W przypadku wymiany elementów wyjmij stary element przed wykonaniem procedury instalacji. Informacje na temat zadania Na ilustracji przedstawiono umiejscowienie i procedurę instalacji głośników.
Kroki 1. Znajdź gniazdo głośników w komputerze. 2. Dopasuj i umieść głośniki w komputerze. 3. Umieść kable głośnikowe w zaciskach w komputerze. Kolejne kroki 1. 2. 3. 4. 5. 6. 7. 8. 9. Instalowanie płyty wskaźników LED Zainstaluj ramę wewnętrzną. Zainstaluj kartę sieci WWAN. Zainstaluj kartę sieci WLAN. Zainstaluj dysk twardy Zainstaluj dysk SSD. Zainstaluj akumulator. Zainstaluj pokrywę dolną. Wykonaj procedurę przedstawioną w sekcji Po zakończeniu serwisowania komputera.
Zestaw radiatora — konfiguracja z oddzielną kartą graficzną Wymontowywanie zestawu radiatora — konfiguracja z oddzielną kartą graficzną Wymagania 1. Wykonaj procedurę przedstawioną w sekcji Przed przystąpieniem do serwisowania komputera. 2. Wymontuj pokrywę dolną. 3. Wymontuj akumulator. Informacje na temat zadania Na ilustracji przedstawiono umiejscowienie i procedurę wymontowywania radiatora.
Kroki 1. Znajdź wnękę na zestaw radiatora w komputerze. 2. Wykręć dwie śruby (M2x5) i sześć śrub (M2x3), które mocują zestaw radiatora do komputera. 3. Odłącz kabel wentylatora radiatora od płyty systemowej. 4. Wyjmij zespół radiatora z komputera. 5. Wykręć śrubę (M2x5) mocującą wentylator radiatora do zestawu radiatora. 6. Wyjmij wentylator radiatora z zestawu radiatora.
Demontowanie i montowanie
Kroki 1. Odszukaj gniazdo radiatora w komputerze. 2. Dopasuj i włóż wentylator radiatora do zestawu radiatora. 3. Wkręć śrubę (M2x5) mocującą wentylator radiatora do zestawu radiatora. 4. Umieść zestaw radiatora w gnieździe. 5. Wkręć dwie śruby (M2x5) i sześć śrub (M2x3), aby zamocować zestaw radiatora do komputera. UWAGA Wkręć śruby w kolejności wskazanej na radiatorze. 6. Podłącz kabel wentylatora radiatora do płyty systemowej. Kolejne kroki 1. Zainstaluj akumulator. 2. Zainstaluj pokrywę dolną. 3.
Zestaw radiatora — konfiguracja UMA Wymontowywanie zestawu radiatora — konfiguracja UMA Wymagania 1. Wykonaj procedurę przedstawioną w sekcji Przed przystąpieniem do serwisowania komputera. 2. Wymontuj pokrywę dolną. 3. Wymontuj akumulator. Informacje na temat zadania Na ilustracji przedstawiono umiejscowienie i procedurę wymontowywania zestawu radiatora.
Kroki 1. Odszukaj radiator w komputerze. 2. Wykręć dwie śruby (M2x5) i cztery śruby (M2x3) mocujące zestaw radiatora do komputera. UWAGA Wykręć śruby w kolejności wskazanej na radiatorze. 3. Odłącz kabel wentylatora radiatora od płyty systemowej. 4. Wyjmij zespół radiatora z komputera. 5. Wykręć śrubę (M2x5) mocującą wentylator radiatora do zestawu radiatora. 6. Wyjmij wentylator radiatora z zestawu radiatora.
Demontowanie i montowanie
Kroki 1. Odszukaj gniazdo radiatora w komputerze. 2. Dopasuj i włóż wentylator radiatora do zestawu radiatora. 3. Wkręć śrubę (M2x5) mocującą wentylator radiatora do zestawu radiatora. 4. Umieść zestaw radiatora w gnieździe. 5. Wkręć dwie śruby (M2x5) i cztery śruby (M2x3) mocujące zestaw radiatora do komputera. UWAGA Wkręć śruby w kolejności wskazanej na radiatorze. 6. Podłącz kabel wentylatora radiatora do płyty systemowej. Kolejne kroki 1. Zainstaluj akumulator. 2. Zainstaluj pokrywę dolną. 3.
Płyta systemowa Wymontowywanie płyty systemowej Wymagania 1. 2. 3. 4. 5. 6. 7. 8. 9. 10. Wykonaj procedurę przedstawioną w sekcji Przed przystąpieniem do serwisowania komputera. Wymontuj pokrywę dolną. Wymontuj akumulator. Wymontuj dysk SSD. Wymontuj dysk twardy. Wymontuj kartę sieci WLAN. Wymontuj kartę sieci WWAN. Wymontuj ramę wewnętrzną. Wymontuj radiator. Wymontuj moduł pamięci. Informacje na temat zadania Ilustracja przedstawia umiejscowienie i procedurę wymontowywania płyty systemowej.
Demontowanie i montowanie 67
Kroki 1. Odszukaj płytę systemową w komputerze. 2. Wykręć śrubę (M2x3) mocującą metalowy wspornik czytnika linii papilarnych. 3. Zdejmij metalowy wspornik z czytnika linii papilarnych i odwróć czytnik. 4. Odłącz kabel kamery od płyty systemowej. 5. Wykręć dwie śruby mocujące metalowy wspornik EDP. 6. Wyjmij metalowy wspornik EDP z komputera. 7. Odklej taśmę mocującą kabel wyświetlacza do płyty systemowej. 8. Otwórz zatrzask i odłącz kabel klawiatury od płyty systemowej. 9.
Demontowanie i montowanie 69
Kroki 1. Odszukaj wnękę na płytę systemową w komputerze. 2. Włóż złącza płyty systemowej do otworów w zestawie podparcia dłoni i klawiatury, a następnie dopasuj otwory na śruby w płycie systemowej do otworów w zestawie podparcia dłoni i klawiatury. 3. Wkręć cztery śruby (M2x4) mocujące płytę systemową do zestawu podparcia dłoni i klawiatury. 4. Dopasuj i umieść czytnik linii papilarnych w gnieździe w komputerze. 5. Umieść metalowy wspornik na czytniku linii papilarnych. 6.
Kroki 1. Odszukaj klawiaturę w komputerze. 2. Otwórz zatrzask i odłącz kabel klawiatury oraz kabel podświetlenia klawiatury od podparcia dłoni. 3. Wykręć 22 śruby (M2x2) mocujące klawiaturę do obudowy komputera. 4. Wyjmij klawiaturę z komputera. Instalowanie klawiatury Wymagania W przypadku wymiany elementów wyjmij stary element przed wykonaniem procedury instalacji. Informacje na temat zadania Na ilustracji przedstawiono umiejscowienie i procedurę instalacji klawiatury.
Kroki 1. Zlokalizuj wnękę na klawiaturę w komputerze. 2. Dopasuj i umieść klawiaturę na miejscu. 3. Wkręć 22 śruby (M2x2) mocujące klawiaturę do obudowy komputera. 4. Podłącz kabel klawiatury i kabel podświetlenia klawiatury do podparcia dłoni. Kolejne kroki 1. Zainstaluj płytę systemową. UWAGA Płytę systemową można wyjąć bez demontowania radiatora. 2. 3. 4. 5. 6. 7. 8. 9. 10. Zainstaluj moduł pamięci. Zainstaluj ramę wewnętrzną. Zainstaluj kartę sieci WWAN. Zainstaluj kartę sieci WLAN.
3. 4. 5. 6. 7. 8. 9. 10. Wymontuj akumulator. Wymontuj dysk SSD. Wymontuj dysk twardy. Wymontuj kartę sieci WLAN. Wymontuj kartę sieci WWAN. Wymontuj ramę wewnętrzną. Wymontuj moduł pamięci. Wymontuj płytę systemową. UWAGA Płytę systemową można wyjąć bez demontowania radiatora. . 11. Wymontuj klawiaturę. Informacje na temat zadania Na ilustracji przedstawiono umiejscowienie i procedurę wymontowywania wspornika klawiatury. Kroki 1. Odszukaj wspornik klawiatury w komputerze. 2.
Kroki 1. Znajdź wnękę wspornika klawiatury w komputerze. 2. Dopasuj i umieść klawiaturę na wsporniku klawiatury. 3. Naciśnij kratkę w punktach zatrzaskowych, aby przymocować zestaw klawiatury do podparcia dłoni. UWAGA Klawiatura ma po stronie kratki kilka punktów zatrzaskowych, które należy mocno docisnąć po założeniu klawiatury. 4. Wkręć jedenaście śrub (M2x2), które mocują klawiaturę do wspornika klawiatury. Kolejne kroki 1. Zainstaluj klawiaturę 2. Zainstaluj płytę systemową.
Przycisk zasilania Wymontowywanie przycisku zasilania z czytnikiem linii papilarnych Wymagania 1. 2. 3. 4. 5. 6. 7. 8. 9. 10. Wykonaj procedurę przedstawioną w sekcji Przed przystąpieniem do serwisowania komputera. Wymontuj pokrywę dolną. Wymontuj akumulator. Wymontuj dysk SSD. Wymontuj dysk twardy. Wymontuj kartę sieci WLAN. Wymontuj kartę sieci WWAN. Wymontuj ramę wewnętrzną. Wymontuj moduł pamięci. Wymontuj płytę systemową. UWAGA Płytę systemową można wyjąć wraz z radiatorem.
Instalowanie przycisku zasilania z czytnikiem linii papilarnych Wymagania W przypadku wymiany elementów wyjmij stary element przed wykonaniem procedury instalacji. Informacje na temat zadania Na ilustracji przedstawiono umiejscowienie i procedurę instalacji przycisku zasilania z czytnikiem linii papilarnych. Kroki 1. Odszukaj gniazdo przycisku zasilania z czytnikiem linii papilarnych w komputerze. 2. Dopasuj i umieść przycisk zasilania z czytnikiem linii papilarnych w komputerze. 3.
Zestaw wyświetlacza Wymontowywanie zestawu wyświetlacza Wymagania 1. 2. 3. 4. 5. Wykonaj procedurę przedstawioną w sekcji Przed przystąpieniem do serwisowania komputera. Wymontuj pokrywę dolną. Wymontuj akumulator. Wymontuj kartę sieci WLAN. Wymontuj kartę sieci WWAN. Informacje na temat zadania Na ilustracji przedstawiono umiejscowienie i procedurę wymontowywania wentylatora zestawu wyświetlacza.
Demontowanie i montowanie
Demontowanie i montowanie 79
Kroki 1. Zlokalizuj kabel wyświetlacza, kabel ekranu dotykowego i zawiasy wyświetlacza w komputerze. 2. Odklej taśmę i odłącz kabel ekranu dotykowego. 3. Wykręć dwie śruby (M2x3) mocujące metalowy wspornik EDP do komputera. 4. Odklej taśmę mocującą kabel wyświetlacza do płyty systemowej. 5. Otwórz zatrzask i odłącz kabel klawiatury od płyty systemowej. 6. Wyjmij kable kart sieci WLAN i WWAN z zacisków. 7. Wykręć sześć śrub (M2,5x4) mocujących zawiasy wyświetlacza do obudowy komputera. 8.
Demontowanie i montowanie 81
Demontowanie i montowanie
Kroki 1. Połóż zestaw wyświetlacza na płaskiej i czystej powierzchni. 2. Wyrównaj i umieść zestaw podparcia dłoni i klawiatury w zestawie wyświetlacza. 3. Zamknij zawiasy wyświetlacza, korzystając z wypustek. 4. Podłącz kabel wyświetlacza do płyty systemowej i przymocuj kabel taśmą. 5. Umieść metalowy wspornik EDP na złączu kabla wyświetlacza. 6. Wkręć dwie śruby (M2x3) mocujące metalowy wspornik EDP do płyty systemowej. 7. Podłącz kabel ekranu dotykowego do złącza na płycie systemowej. 8.
Kroki 1. Rysikiem z tworzywa sztucznego podważ dolną krawędź osłony wyświetlacza, zaczynając od zagłębień w pobliżu zawiasów. 2. Kontynuuj podważanie wzdłuż krawędzi osłony wyświetlacza, aby zwolnić ją z zestawu tylnej pokrywy wyświetlacza i anteny. 3. Wyjmij osłonę wyświetlacza z zestawu tylnej pokrywy wyświetlacza i anteny. Instalowanie osłony wyświetlacza Wymagania W przypadku wymiany elementów wyjmij stary element przed wykonaniem procedury instalacji.
Kroki Dopasuj osłonę wyświetlacza do zestawu pokrywy tylnej wyświetlacza i anteny, a następnie delikatnie wciśnij osłonę na miejsce. Kolejne kroki 1. 2. 3. 4. 5. 6. Zainstaluj zestaw wyświetlacza. Zainstaluj kartę sieci WWAN. Zainstaluj kartę sieci WLAN. Zainstaluj akumulator. Zainstaluj pokrywę dolną. Wykonaj procedurę przedstawioną w sekcji Po zakończeniu serwisowania komputera. Osłony zawiasów Zdejmowanie osłon zawiasów Wymagania 1. 2. 3. 4.
5. Wymontuj osłonę wyświetlacza. Informacje na temat zadania Na ilustracji przedstawiono umiejscowienie i procedurę wymontowywania osłon zawiasów. Kroki 1. Odszukaj osłonę zawiasów na tylnej pokrywie wyświetlacza. 2. Wykręć dwie śruby (M2x2,5) mocujące osłony zawiasów do obudowy. 3. Ściśnij osłony zawiasów, aby uwolnić je z tylnej pokrywy wyświetlacza, a następnie przesuń je do wewnątrz, aby zdjąć je z zawiasów wyświetlacza.
Kroki 1. Załóż osłony na zawiasy wyświetlacza i przesuń je na zewnątrz. 2. Wkręć dwie śruby (M2x2,5) mocujące osłony zawiasów do zawiasu wyświetlacza. Kolejne kroki 1. 2. 3. 4. 5. 6. 7. Zainstaluj oprawę wyświetlacza. Zainstaluj zestaw wyświetlacza. Zainstaluj kartę sieci WWAN. Zainstaluj kartę sieci WLAN. Zainstaluj akumulator. Zainstaluj pokrywę dolną. Wykonaj procedurę przedstawioną w sekcji Po zakończeniu serwisowania komputera. Panel wyświetlacza Wymontowywanie panelu wyświetlacza Wymagania 1.
3. 4. 5. 6. 7. 8. Wymontuj akumulator. Wymontuj kartę sieci WLAN. Wymontuj kartę sieci WWAN. Wymontuj zestaw wyświetlacza. Wymontuj osłonę wyświetlacza. Zdejmij osłony zawiasów. Informacje na temat zadania Na ilustracji przedstawiono umiejscowienie i procedurę wymontowywania panelu wyświetlacza.
Demontowanie i montowanie 89
Kroki 1. Umieść panel wyświetlacza na zestawie tylnej pokrywy wyświetlacza. 2. Wykręć cztery śruby (M2,5x3,5) mocujące panel wyświetlacza do zestawu wyświetlacza. 3. Unieś i odwróć panel wyświetlacza, aby uzyskać dostęp do kabla wyświetlacza. 4. Odklej taśmę przewodzącą ze złącza kabla wyświetlacza. 5. Otwórz zatrzask i odłącz kabel wyświetlacza od panelu wyświetlacza. UWAGA Nie ciągnij ani nie odrywaj taśmy elastycznej od panelu wyświetlacza. Nie ma potrzeby oddzielać wsporników od panelu.
Demontowanie i montowanie 91
Kroki 1. Podłącz kabel wyświetlacza do złącza i zamknij zatrzask. 2. Przyklej taśmę mocującą złącze kabla wyświetlacza. 3. Przyklej taśmę przewodzącą mocującą złącze kabla wyświetlacza. 4. Wkręć cztery śruby (M2,5x3,5) mocujące panel wyświetlacza do zestawu wyświetlacza. Kolejne kroki 1. 2. 3. 4. 5. 6. 7. 8. Załóż osłony zawiasów. Zainstaluj oprawę wyświetlacza. Zainstaluj zestaw wyświetlacza. Zainstaluj kartę sieci WWAN. Zainstaluj kartę sieci WLAN. Zainstaluj akumulator. Zainstaluj pokrywę dolną.
Kroki Po wykonaniu czynności wstępnych pozostanie zestaw podparcia dłoni i klawiatury. Instalowanie zestawu podparcia dłoni i klawiatury Wymagania W przypadku wymiany elementów wyjmij stary element przed wykonaniem procedury instalacji. Informacje na temat zadania Na ilustracji przedstawiono umiejscowienie i procedurę instalacji zestawu podparcia dłoni i klawiatury.
Kroki Połóż zestaw podparcia dłoni i klawiatury na płaskiej powierzchni. Kolejne kroki 1. 2. 3. 4. 5. 6. 7. 8. 9. 10. 11. 12. 13. 14. 15. 16. 94 Zainstaluj płytę systemową. Zainstaluj tabliczkę dotykową. Zainstaluj złącze zasilania. Zainstaluj przycisk zasilania z czytnikiem linii papilarnych. Zainstaluj zestaw wyświetlacza. Zainstaluj głośniki. Instalowanie płyty wskaźników LED Zainstaluj moduł pamięci. Zainstaluj ramę wewnętrzną. Zainstaluj kartę sieci WWAN. Zainstaluj kartę sieci WLAN.
5 Rozwiązywanie problemów Program diagnostyczny ePSA (Enhanced Pre-Boot System Assessment) Informacje na temat zadania Test diagnostyczny ePSA obejmuje pełną kontrolę elementów sprzętowych. Test ePSA jest wbudowany w systemie BIOS i uruchamiany wewnętrznie przez system BIOS.
• Komputer jest w stanie uśpienia, hibernacji lub jest wyłączony. Kontrolka stanu zasilania i stanu akumulatora miga światłem bursztynowym wraz z uruchomionymi kodami dźwiękowymi, wskazując błędy. Na przykład kontrolka stanu zasilania i stanu akumulatora miga dwa razy światłem bursztynowym, a potem następuje pauza, a następnie światłem białym trzy razy, a potem następuje pauza. Sekwencja 2,3 jest wykonywana do chwili wyłączenia komputera. Oznacza ona brak pamięci lub pamięci RAM.
6 Uzyskiwanie pomocy Tematy: • Kontakt z firmą Dell Kontakt z firmą Dell Wymagania UWAGA W przypadku braku aktywnego połączenia z Internetem informacje kontaktowe można znaleźć na fakturze, w dokumencie dostawy, na rachunku lub w katalogu produktów firmy Dell. Informacje na temat zadania Firma Dell oferuje kilka różnych form obsługi technicznej i serwisu, online oraz telefonicznych. Ich dostępność różni się w zależności od produktu i kraju, a niektóre z nich mogą być niedostępne w regionie użytkownika.