
Owners Manual


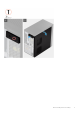
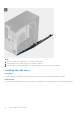
Table Of Contents
- Working inside your computer
- Disassembly and reassembly
- Recommended tools
- Screw List
- Major components of your system
- Side cover
- Power-supply unit cage
- Front bezel
- Memory modules
- Solid-state drive
- 2.5-inch hard drive
- 3.5-inch hard drive
- WLAN card
- Slim optical-drive
- Graphics card
- System fan
- Coin-cell battery
- Processor fan and heat-sink assembly
- Processor
- Power button
- Intrusion switch
- Front I/O panel
- System board
- Drivers and downloads
- System setup
- Troubleshooting
- Getting help and contacting Dell

Steps
1. Remove the single screw (M6.32x12.7) to unlock the release latch.
2. Pull the release latch to release the side cover from the computer.
3. Open the side cover towards the side of the computer and lift the cover away from the computer.
Installing the side cover
Prerequisites
If you are replacing a component, remove the existing component before performing the installation procedure.
About this task
The following image indicates the location of the side cover and provides a visual representation of the installation procedure.
10
Disassembly and reassembly