
Service Manual

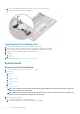
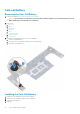


b. Remove the M2x3 screw that secures the DC-in connector to the computer [2].
c. Lift the DC-in connector from the computer [3].
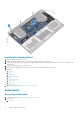
Installing the DC-in Adapter Port
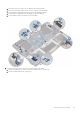
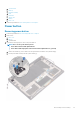
1. Place the DC-in adapter port into the slot on the palm-rest assembly.
2. Route the power-adapter port cable through its routing guides on the palm-rest assembly.
3. Replace the M2x3 screw that secures the power-adapter port to the palm-rest assembly.
4. Connect the power-adapter port cable to the system board.
5. Install the:
a. Battery
b. Base cover
6. Follow the procedures in After Working Inside Your Computer.
System board
Removing the System Board
1. Follow the procedures in Before Working Inside Your Computer.
2. Remove the:
a. base cover
b. battery
c. fans
d. heatsink assembly
e. WLAN
f. hard drive (optional)
g. keyboard
h. SSD
i. memory modules
NOTE:
Your computer’s Service Tag is located under the system badge flap. You must enter the Service Tag in the
BIOS after you replace the system board.
NOTE: Before disconnecting the cables from the system board, note the location of the connectors so that you can
re-connect them correctly after you replace the system board.
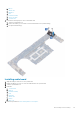
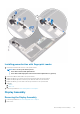
3. To remove the system board:
a. Lift the latch and disconnect the touchpad cable [1].
b. Lift the latch and disconnect the keyboard controller board cable [2].
32
Disassembly and reassembly