Precision 5820 Tower Rack rails Installation Guide Regulatory Model: D02T Regulatory Type: D02T002
Notes, cautions, and warnings NOTE: A NOTE indicates important information that helps you make better use of your product. CAUTION: A CAUTION indicates either potential damage to hardware or loss of data and tells you how to avoid the problem. WARNING: A WARNING indicates a potential for property damage, personal injury, or death. © 2019 Dell Inc. or its subsidiaries. All rights reserved. Dell, EMC, and other trademarks are trademarks of Dell Inc. or its subsidiaries.
Contents 1 Before you begin............................................................................................................................................ 4 Safety instructions............................................................................................................................................................. 4 Before working inside your computer........................................................................................................................
1 Before you begin Safety instructions Use the following safety guidelines to protect your computer from potential damage and to ensure your personal safety. Unless otherwise noted, each procedure included in this document assumes that the following conditions exist: • You have read the safety information that shipped with your computer. • A component can be replaced or, if purchased separately, installed by performing the removal procedure in reverse order.
7 Remove any installed ExpressCards or Smart Cards from the appropriate slots. Safety precautions The safety precautions chapter details the primary steps to be taken before performing any disassembly instructions. Observe the following safety precautions before you perform any installation or break/fix procedures involving disassembly or reassembly: • Turn off the system and all attached peripherals. • Disconnect the system and all attached peripherals from AC power.
• Use a wired ESD wrist strap that is properly grounded. The use of wireless anti-static straps is no longer allowed; they do not provide adequate protection. Touching the chassis before handling parts does not ensure adequate ESD protection on parts with increased sensitivity to ESD damage. • Handle all static-sensitive components in a static-safe area. If possible, use anti-static floor pads and workbench pads.
Transporting sensitive components When transporting ESD sensitive components such as replacement parts or parts to be returned to Dell, it is critical to place these parts in anti-static bags for safe transport. Lifting equipment Adhere to the following guidelines when lifting heavy weight equipment: CAUTION: Do not lift greater than 50 pounds. Always obtain additional resources or use a mechanical lifting device. 1 Get a firm balanced footing.
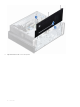
2 Rack rails Installing the rack rails 1 Follow the procedure in Before working inside your computer. 2 To remove the side cover: 8 a Press the latch. b Pull the latch [1] upward and slide the side cover outwards to remove it from the system [2].
3 Remove the 3 screws that secure the top cover to the system chassis [1]. 4 Slide the top cover outwards and lift it away from the system [2].
5 Align and install the side cover to the system.
CAUTION: Ensure to install the side cover on the system to prevent any hazards or loss of components. 6 Before installing the rails, ensure to remove the six (M5x6) screws secured to the screw slots in one of the rail.
7 Align the hooks in the rail to the hook slots on top of the system chassis.
8 Fasten the two (#6-32x1/4) screws to secure the rail on the top of the system chassis. 9 Fasten the three (M5x6) screws removed from the rail in step 6, to secure the rail to the system. 10 Align the screw holes on the other rail to the screw holes on the bottom of the system and fasten the remaining three (M5x6) screws to secure the rail. NOTE: Removing the bottom cover is not required to install the rail to the bottom of the system.
11 Align the screw holes on the rack ears with the screw holes on the rails on the top and bottom of the system. 12 Fasten the 4 (M3.5x8.4) screws on the top and bottom of the system to secure the rack ears to the system. 13 Install the system in the rack.
3 Getting help Contacting Dell NOTE: If you do not have an active Internet connection, you can find contact information on your purchase invoice, packing slip, bill, or Dell product catalog. Dell provides several online and telephone-based support and service options. Availability varies by country and product, and some services may not be available in your area. To contact Dell for sales, technical support, or customer service issues: 1 Go to Dell.com/support. 2 Select your support category.