
Instruction Manual


Back to Contents Page
Configuring Network Settings
Enabling LAN, WiFi, or WWAN
Connecting to a Local Area Network (LAN)
Connecting to a Wireless Network (WiFi)
Connecting to a Mobile Broadband Network (WWAN)
Enabling LAN, WiFi, or WWAN
Before you start using your computer in the Dell™ Latitude ON™ mode, you must configure it to connect to either a LAN,
WiFi, or WWAN. The first time you launch Latitude ON Flash, a First-Time Wizard will guide you through the network setup
process. You can also configure settings at any time, as explained below.
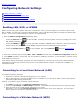
1. Open the Network Configuration dialog box by either:
Clicking the Network icon on the LaunchBar. (Hovering the mouse pointer over this icon displays the current
LAN and WiFi connection status.)
Clicking the WWAN icon icon on the LaunchBar, available if a WWAN device is detected. (Hovering the mouse
pointer over the icon displays the current WWAN connection status and the detected signal strength.)
Clicking the Settings Panel icon on the LaunchBar, then clicking Network within the Settings Panel.
2. Select your connection type by clicking WIFI, LAN, or WWAN at the left side of the Network Configuration dialog box.
3. If the Enable checkbox is not checked, click the checkbox to enable the connection. (If the checkbox is checked, clicking
it will disable the connection.)
If the network settings are properly configured, then after establishing a connection for the first time, Latitude ON Flash
automatically recognizes the connection and connects to the enabled network, whether it is LAN, WiFi, or WWAN; or a
combination of them.
Connecting to a Local Area Network (LAN)
For standard automatic connection:
1. Ensure that a network cable has been plugged in to your computer.
2. After a cable has been connected, the DHCP service is available on your network by default, and you should get the
appropriate IP/DNS settings automatically.
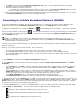
However, if you wish to specify connection settings manually:
1. Click LAN at the left side of the Network Configuration dialog box.
2. Uncheck the IP Settings and DNS Settings checkboxes. This enables the fields under them for manual text input.
3. Enter the values for IP or DNS settings assigned by your IT staff.
Alternatively, you can click Connection Assistant in the bottom right corner of the dialog box. This convenient
feature guides you through the configuration process.
Connecting to a Wireless Network (WiFi)