Stasiun Kerja Dell Precision R7610 Panduan Pemilik Komputer Model Resmi: E15S Tipe Resmi: E15S002
Catatan, Perhatian, dan Peringatan CATATAN: CATATAN menunjukkan informasi penting yang membantu Anda untuk menggunakan komputer dengan lebih baik. PERHATIAN: PERHATIAN menunjukkan kemungkinan terjadinya kerusakan pada perangkat keras atau hilangnya data, dan memberitahu Anda mengenai cara menghindari masalah tersebut. PERINGATAN: PERINGATAN menunjukkan kemungkinan terjadinya kerusakan pada properti, cedera, atau kematian. © 2013 Dell Inc.
Daftar Isi Catatan, Perhatian, dan Peringatan............................................................................................2 1 Mengerjakan Komputer Anda...................................................................................................7 Sebelum Mengerjakan Bagian Dalam Komputer.....................................................................................................7 Alat Bantu yang Disarankan...........................................................................
18 Memasang Selubung Pendingin ..........................................................................................43 19 Melepaskan SAS (Serial attached SCSI) Backplane........................................................45 20 Memasang SAS (Serial Attached SCSI) backplane..........................................................47 21 Melepaskan Unit Sasis Depan..............................................................................................49 22 Memasang Unit Sasis Depan...............
40 Memasang Kartu Host Akses Jarak Jauh..........................................................................89 41 Melepaskan Kartu Pengontrol SAS.....................................................................................91 42 Memasang Kartu Pengontrol SAS.......................................................................................93 43 Melepaskan Board Sistem....................................................................................................
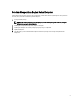
Mengerjakan Komputer Anda 1 Sebelum Mengerjakan Bagian Dalam Komputer Gunakan panduan keselamatan berikut untuk membantu Anda melindungi komputer dari kemungkinan kerusakan dan membantu Anda memastikan keselamatan diri Anda. Kecuali dinyatakan sebaliknya, setiap prosedur yang disertakan dalam dokumen ini mengasumsikan adanya kondisi berikut: • • Anda telah membaca informasi keselamatan yang dikirimkan bersama komputer Anda.
5. Tekan dan tahan tombol daya saat koneksi komputer dicabut untuk menghubungkan board sistem ke ground. 6. Lepaskan penutup. PERHATIAN: Sebelum menyentuh apa pun di bagian dalam komputer, sentuh permukaan logam yang tidak dicat, seperti logam pada bagian belakang komputer. Saat bekerja, sentuh secara berkala permukaan logam yang tidak bercat untuk menghilangkan listrik statis, yang dapat mengganggu komponen internal.
Sebelum Mengerjakan Bagian Dalam Komputer Setelah Anda menyelesaikan setiap prosedur penggantian, pastikan Anda telah menyambungkan semua peralatan eksternal, kartu, dan kabel sebelum menyalakan komputer. 1. Pasang kembali penutup. PERHATIAN: Untuk menyambungkan kabel jaringan, terlebih dahulu pasang kabel ke dalam perangkat jaringan dan pasang ke dalam komputer. 2. Sambungkan setiap kabel telepon atau jaringan ke komputer. 3. Sambungkan komputer dan semua perangkat yang terpasang ke stopkontak. 4.
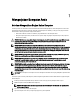
Ikhtisar Sistem 2 Gambar yang ditampilkan di bawah ini menampilkan tampilan dalam dari komputer setelah bezel depan dan penutup dilepaskan. Gelembung dialog menampilkan nama dan tata letak dari komponen di dalam komputer. 1. panel kontrol 2. penutup plastik 3. selubung pendingin 4. braket kipas 5. kipas sistem 6. unit distribusi daya 7. sangkar kartu ekspansi tengah 8. sangkar kartu ekspansi luar 9. baterai sel berbentuk koin 10. SAS backplane 11. unit chassis depan 12. hard disk 13.
Melepaskan Bezel Depan 1. Ikuti prosedur dalam Sebelum Mengerjakan Bagian Dalam Komputer Anda. 2. Buka bezel depan yang terkunci menggunakan kunci yang diberikan. 3 a) Angkat tab pelepas bezel dan angkat bezel depan secara perlahan dari komputer.
Memasang Bezel Depan 1. Masukkan bezel depan ke dalam slot-nya dengan arah menghadap ke bawah dan tekan ke dalam komputer. 2. Kuatkan tab pelepas. 3. Kunci bezel depan menggunakan kunci yang diberikan. 4. Ikuti prosedur dalam Setelah Mengerjakan Bagian Dalam Komputer Anda.
Melepaskan Penutup 1. Ikuti prosedur dalam Sebelum Mengerjakan Bagian Dalam Komputer Anda. 2. Lepaskan: 3. Putar kunci pelepas kait-searah putaran jam ke posisi tidak terkunci. – 5 bezel depan a) Angkat kait dan geser ke belakang komputer. 4. Angkat penutup dari komputer.
Memasang Penutup 1. Tempatkan penutup pada komputer dan tekan hingga terdengar bunyi klik tanda telah terpasang dengan benar. 2. Tekan kait penutup. 3. Pasang bezel depan. 4. Ikuti prosedur dalam Setelah Mengerjakan Bagian Dalam Komputer Anda.
Melepaskan Catu Daya 1. Ikuti prosedur dalam Sebelum Mengerjakan Bagian Dalam Komputer Anda. 2. Tekan dan tahan tab warna jingga ke arah kait lalu tarik unit catu daya dari komputer.
Memasang Unit Catu Daya 1. Masukkan unit catu daya ke dalam komputer hingga terdengar suara klik tanda telah terpasang dengan benar. 2. Ikuti prosedur dalam Setelah Mengerjakan Bagian Dalam Komputer Anda.
Melepaskan Rangka Hard Disk 1. Ikuti prosedur dalam Sebelum Mengerjakan Bagian Dalam Komputer Anda. 2. Lepaskan bezel depan. 3. Tekan tombol pelepas rangka hard-drive. 9 a) Tarik handel rangka hard disk hingga terbuka. b) Geser hard drive dari celah drive.
Memasang Rangka Hard Disk 1. Masukkan hard disk ke dalam laci drive. 2. Tekan handel rangka hard disk hingga terdengar suara klik tanda telah terpasang dengan benar. 3. Pasang bezel depan. 4. Ikuti prosedur dalam Setelah Mengerjakan Bagian Dalam Komputer Anda.
Melepaskan Unit Hard Disk 1. Ikuti prosedur dalam Sebelum Mengerjakan Bagian Dalam Komputer Anda. 2. Lepaskan: 3. – bezel depan – rangka hard drive 11 Lepaskan sekrup yang menahan caddy hard drive ke hard drive. a) Geser hard drive dari unit drive.
Memasang Unit Hard Disk 1. Tempatkan hard disk ke dalam kotak hard disk. 2. Kuatkan sekrup yang menahan hard disk pada kedua sisi kotak hard disk. 3. Pasang : 4. – rangka hard drive – bezel depan 12 Ikuti prosedur dalam Setelah Mengerjakan Bagian Dalam Komputer Anda.
Melepaskan Panel Kontrol 13 PERHATIAN: Diperlukan dua obeng Torx berbeda untuk pembongkaran/pemasangan kembali panel kontrol, obeng T10 dan T8. 1. Ikuti prosedur dalam Sebelum Mengerjakan Bagian Dalam Komputer Anda. 2. Lepaskan: 3. – bezel depan – penutup Lepaskan sekrup torx yang menahan panel kontrol. a) Cabut kabel panel kontrol. b) Lepaskan sekrup yang menahan board panel kontrol.
Memasang Panel Kontrol 1. Sambungkan kabel panel kontrol. 2. Pasang sekrup yang menahan panel kontrol. 3. Pasang kembali sekrup torx yang menahan panel kontrol. 4. Pasang : 5. – penutup – bezel depan. 14 Ikuti prosedur dalam Setelah Mengerjakan Bagian Dalam Komputer Anda.
Melepaskan Drive Optik 1. Ikuti prosedur dalam Sebelum Mengerjakan Bagian Dalam Komputer Anda. 2. Lepaskan: 3. – bezel depan – penutup – selubung pendingin 15 Tekan tab pelepas berwarna biru ke arah yang ditunjukkan dan angkat penutup plastiknya. a) Lepaskan penutup plastik dari penjepit yang menahannya pada sisi yang lain dan lepaskan dari komputer. 4. Cabut kabel daya dan kabel data dari drive optis. a) Tekan ke bawah dan tekan tab pelepas berwarna biru ke arah bagian depan komputer.
Memasang Drive Optik 16 1. Masukkan drive optis ke dalam laci drive. 2. Sambungkan kabel daya dan data. 3. Pasang kembali penutup plastik dengan cara mengencangkan tab yang ada di salah satu sisi ke penjepit logam dan dengan cara menekan sisi yang lainnya sampai terdengar suara klik tanda telah terpasang dengan benar. 4. Pasang: 5. – selubung pendingin – penutup – bezel depan Ikuti prosedur dalam Setelah Mengerjakan Bagian Dalam Komputer Anda.
Melepaskan Selubung Pendingin 1. Ikuti prosedur dalam Sebelum Mengerjakan Bagian Dalam Komputer Anda. 2. Lepaskan: 3. – bezel depan – penutup 17 Angkat selubung pendingin ke atas dan lepaskan dari board sistem.
Memasang Selubung Pendingin 1. Tempatkan selubung pendingin secara perlahan di depan kipas sistem ke dalam board sistem. 2. Pasang: 3. – penutup – bezel depan 18 Ikuti prosedur dalam Setelah Mengerjakan Bagian Dalam Komputer Anda.
Melepaskan SAS (Serial attached SCSI) Backplane 1. Ikuti prosedur dalam Sebelum Mengerjakan Bagian Dalam Komputer Anda. 2. Lepaskan: – bezel depan – penutup – selubung pendingin – drive optik – rangka hard drive – unit hard disk 3. Cabut semua kabel SAS dengan cara menekan tab pelepas yang sesuai. 4. Tekan tab pelepas berwarna biru ke arah yang ditunjukkan oleh tanda panah ke arah unit hard drive untuk melepaskan SAS backplane dari board sistem.
Memasang SAS (Serial Attached SCSI) backplane 20 1. Tekan tab pelepas berwarna biru dan masukkan backplane ke dalam slot pada board sistem bersama dengan unit hard drive. 2. Sambungkan kabel SAS. 3. Pasang: 4. – unit hard disk – rangka hard drive – drive optik – selubung pendingin – penutup – bezel depan Ikuti prosedur dalam Setelah Mengerjakan Bagian Dalam Komputer Anda.
Melepaskan Unit Sasis Depan 1. Ikuti prosedur dalam Sebelum Mengerjakan Bagian Dalam Komputer Anda. 2. Lepaskan: 3. – bezel depan – penutup – selubung pendingin 21 Tekan ke dalam kedua tab pelepas dan geserkan unit chassis depan ke arah bagian depan komputer.
Memasang Unit Sasis Depan 22 1. Geser unit sasis depan ke arah belakang komputer hingga terdengar suara jika telah terpasang dengan benar. 2. Pasang: 3. – selubung pendingin – penutup – bezel depan Ikuti prosedur dalam Setelah Mengerjakan Bagian Dalam Komputer Anda.
Melepaskan Braket Kipas 1. Ikuti prosedur dalam Sebelum Mengerjakan Bagian Dalam Komputer Anda. 2. Lepaskan: 3. – penutup – selubung pendingin 23 Tarik kedua tab pelepas ke atas secara bersamaan untuk melepaskan braket kipas. a) Angkat braket kipas dan lepaskan dari komputer.
Memasang Braket Kipas 1. Tempatkan braket kipas ke dalam komputer. 2. Pastikan tidak ada kabel di bagian atas konektor kipas. 3. Tekan kedua tab pelepasan ke arah bawah secara bersamaan untuk menguatkan braket. 4. Pasang: 5. – selubung pendingin – penutup 24 Ikuti prosedur dalam Setelah Mengerjakan Bagian Dalam Komputer Anda.
Melepaskan Kipas Sistem 1. Ikuti prosedur dalam Sebelum Mengerjakan Bagian Dalam Komputer Anda. 2. Lepaskan: 3. – penutup – unit chassis depan 25 Tekan tab pelepas dan angkat kipas dari unit kipas sistem. a) Ulangi langkah di atas untuk melepaskan kipas sistem yang tersisa dari unit tersebut.
Memasang Kipas Sistem 26 1. Masukkan kipas ke dalam unit kipas sistem hingga terdengar suara klik tanda telah terpasang dengan benar. 2. Ulangi langkah di atas untuk memasang kipas sistem yang tersisa ke dalam unit tersebut. 3. Pasang: 4. – unit chassis depan – penutup Ikuti prosedur dalam Setelah Mengerjakan Bagian Dalam Komputer Anda.
Melepaskan Baterai Sel Koin 1. Ikuti prosedur dalam Sebelum Mengerjakan Bagian Dalam Komputer Anda. 2. Lepaskan: 3. – bezel depan – penutup – selubung pendingin – braket kipas 27 Tekan kait pelepas dari baterai untuk memungkinkan baterai tersembul dari soket. Angkat baterai sel berbentuk koin dari komputer.
Memasang Baterai Sel Koin 28 1. Tempatkan baterai sel berbentuk koin ke dalam slot pada board sistem. 2. Tekan baterai sel berbentuk koin ke bawah hingga kait pelepas memantul kembali ke tempatnya dan menahannya. 3. Pasang: 4. – braket kipas – selubung pendingin – penutup – bezel depan Ikuti prosedur dalam Setelah Mengerjakan Bagian Dalam Komputer.
Melepaskan Memori 1. Ikuti prosedur dalam Sebelum Mengerjakan Bagian Dalam Komputer Anda. 2. Lepaskan: 3. – bezel depan – penutup – selubung pendingin – unit chassis depan – braket kipas 29 Tekan klip yang menguatkan memori pada setiap sisi modul memori, dan angkat modul memori ke atas untuk melepaskannya dari komputer.
Memasang Memori 1. Masukkan modul memori ke dalam soket memori. 2. Tekan modul memori hingga klip penahan menguatkan modul memori pada tempatnya. 3. Pasang: 4. – braket kipas – unit chassis depan – selubung pendingin – penutup – bezel depan 30 Ikuti prosedur dalam Setelah Mengerjakan Bagian Dalam Komputer Anda.
Melepaskan Heat Sink 1. Ikuti prosedur dalam Sebelum Mengerjakan Bagian Dalam Komputer Anda. 2. Lepaskan: – bezel depan – penutup – selubung pendingin – braket kipas 31 3. Geser unit chassis depan ke arah depan. 4. Longgarkan sekrup penahan pada unit pendingin tersebut. Direkomendasikan untuk mulai melonggarkan sekrup arah-diagonal untuk mencegah salah satu sisi unit pendingin terangkat selama pelepasan. a) Angkat unit pendigin dan lepaskan dari komputer.
Memasang Heat Sink 1. Tempatkan unit pendingin di atas prosesor pada board sistem. 2. Kencangkan dan amankan sekrup penahan arah-diagonal pada unit pendingin. 3. Pasang: 4. – braket kipas – unit chassis depan – selubung pendingin – penutup – bezel depan 32 Ikuti prosedur dalam Setelah Mengerjakan Bagian Dalam Komputer Anda.
Melepaskan Prosesor 1. Ikuti prosedur dalam Sebelum Mengerjakan Bagian Dalam Komputer Anda. 2. Lepaskan: 3. – bezel depan – penutup – selubung pendingin – unit chassis depan – braket kipas – heat sink 33 Untuk melepaskan prosesor: CATATAN: Penutup prosesor dikuatkan oleh dua tuas. Tuas ini memiliki ikon yang menunjukkan tuas mana yang perlu dibuka terlebih dahulu dan tuas mana yang ditutup lebih dahulu.
4. Ulangi langkah-langkah di atas untuk melepaskan prosesor kedua (jika ada) dari komputer. Untuk memverifikasi jika komputer Anda memiliki slot prosesor ganda, lihat Komponen Board Sistem.
Memasang Prosesor 1. Pasang prosesor pada soketnya. 2. Pasang kembali penutup prosesor. 34 CATATAN: Penutup prosesor dikuatkan oleh dua tuas. Tuas ini memiliki ikon yang menunjukkan tuas mana yang perlu dibuka terlebih dahulu dan tuas mana yang ditutup lebih dahulu 3. Geser tuas pertama ke samping ke dalam kait penahan untuk menguatkan prosesor. 4. Ulangi langkah '3' untuk menggeser tuas kedua ke dalam kait penahan. 5. Pasang: 6.
Melepaskan Sangkar Kartu Ekspansi 1. Ikuti prosedur dalam Sebelum Mengerjakan Bagian Dalam Komputer Anda. 2. Lepaskan: – bezel depan – penutup 3. Lepaskan kabel daya dari klip logam. 4. Angkat sangkar kartu ekspansi luar dan balikkan.
5. Cabut semua kabel yang mengarah ke sangkar kartu ekspansi luar dan angkat dari komputer. 6. Cabut semua kabel yang mengarah ke sangkar kartu ekspansi tengah.
7. Angkat kartu ekspansi tengah ke atas dan keluarkan dari komputer.
Memasang Sangkar Kartu Ekspansi 1. Sambungkan kabel yang menuju ke sangkar kartu ekspansi tengah. 2. Pasang sangkar kartu ekspansi tengah pada komputer. 3. Sambungkan kabel yang menuju ke sangkar kartu ekspansi luar. 4. Pasang sangkar kartu ekspansi luar pada komputer. 5. Jalin kabel yang menuju ke sangkar kartu ekspansi. 6. Pasang: 7. – penutup – bezel depan 36 Ikuti prosedur dalam Setelah Mengerjakan Bagian Dalam Komputer Anda.
Melepaskan Unit Distribusi Daya 1. Ikuti prosedur dalam Sebelum Mengerjakan Bagian Dalam Komputer Anda. 2. Lepaskan: – bezel depan – penutup – selubung pendingin – catu daya – kipas sistem – braket kipas 37 3. Geser unit chassis depan ke arah depan. 4. Cabut konektor daya drive optis dan konektor SAS backplane dengan cara menekan takik pada setiap konektor individual dan menariknya ke arah luar. 5.
6. Lepaskan semua kabel dari tab perutean. 7. Lepaskan sekrup yang menahan unit distribusi daya. a) Angkat unit distribusi daya ke atas dan lepaskan dari komputer.
Memasang Unit Distribusi Daya 1. Tempatkan unit distribusi daya pada komputer. 2. Pasang sekrup yang menahan unit distribusi daya. 3. Rutekan semua kabel daya melalui saluran peruteannya. 4. Sambungkan CPU 1, CPU 2, SAS Backplane dan konektor daya drive optis. 5. Geser unit chassis depan ke posisi asalnya. 6. Pasang: 7.
Melepaskan Kartu Host Akses Jarak Jauh 1. Ikuti prosedur dalam Sebelum Mengerjakan Bagian Dalam Komputer Anda. 2. Lepaskan: – bezel depan – penutup – sangkar kartu ekspansi 3. Lepaskan semua kartu dari sangkar riser kartu. 4. Angkat tab pelepas dan geser board riser ke arah kanan untuk melepaskannya dari komputer.
Memasang Kartu Host Akses Jarak Jauh 1. Pasang kartu host akses jarak jauh ke dalam slot-nya. 2. Pasang: 3. – sangkar kartu ekspansi – penutup – bezel depan 40 Ikuti prosedur dalam Setelah Mengerjakan Bagian Dalam Komputer Anda.
Melepaskan Kartu Pengontrol SAS 1. Ikuti prosedur dalam Sebelum Mengerjakan Bagian Dalam Komputer Anda. 2. Lepaskan: 3. – bezel depan – penutup – sangkar kartu ekspansi – kartu host akses jarak jauh 41 Lepaskan sekrup yang menahan kartu pengontrol SAS dan keluarkan dari komputer.
Memasang Kartu Pengontrol SAS 1. Pasang sekrup yang menahan kartu pengontrol SAS. 2. Pasang: 3. – kartu host akses jarak jauh – sangkar kartu ekspansi – penutup – bezel depan 42 Ikuti prosedur dalam Setelah Mengerjakan Bagian Dalam Komputer Anda.
Melepaskan Board Sistem 1. Ikuti prosedur dalam Sebelum Mengerjakan Bagian Dalam Komputer Anda. 2. Lepaskan: 3. – bezel depan – penutup – selubung pendingin – heat sink – prosesor – memori – unit chassis depan – catu daya – braket kipas – sangkar kartu ekspansi – unit distribusi daya 43 Angkat tab pelepas berwarna biru, geser board sistem ke arah yang ditunjukkan dan lepaskan dari komputer.
Memasang Board Sistem 1. Pasang board sistem pada sasis. 2. Geser papan sistem ke bagian belakang komputer. 3. Tekan tab pelepas berwarna biru. 4. Pasang: 5. – unit distribusi daya – sangkar kartu ekspansi – braket kipas – memori – prosesor – heat sink – unit chassis depan – selubung pendingin – penutup – bezel depan 44 Ikuti prosedur dalam Setelah Mengerjakan Bagian Dalam Komputer Anda.
45 Komponen Board Sistem Gambar berikut menampilkan komponen board sistem. 1. 2. 3. 4. 5. 6. 7. 8. 9. 10. 11. slot DIMM Konektor kipas-sistem Konektor panel-depan Konektor daya memori CPU 2 Konektor unit distribusi daya Konektor daya 24-pin Konektor USB depan Bus riser I/O Konektor SAS Konektor bus PCIe G2 S7 Bus riser I/O 12. 13. 14. 15. 16. 17. 18. 19. 20.
46 Penelusuran Kesalahan LED Diagnostik CATATAN: LED diagnostik hanya berfungsi sebagai indikator progres selama proses POST. Lampu LED ini tidak menunjukkan masalah yang dapat menyebabkan rutin POST berhenti. LED diagnostik terletak di bagian depan sasis di sebelah tombol daya. LED diagnostik ini hanya aktif dan terlihat selama proses POST. Setelah sistem operasi mulai memuat, diagnostik mati dan tidak lagi terlihat.
Uraian Masalah Pola Cahaya LED Diagnostik Langkah-Langkah Penelusuran Kesalahan LED Tombol Daya • Kegagalan board sistem mungkin telah terjadi. Kemungkinan kegagalan board sistem, catu daya, atau peripheral telah terjadi. Cabut kabel komputer. Biarkan selama satu menit agar daya terkuras habis. Pasang komputer ke stopkontak listrik yang berfungsi dan tekan tombol daya. • • • • 102 stopkontak tersebut, misalnya, lampu.
Uraian Masalah Pola Cahaya LED Diagnostik Langkah-Langkah Penelusuran Kesalahan LED Tombol Daya menyala, masalahnya ada pada catu daya. Modul memori terdeteksi, namun kegagalan daya memori telah terjadi. • • Jika dua atau lebih modul memori terpasang, lepaskan modul tersebut, lalu pasang kembali satu modul lalu nyalakan kembali komputer.
Uraian Masalah Pola Cahaya LED Diagnostik Langkah-Langkah Penelusuran Kesalahan LED Tombol Daya kartu peripheral satu per satu hingga Anda menemukan kartu yang rusak. Konektor daya tidak terpasang dengan benar. Pasang kembali konektor daya 2x2 dari unit catu daya. Kemungkinan kartu peripheral atau board sistem mengalami kegagalan. Lepaskan semua kartu peripheral dari slot PCI dan PCIe lalu restart komputer.
Uraian Masalah Pola Cahaya LED Diagnostik Langkah-Langkah Penelusuran Kesalahan LED Tombol Daya Modul memori terdeteksi, namun kegagalan memori telah terjadi. • • Kemungkinan terjadi kegagalan pada kartu grafis. • • • Jika ada dua atau lebih modul memori yang terpasang, lepaskan modul (lihat panduan servis), lalu pasang kembali satu modul (lihat panduan servis) lalu nyalakan komputer dari awal.
Uraian Masalah Pola Cahaya LED Diagnostik Langkah-Langkah Penelusuran Kesalahan LED Tombol Daya • Modul memori terdeteksi, namun konfigurasi atau galat kompatibilitas telah terjadi. • • Kemungkinan terjadi kegagalan pada kartu ekspansi. • • • 106 lalu nyalakan komputer dari awal. Jika komputer menyala dengan normal, teruskan memasang modul memori lainnya (satu per satu) hingga Anda mengetahui modul memori yang rusak atau pasang semua modul yang tidak rusak.
Uraian Masalah Pola Cahaya LED Diagnostik Langkah-Langkah Penelusuran Kesalahan LED Tombol Daya dilepaskan dari komputer untuk melihat adanya konflik sumber daya. Kemungkinan terjadi kegagalan sumber daya board sistem dan/atau kegagalan perangkat keras telah terjadi. • • • Beberapa kegagalan lain telah terjadi. • • • • Kosongkan CMOS. Lepaskan semua peripheral internal dan eksternal, dan nyalakan komputer dari awal.
Uraian Masalah Pola Cahaya LED Diagnostik Langkah-Langkah Penelusuran Kesalahan LED Tombol Daya urutan booting untuk perangkat yang terpasang sudah benar. Pesan Galat Galat Yang Menghentikan Sistem Sepenuhnya Berikut ini adalah daftar pesan galat BIOS yang akan menghentikan sistem sepenuhnya, yang mengharuskan Anda untuk melakukan siklus daya sistem: • Error! Memory configured incorrectly. Please enter Setup for Memory Info details (Galat! Memori salah dikonfigurasi.
• Plug & Play Configuration Error (Galat Konfigurasi Pasang & Putar) Galat Yang Tidak Menghentikan Sistem Berikut ini adalah daftar pesan galat BIOS yang tidak menghentikan sistem tetapi akan menampilkan pesan peringatan, jeda selama beberapa detik, dan lalu melanjutkan untuk melakukan booting: • Alert! Cover was previously removed (Waspada! Penutup telah dilepaskan sebelumnya) • Alert! Error initializing PCI Express slot n (or bridge) (Waspada! Galat memulai slot n (atau bridge) PCI Express) 109
47 Spesifikasi CATATAN: Penawaran mungkin berbeda-beda di setiap negara. Spesifikasi berikut adalah yang hanya diwajibkan oleh hukum untuk dikirim bersama komputer Anda. Untuk informasi lebih lanjut tentang konfigurasi komputer Anda, klik Start (Mulai) → Help and Support (Bantuan dan Dukungan) dan pilih opsi untuk melihat informasi tentang komputer Anda. Tabel 1.
Tabel 5. Audio Audio Spesifikasi Terintegrasi codec audio Realtek ALC3220 Tabel 6. Jaringan Jaringan Spesifikasi Terintegrasi Pengontrol Ethernet Intel 82579 dan Intel 82574 Tabel 7. Bus Ekspansi Bus Ekspansi Spesifikasi Tipe bus: PCI Express 3.0 PCI Express 2.0 PCI 2.3 (opsional) SAS USB 2.0 SATA 3 Kecepatan bus: PCI: 133 MB/d PCI Express: • • • • Kecepatan dua arah PCIe 3.0 x16 slot - 16 GB/detik Kecepatan dua arah PCIe 3.0 x8-slot - 8 GB/detik Kecepatan dua arah PCIe 3.
Slot Kartu Spesifikasi Slot 5 PCI Express 3.0 x8/x16 elektris/mekanis, tinggi dan panjang penuh Slot 6 PCI Express 3.0 x16 elektris dan mekanis, tinggi dan panjang penuh Opsi Riser Tengah 2: Slot 5 PCI 32b, 5V, ketinggian penuh, panjang penuh Slot 6 PCI Express 3.0 x16 elektris dan mekanis, tinggi dan panjang penuh IO Belakang: Slot 7 PCI Express 2.0 x4/x16 elektris/mekanis, tinggi dan panjang penuh Tabel 9.
Konektor internal Spesifikasi Kipas sistem enam konektor empat-pin Kontrol daya jarak jauh kartu host satu konektor dua-pin CPU/daya Memori empat konektor empat-pin Memori dua belas konektor 240-pin (DDR3) IO Belakang: PCI Express satu konektor 98-pin (x8) Riser: Riser Luar PCI Express tiga konektor 164-pin (x16) Opsi Riser Tengah 1 PCI Express dua konektor 164-pin (x16) Opsi Riser Tengah 2: PCI satu konektor 120-pin (32 bita) PCI Express satu konektor 164-pin (x16) IO Depan: USB Depan
Kontrol dan Lampu Spesifikasi padam (tidak menyala) — Komputer tidak mendeteksi adanya koneksi fisik ke jaringan. Lampu integritas tautan jaringan (belakang): lampu hijau — Sambungan yang baik sebesar 10 Mbs terjadi antara jaringan dan komputer. lampu oranye — Sambungan yang baik sebesar 100 Mbs terjadi antara jaringan dan komputer.
Tabel 15.
48 Pengaturan Sistem Menu Booting Seperti halnya platform workstation sebelumnya, komputer ini menyertakan menu booting satu-kali. Fitur ini memberi mekanisme cepat dan mudah untuk melewatkan urutan booting yang ditetapkan oleh Pengaturan Sistem dan melakukan booting secara langsung ke perangkat tertentu (misalnya: floppy, CD-ROM, atau hard disk).
Dell Diagnostics Platform yang dipasang pabrik mencakup diagnostik sistem 32-pada partisi utilitas yang terpasang. Akses diagnostik ini menggunakan kombinas tombol selama booting sistem dan pilih Diagnostics. Setelah menekan kombinasi tombol, modl yang sesuai akan dimuat dan diagnostik PSA berjalan. Jika ini dilewati, menu utama Dell Diagnostics muncul. Saat keluar diagnostik, sistem akan melakukan booting ulang dan kembali ke sistem operasi yang dipasang.
Drive Diskette Drive Menentukan cara BIOS mengonfigurasi drive floppy. • • SATA Operation Mengonfigurasikan modus pengoperasian pengontrol hard disk terintegrasi.
Video Primary Video Memungkinkan pengguna untuk secara spesifik urutan sistem menunjuk pengontrol video utama ketika satu atau dua pengontrol tersedia. • • Pengontrol 1 Pengontrol 2 Performance (Performa) Multi Core Support Menetapkan apakah komputer akan mengaktifkan satu atau semua core. Enable Multi Core Support (Aktifkan Dukungan Multi Core) — Diaktifkan secara default. Hyper-Threading Technology Mengaktifkan atau menonaktifkan Hyper-Threading Technology.
Virtualization Support (Dukungan Virtualisasi) Enable Intel® VT for Direct I/O (Aktifkan Intel® VT for Direct I/O) - Dinonaktifkan secara default. Security (Keamanan) Administrator Password Digunakan untuk mencegah pengguna yang tidak berizin dari mengubah setiap setelan konfigurasi. Masukkan data berikut dan klik OK: 1. Old Password (Sandi Lama) 2. New Password (Sandi Baru) 3.
Security (Keamanan) • • Aktifkan On-Silent (Aktif/Diam-diam) — Diaktifkan secara default jika intrusi sasis terdeteksi. Pengelolaan Daya AC Recovery Menentukan cara sistem merespons saat daya AC diterapkan setelah listrik mati. Anda dapat menetapkan Pemulihan AC ke: • • • Auto On Time Power Off (Daya Mati, bawaan) Power On (Daya Aktif) Last State (Kondisi Terakhir) Menetapkan waktu untuk mengaktifkan komputer secara otomatis. Waktu ditetapkan dalam format standar 12-jam (jam:menit:detik).
POST Behavior (Perilaku POST) Fast Boot Memungkinkanpercepatan proses booting dengan melewatkan beberapa langkah kompatibilitas. Enable Fast Boot (Aktifkan Booting Cepat) — Diaktifkan secara default Numlock LED Menetapkan apakah fitur Numlock harus aktif ketika komputer pertama kali dinyalakan.
Menghubungi Dell 49 Menghubungi Dell CATATAN: Jika Anda tidak memiliki sambungan Internet aktif, Anda dapat menemukan informasi kontak pada faktur pembelian, slip kemasan, tagihan, atau katalog produk Dell. Dell menyediakan beberapa dukungan berbasis online dan telepon serta opsi servis. Ketersediaan bervariasi menurut negara dan produk, dan sebagian layanan mungkin tidak tersedia di daerah Anda. Untuk menghubungi Dell atas masalah penjualan, dukungan teknis, atau layanan pelanggan: 1. Kunjungi dell.