Dell Precision Appliance for Wyse User’s Guide
Notes, cautions, and warnings NOTE: A NOTE indicates important information that helps you make better use of your computer. CAUTION: A CAUTION indicates either potential damage to hardware or loss of data and tells you how to avoid the problem. WARNING: A WARNING indicates a potential for property damage, personal injury, or death. Copyright © 2016 Dell Inc. All rights reserved. This product is protected by U.S. and international copyright and intellectual property laws.
Contents 1 Overview................................................................................................................. 5 Solution overview.................................................................................................................................. 5 Hardware components....................................................................................................................5 Software components.......................................................................
Installing the VMware tools................................................................................................................ 24 5 Post Operating System Installation Tasks......................................................26 6 Precision Appliance for Wyse - Clients...........................................................27 Client and connect support matrix.....................................................................................................
Overview 1 The Dell Precision Appliance for Wyse is a 2 Rack Unit (2U) pre-configured appliance, which is configured on the Dell Precision Rack 7910. The Dell Precision Appliance for Wyse is an Independent Software Vendor (ISV) certified solution that offers flexible deployment, scalability, and management of a high-performance virtual workstation environment. Using this solution, you can achieve mobile, needbased access to graphics-intensive applications and data along with security.
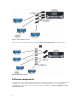
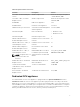
Figure 1. Dedicated GPU solution Figure 2 shows the hardware components for the Dell Precision Rack 7910’s shared GPU option. Figure 2. Shared GPU solution Software components Table 1 describes the driver/firmware/software versions that are required for successful installation and configuration of a GPU enabled virtual desktop; either in the dedicated GPU or in the shared GPU configurations. The software versions listed in the table are available at the Dell.com/support for Dell Precision Rack 7910.
Table 1. Required software and versions Software Description Version Server OS – Dedicated Graphics version VMware vSphere ESXi Dell Custom Image: 6.0 Update 1 – Build 3029758; A00 Server OS – vGPU, or Shared Graphics version VMware vSphere ESXi Dell Custom Image: 6.0 – Build 2494585; A00 R7910 BIOS BIOS for the Appliance 1.4.3 R7910 Firmware Firmware for the Appliance 2.21.21.21 iDRAC with Lifecycle Controller Server Out of Band Management 2.21.21.
Prerequisites for the GPU appliance Before configuring the dedicated GPU version of the appliance, you must be aware of: • Hypervisor User name and Password • Hypervisor Host License (optional) NOTE: The prerequisites required are available in the Using the Quick Start Tool section. NVIDIA GPU driver The installation of the NVIDIA graphics driver is required on each virtual machine. You can download the GPU driver available at Dell.com/support for Dell Precision Rack 7910.
• vSphere hypervisor Host License (optional) NOTE: The prerequisites required are available in the Using the Quick Start Tool section. NVIDIA GPU driver The installation of the NVIDIA graphics driver is required on each virtual machine. You can download the GPU driver available at Dell.com/support for Dell Precision Rack 7910. VMware Horizon View bits (optional) The virtual machines configured for the Dell Precision Rack 7910 can be integrated into a VMware Horizon View environment.
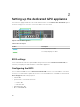
Setting up the dedicated GPU appliance 2 This solution is equipped with three host cards and three GPUs on the Dell Precision Rack 7910. Figure 3 shows the setup process on how to connect the GPUs to the host cards: Figure 3. Dedicated GPU appliance Table 2.
Updating the BIOS If the BIOS requires an update, you can use the BIOS Update Utility that is accessible from the Boot Manager. For more information, see the Updating the BIOS version topic in the Dell Precision Rack 7910 Owner’s Manual. Connecting the GPUs to the host cards The cabling needs to be done on the Dell Precision Rack 7910 in the following order: Table 3. GPU to host card Host cards GPUs PCI Slot 1 <—> PCI Slot 4 PCI Slot 2 <—> PCI Slot 5 PCI Slot 3 <—> PCI Slot 6 1.
3. Ensure all the cables are firmly plugged in. The system is now ready for setup and configuration. Configuring the host cards for use with or without VMware Horizon View NOTE: This section applies only if you have purchased the Dell Precision Rack 7910 with host cards and GPUs solution. This section may also be beneficial if you are not using VMware Horizon View. You should perform these steps before using the Dell Precision Rack 7910’s Quick Start Tool.
Enabling the host driver function For each Teradici host card, you need to enable the host driver function through the web interface of the host card. 1. Log into the administrative web interface for the host card. 2. From the menu, select Configuration > Host Driver Function menu, enable the Host Driver Function. 3. Restart the Dell Precision Appliance for Wyse.
Using the Quick Start Tool 3 NOTE: • The prerequisite to install the Quick Start Tool is to install the Microsoft .Net version 4.0 or later. • If you are using an older version (1.0) of the Quick Start Tool, it is recommended to download and install the latest version (1.1) of the Quick Start Tool from the Drivers and Downloads section available at Dell.com/support page for Dell Precision Rack 7910.
Prerequisites for using the Quick Start Tool Before you configure the virtual machine for your Dell Precision Rack 7910, your system should be racked, cabled, connected to the network, and turned on.
c. Enter the Secondary NTP Server IP address. NOTE: The information under Host Options are optional. You can skip these options, if desired. If you skip the VMware vSphere license option, your workstation will run for a 60-day trial period. 7. Click Next. The Virtual Machine Configuration screen is displayed. 8. Under Virtual Machine Configuration: a. Enter a name for your virtual machines of your choice. For example: VM1 b. Select the operating system for your virtual machines.
NOTE: The information under Host Options are optional. You can skip these options, if desired. If you skip the VMware vSphere license option, your workstation will run for a 60-day trial period. 7. Click Next. The Virtual Machine Configuration screen is displayed. 8. Under Virtual Machine Configuration, select the number of virtual machines that you want to configure. The default option is 4 Virtual Machines. a. Enter a name for your virtual machines of your choice. For example: VM1 b.
Command Description numVGPU Number of virtual machines to create (optional). Valid values are 0,4 and 8. The Default numVGPU is 4, if not specified. This value is only applicable if the system is equipped with the shared vGPU graphics option. osType Operating System of virtual machine that gets created (optional). OsType values should be separated by a comma. The default OsType is Windows 7 x64 for all VMs created. The total number of OsTypes should match with numVGPU values.
4 Installing the VM guest operating system Installing Microsoft Windows 7 NOTE: • If the VMs are configured using an older version of the Quick Start Tool, see the prerequisites for the VMs in Using the Quick Start Tool topic. • Before you install the Microsoft Windows 8.1 operating system, make sure that you have the: – Microsoft Windows 8.1 Disk Image File (ISO), CD, USB, or network install. – VM Boot Option set to EFI.
6. Follow the instructions to install Microsoft Windows 7 at Microsoft Website. Installing the graphics driver Before you install the graphics driver, make sure you download the graphics driver available at Dell.com/ support for Dell Precision Rack 7910, under Drivers and Downloads. After you download the graphics driver, perform the following steps: 1. Double-click the driver .exe file. The User Account Control dialog box is displayed. 2. Click Yes. The Update Package dialog box is displayed. 3.
Installing Microsoft Windows 8.1 NOTE: • • • If the VMs are configured using an older version of the Quick Start Tool, see the prerequisites for the VMs in Using the Quick Start Tool topic. Before you install the Microsoft Windows 8.1 operating system, make sure that you have the: – Microsoft Windows 8.1 Disk Image File (ISO), CD, USB, or network install. – VM Boot Option set to EFI. For more information about the EFI Boot Option, see the VMware documentation - 28494.
6. Follow the instructions to install Microsoft Windows 8.1 at Microsoft Website. Installing the graphics driver Before you install the graphics driver, make sure you download the graphics driver available at Dell.com/ support for Dell Precision Rack 7910, under Drivers and Downloads. After you download the graphics driver, perform the following steps: 1. Double-click the driver .exe file. The User Account Control dialog box is displayed. 2. Click Yes. The Update Package dialog box is displayed. 3.
5. Click the green triangle to start the virtual machine. 6. Follow the instructions to install Red Hat Enterprise Linux 7 at access.redhat.com/ documentation/en-US/Red_Hat_Enterprise_Linux/7/html/Installation_Guide/ Installing the graphics driver Before you install the graphics driver, make sure you download the latest version of the NVIDIA graphics driver available at Dell.com/support for Dell Precision Rack 7910. After you download the graphics driver, perform the following steps: 1.
10. Log in to the VM as root. 11. Register RHEL with subscription and skip to step 12. Otherwise, install the following from the ISO following steps: a. mkdir /media/cdrom b. mount /dev/cdrom /media/cdrom c. vi /etc/yum.repos.d/rhel7_cdrom.repo and add the following: [RHEL_7_Disc] name=RHEL_7_x86_64_Disc baseurl="file:///media/cdrom/" gpgcheck=0 12. yum update 13. yum install kernel-devel kernel-headers gcc make 14. Run sh NVIDIA….sh again. Repeat the steps again. Kernel modules should build and install.
The VMware Tools installation instructions page is displayed. Table 5.
5 Post Operating System Installation Tasks NOTE: The post operating system installation tasks apply only if you have purchased your workstation with Shared GPU option. After you configure the virtual machine and after you install the operating system on the virtual machine, you need to install the VMware View Agent and Direct Connect Agent.
Precision Appliance for Wyse - Clients 6 After you configure the virtual machines for your Dell Precision Rack 7910 with the Dedicated GPU (NVIDIA Quadro Graphics) option or Shared GPU (NVIDIA GRID K2A Graphics) option, Dell recommends you to use Dell Wyse 5020-P25 for getting connected to the remote system. As a remote user of the Dell Precision Rack 7910, you need to setup and configure your Dell Wyse 5020-P25 to get connected remotely.
Table 9. vGPU monitor support Number of monitors Maximum resolution (per monitor) Display interface 1 2560x1600 1 – DisplayPort 2 2560x1600 2 - DisplayPort 3 2560x1600 3 - DisplayPort 4 2560x1600 4 - DisplayPort Connecting a PCoIP Zero Client directly to a host card This section provides a brief outline on how to connect a client to a Virtual Machine by utilizing a host card. By default, the Dell Wyse P25 and P45 zero clients may be configured to connect to a VMware Horizon infrastructure.
7 Troubleshooting Table 10. Possible cause and workaround Problem VMs randomly displays the Blue Screen Of Death (BSOD) and VMware ESXi have a purple screen of death. Workaround • Ensure that each VM has msi interrupt vectors disabled: a. b. c. • Edit the VM again and select the Options tab and click General > Configuration Parameters. Click Add Row. Create six rows. Add the following in the left column: – pciPassthru0.msiEnabled – pciPassthru1.msiEnabled – pciPassthru2.msiEnabled – pciPassthru3.
Problem The message “Source signal on other port” is displayed on the display. The following shows two host scenarios using VMware View virtual desktops or PCoIP Host Cards for remote workstation applications. Workaround This indicates that a video source connected to the Host does not correspond with the video port used on the zero client. This can be corrected by either swapping the video ports used on the Host or the zero client. This is resolved in VMware View 5.0.1.
Problem Workaround a session with video signals from the host card and GPU. The primary port of the host card must match both the primary port of the zero client and the primary port of the GPU. Similarly, the secondary port on the host card is matched to the secondary port on the GPU and zero client and so on (when more than one port is used).
Contacting Dell 8 NOTE: If you do not have an active Internet connection, you can find contact information on your purchase invoice, packing slip, bill, or Dell product catalog. Dell provides several online and telephone-based support and service options. Availability varies by country and product, and some services may not be available in your area. To contact Dell for sales, technical support, or customer service issues: 1. Go to Dell.com/support. 2. Select your support category. 3.