Dell™ 2100MP Projector User's Guide The information below is provided by the supplier of the referenced device without independent verification by Dell and is subject to the restrictions and disclaimers. Safety Instructions (Read before connecting the projector) About Your Projector Installation Using Your Projector Troubleshooting Specifications Regulatory Notices Contacting Dell Notes, Notices, and Cautions NOTE: A NOTE indicates important information that helps you make better use of your projector.
Back to Contents Page About Your Projector: Dell™ 2100MP Projector Features Equipment Main Unit Control Panel Connection Ports Remote Control Features Single chip 0.55" Texas Instruments DLP™ technology High contrast, double data rate(DDR) digital micromirror device True SVGA, 800 x 600 addressable pixels 4.0 lb (1.
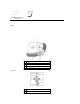
Dell 2100MP Projector Safety and Warranty Guide Owner's Manual Main Unit 1 Control panel 2 Focus ring 3 Lens 4 Elevator button 5 Remote control receiver 1 Power button 2 Four directional keys Control Panel
3 Keystone adjustment 4 Temperature warning light 5 Lamp warning light 6 Re-sync 7 Menu 8 Keystone adjustment 9 Source 1 VGA in (D-sub) connector 2 VGA out (monitor loop-through) 3 IR receiver 4 USB connector 5 S-video connector 6 Composite video connector 1 Light 2 Power button 3 Previous Page button (page up) 4 Four Direction buttons 5 Source button 6 Resync button 7 Keystone Correction button 8 Zoom in/out 9 Hide button Connection Ports Remote Control
10 Freeze button 11 Menu button 12 Next Page button (page down) 13 Video Mode button Battery Disposal: Your projector remote control uses zinc-manganese batteries. If you need to replace the batteries, see your Dell 2100MP Projector Quick Start Card. Do not dispose of used batteries along with household waste. Contact your local waste disposal agency for the address of the nearest battery deposit site.
Back to Contents Page Contacting Dell To contact Dell electronically, you can access the following websites: l l l www.dell.com support.dell.com (technical support) premiersupport.dell.com (technical support for educational, government, healthcare, and medium/large business customers, including Premier, Platinum, and Gold customers) For specific web address for your country, find the appropriate country section in the table below.
(Vienna) International Access Code:900 Home/Small Business Sales 01 795676-02 Home/Small Business Fax 01 795676-05 Home/Small Business Customer Care 01 795676-03 Country Code:43 Preferred Accounts/Corporate Customer Care 0660-8056 City Code:1 Home/Small Business Technical Support 01 Preferred Accounts/Corporate Technical Support 795676-04 0660-8779 Website: support.euro.dell.com E-mail: tech_support_central_europe@dell.
Canada (North York, Ontario) International Access Code:011 Automated Order-Status System toll free: 1-800-4339014 AutoTech (Automated technical support) toll free: 1-800-2479362 Customer Care Home & Home Office & Small Business 1-800-847-4096 Customer Care Medium, Large, Commercial, Government (100+ Employees) 1-800-326-9463 Technical Support Home & Home Office & Small Business 1-800-847-4096 Technical Support Medium, Large, Commercial, Government (100+ Employees) 1-800-387-5757 Sales (direct-f
Large Corporate Accounts West toll free: 800 858 2811 Large Corporate Accounts GCP toll free: 800 858 2055 Large Corporate Account Key Accounts toll-free:800-8582628 Large Corporate Accounts Spare Parts toll free: 800-858-2621 Colombia General Support Costa Rica General Support Czech Republic (Prague) Technical Support 02 22 83 27 27 Customer Care 02 22 83 27 11 International Access Code:00 Fax 02 22 83 27 14 TechFax 02 22 83 27 28 Switchboard 02 22 83 27 11 Country Code:420 Cit
Country Code:358 City Code:9 Home/Small Business Customer Care 09 693 791 94 Fax 09 253 313 99 Switchboard 09 253 313 00 Website: support.euro.dell.com E-mail: fin_support@dell.
India Ireland (Cherrywood) Large Corporate Accounts HK toll free: 800 96 4108 Large Corporate Accounts GCP HK toll free: 800 90 3708 Technical Support 1600-33-8045 Sales 1600-33-8044 Ireland Technical Support 1850 543 543 UK Technical Support (dial within UK only) 0870 908 0800 International Access Code:16 Home User Customer Care 01 204 4095 Country Code:353 Small Business Customer Care 01 204 4444 Corporate Customer Care 01 204 4003 0870 906 0010 01 204 4444 0870 907 4000 S
Korea (Seoul) International Access Code:001 Customer Care 44 556-4240 24-Hour Automated Order Service 44 556-3801 Individual User 44 556-1760 Business Sales Division (Up to 400 employees) 44 556-1465 Public Sales (Government agencies, education institutions, and medical institutions) 44 556-1469 Preferred Accounts Division Sales (Over 400 employees) 44 556-3433 Global Segment Japan 44 556-3469 Large Corporate Accounts Sales (Over 3500 employees) 44 556-3430 Faxbox Service 44 556-3
or 001-877-269-3383 International Access Code:00 Sales Country Code:52 Customer Service 50-81-8800 or 01-800-888-3355 001-877-384-8979 or001-877-269-3383 Main 50-81-8800 or 01-800-888-3355 Montserrat General Support toll free:1-866-2786822 Netherlands Antilles General Support 001-800-882-1519 Netherlands (Amsterdam) Technical Support 20 674 4500 Home/Small and Medium Business 20 674 5500 International Access Code:00 Home/Small and Medium Business Fax 20 674 4775 Country Code:31 Home
Panama General Support 001-800-507-0962 Peru General Support 0800-50-669 Poland (Warsaw) Customer Service Phone 22 57 95 700 Customer Care 22 57 95 999 International Access Code:011 Sales 22 57 95 999 Switchboard 22 57 95 999 Customer Service Fax 22 57 95 806 Reception Desk Fax 22 57 95 998 35 800 834 077 Country Code:48 Website: support.euro.dell.com E-mail: pl_support@dell.
Countries Spain (Madrid) Home and Small Business Technical Support 91 902 100 130 International Access Code:00 Customer Care 91 902 118 540 Sales 91 902 118 541 Switchboard 91 902 118 541 Fax 91 902 118 539 Technical Support 91 902 100 130 Customer Care 91 902 118 546 Switchboard 91 722 92 00 Fax 91 722 95 83 Country Code:34 City Code:91 Website: support.euro.dell.com E-mail: support.euro.dell.com/es/es/emaildell/ Corporate Website: support.euro.dell.com E-mail: support.euro.
228 or 0800 33 556 Corporate Sales toll free: 0080 651 227/ 0800 33 555 Thailand Technical Support toll free: 088 006 007 International Access Code:001 Customer Service (Penang, Malaysia) Country Code:66 604 Sales 633 4949 toll free: 088 006 009 Trinidad and Tobago General Support 1-800-805-8035 Turks and Caicos Islands General Support toll free:1-866-5403355 U.K.
Dell Sales toll free: 1-800-2893355 or toll free: 1-800879-3355 Dell Outlet Store (Dell refurbished computers) toll free: 1-888-7987561 Software and Peripherals Sales toll free: 1-800-6713355 Spare Parts Sales toll free: 1-800-3573355 Extended Service and Warranty Sales toll free: 1-800-2474618 Fax toll free: 1-800-7278320 Dell Services for the Deaf, Hard-of-Hearing, or Speech-Impaired toll free: 1-877DELLTTY (1-877-335-5889) U.S.
Back to Contents Page Installation: Dell™ 2100MP Projector Connecting the Projector Powering On/Off the Projector Adjusting the Projected Image Changing the Lamp Connecting the Projector A. To Computer 1 Power cord 2 D-sub to D-sub cable 3 USB to USB cable B. To DVD Player: There are three possible methods of connecting to a DVD player. 1. Connecting with component cable: 1 Power cord 2 D-sub to HDTV/Component cable 2.
1 Power cord 2 S-video cable 3. Connecting with composite cable: 1 Power cord 2 Composite video cable Powering On/Off the Projector Powering On the Projector NOTE: Turn on the projector before you turn on the source. 1. 2. 3. 4. l l Remove the lens cap. Ensure that the power cord and appropriate signal cable(s) are securely connected. The power button light blinks green. Press the power button to turn on the projector. The Dell logo will be displayed for 30 seconds.
1 Power button 2 Lens cap Powering Off the Projector DO NOT UNPLUG THE PROJECTOR BEFORE PROPERLY SHUTTING DOWN USING THE FOLLOWING STEPS. 1. 2. 3. 4. Press the power button to turn off the projector. The "Power Off the Lamp?" message appears on the OSD. Press the power button again. The cooling fans continue to operate for 2 minutes. If the LAMP light is solid orange, replace the lamp. If the TEMP light is solid orange, the projector has overheated. The display automatically shuts down.
Adjusting the Projector Focus Rotate the focus ring until the image is clear. The projector focuses at distances from 4.0 ft to 39.4 ft (1.2 m to 12 m). 1 Focus ring Adjusting Projection Image Size Screen (Diagonal) Screen Size Distance * 29.4" (74.7cm) 81.6" (207.3cm) 133.8" (339.9cm) 185.3" (470.6cm) 237.5" (603.3cm) 289.7" (735.9cm) 23.5"X17.7" 65.3"X49.0" 107.1"X80.3" 148.2"X111.2" 190.0"X142.5" 231.8"X173.8" (59.8cmx44.8cm) (165.8cmx124.4cm) (271.9cmx203.9cm) (376.5cmx282.4cm) (482.
1. 2. 3. 4. 5. 6. 7. Turn off the projector and disconnect the power cord. Let the projector cool for at least 30 minutes. Loosen the 2 screws that secure the lamp cover, and remove the cover. Loosen the 3 screws that secure the lamp. Pull up the lamp by its metal handle. Reverse steps 1 through 5 to install the new lamp. Reset the lamp by selecting the left Lamp Reset icon in the OSD Management tab. 8. Dell may require that lamps replaced under warranty are returned to Dell.
Back to Contents Page Regulatory Notices: Dell™ 2100MP Projector Federal Communications Commission (FCC) Notice (U.S.
Hsinchu, February 28, 2003 Mr.
Class B ITE MIC Notice (South Korea Only) B Class Device Please note that this device has been approved for non-business purposes and may be used in any environment, including residential areas. Polish Center for Testing and Certification Notice The equipment should draw power from a socket with an attached protection circuit (a three-prong socket). All equipment that works together (computer, monitor, printer, and so on) should have the same power supply source.
NOM Information (Mexico Only) The following information is provided on the device(s) described in this document in compliance with the requirements of the official Mexican standards (NOM) Exporter: Dell Computer Corporation One Dell Way Round Rock, TX 78682 Importer: Dell Computer de México, Paseo de la Reforma 2620, 11th Floor Col. Lomas Altas México DF CP 11950 Ship to: Dell Computer de Mexico, S.A. de C.V. al Cuidado de Kuehne & Nagel de México S. de R.I., Avenida Soles No. 55 Col.
Back to Contents Page Safety Instructions: Dell™ 2100MP Projector CAUTION Use the following safety guidelines to help protect your projector from potential damage and to ensure your own personal safety: l The surface beneath the projector might be hot with use. Be careful in handling the unit. l The lamp becomes very hot with use. Do not attempt to replace the lamp after use until the projector has been allowed to cool down for at least 30 minutes, and follow all instructions in "Changing the Lamp.
Back to Contents Page Specifications: Dell™ 2100MP Projector Light Valve single-chip DLP™ technology Contrast Ratio 1800:1 Typical (Full On/Full Off) Lamp 150-watt, user-replaceable P-VIP lamp Number of Pixels 800 x 600 Displayable Color 16.7M colors Color Wheel Speed 120Hz(2X) Projection Lens F/2.4, f=22.4mm. Fixed focal lens Projection Screen Size 29.4-289.7 inches (diagonal) Projection Distance 4.0–39.4 ft (1.2m–12m) Video Compatibility NTSC, NTSC 4.
MAC II 13 640X480 66.68 35 *MAC 16 832X624 74.55 49.725 *MAC 19 1024X768 75 60.24 *MAC 1152X870 75.06 68.68 MAC G4 640X480 60 31.35 *IMAC DV 1024X768 75 60 * Compression computer image.
Back to Contents Page Troubleshooting: Dell™ 2100MP Projector No image appears on the screen Partial, scrolling, or incorrectly displayed image The screen does not display your presentation Image is unstable or flickering Image has vertical flickering bar Image color is not correct Image is out of focus The image is stretched when displaying 16:9 DVD Image is reversed Lamp is burned out or makes a popping sound Self-diagnostic for video If you experience problems with your projector, see the following tro
Image color is not correct l If your graphic card output signal is "sync on Green", and you would like to display VGA at 60Hz signal, please go into "OSD--> Management --> Signal Type" and select "RGB". l Or run "Self-diagnostic test" (see " Self-diagnostic for video " ) for preliminary diagnostic on image color problem. Image is out of focus l Adjust the focus ring on the projector lens. l Ensure that the projection screen is within the required distance from the projector (4.0ft [1.2m] to 39.
Back to Contents Page Using Your Projector: Dell™ 2100MP Projector Control Panel Remote Control On-Screen Display Control Panel Power See "Powering On/Off the Projector." Source Press to step through Analog RGB, Composite, Component-I, S-video, and Analog YPbPr sources when multiple sources are connected to the projector. Resync Press to synchronize the projector to the input source. Resync will not operate if the OSD (On-Screen Display) is displayed. Menu Press to activate the OSD.
Directional Keys Use or to select OSD items, use "left" and "right" button to make adjustments. Hide Press Hide button to hide the image, press again to resume display of the image. Video Mode The Dell 2100MP Microprojector has preset configurations that are optimized for displaying data (PC Graphics) or video (movies, games, etc.). Press Video Mode button to toggle between PC mode, Movie mode, or User mode (for user to setup and save preferred settings).
Brightness Adjusts the brightness of the image. l Press to darken the image. l Press to lighten the image. Contrast Controls the degree of difference between the lightest and darkest parts of the picture. Adjusting the contrast changes the amount of black and white in the image. l Press to decrease the contrast. l Press to increase the contrast. Color Temp. Adjusts the color temperature. With the higher temperature, the screen looks colder; with the lower temperature, the screen looks warmer.
Select this function to fit 1:1, 16:9 (16:9U) or 4:3 aspect ratio. In order to use the 1:1 aspect ratio, the input must be a computer signal (through VGA cable) less than SVGA (800 x 600), component 576p/ 480i / 480p, S-Video, or Video (composite). If the input signal is a computer signal greater than SVGA or component 1080i / 720p, only 16:9 (16:9U) or 4:3 aspect ratio will be available. When an icon is selected, the color of the icon will change to dark blue.
l l l l Front Projection-Desktop The default setting. Rear Projection-Desktop The projector reverses the image so you can project from behind a translucent screen. Front Projection-Ceiling Mount The projector turns the image upside down for ceiling-mounted projection. Rear Projection-Ceiling Mount The projector simultaneously reverses and turns the image upside down. You can project from behind a translucent screen with a ceiling-mounted projection.
Language Menu Language Language Press or to select the language you prefer. Factory Reset Menu Factory Reset Select Yes to reset the projector to its factory default settings. Reset items include both computer image and video image settings.
Computer Image- Note: this menu is only available with computer input signal. Frequency Change the display data frequency to match the frequency of your computer graphic card. If you experience a vertical flickering bar, use the frequency function to make an adjustment. Tracking Synchronize the signal timing of the display with that of the graphic card. If you experience an unstable or flickering image, use the tracking function to correct it. Hor.
Video Image- Note: this menu is only available with S-video, video(composite) or component 480i signal. Color Saturation Adjust a video image from black and white to fully saturated color. l Press to decrease the amount of color in the image. l Press to increase the amount of color in the image. Sharpness Adjust the sharpness of the image. l Press to decrease the sharpness. l Press to increase the sharpness. Tint Adjust the color balance of red and green.