Dell Rugged Desk Dock User’s Guide
Notes, Cautions, and Warnings NOTE: A NOTE indicates important information that helps you make better use of your computer. CAUTION: A CAUTION indicates either potential damage to hardware or loss of data and tells you how to avoid the problem. WARNING: A WARNING indicates a potential for property damage, personal injury, or death. © 2014 Dell Inc. All rights reserved. Reproduction in any manner whatsoever without the written permission of Dell Inc. is strictly forbidden.
Contents 1 About Your Dell Rugged Desk Dock.............................................................................................. 5 2 Adjusting the Dell Rugged Desk Dock.......................................................................................... 9 3 Using the Dell Rugged Desk Dock................................................................................................ 11 Setting Up Your Rugged Desk Dock........................................................................
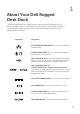
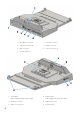
1 About Your Dell Rugged Desk Dock The Dell Rugged Desk Dock docking device supports the Dell Rugged Family of laptop computers, but is not compatible with any previous series laptop computers. The Rugged Desk Dock enables you to connect your laptop computer to the following external devices: Connector Description J-45 NETWORK CONNECTOR - Connects a network R interface cable. UDIO CONNECTORS (2) - Connects audio headset or A speakers and a microphone. SB 2.0 CONNECTOR - Connect a USB 2.
1 AC adapter connector 2 network connector 3 USB 3.0 connectors (3) 4 HDMI connector 5 VGA connector 6 serial connectors (2) 7 security cable slot 1 eject button (with integral docking indicator light) 2 power button (with integral power indicator light) 3 docking connector 4 USB 2.
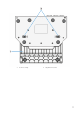
1 front hook tray 2 adjustment screws 7
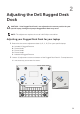
2 Adjusting the Dell Rugged Desk Dock CAUTION: If the Rugged Desk Dock is not adjusted to the correct position for your specific laptop, damage to laptop or Rugged Desk Dock may occur. NOTE: This adjustment requires the use of a #2 Phillips screwdriver.
3 Slide front hook tray out until the correct letter designation is visible. 4 Re-tighten (2) adjustment screws ensuring the screw head aligns with the corresponding pocket in the front hook tray. CAUTION: Do not overtighten adjustment screws or damage may occur to the Rugged Desk Dock. (Maximum torque = 6 in-lbs (0.
3 Using the Dell Rugged Desk Dock WARNING: Before you begin any of the procedures in this section, follow the safety instructions that shipped with your computer. Setting up your Rugged Desk Dock NOTE: If the cable connector of the external device has thumbscrews, tighten the screws to ensure a proper connection. 1 Connect the peripheral device’s cable to the appropriate connector on the Rugged Desk Dock. 2 Connect any external devices, like external displays, to electrical outlets.
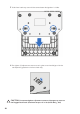
Docking Your Laptop CAUTION: Always use the Dell AC adapter that came with the Rugged Desk Dock. If you use any other commercially available AC adapter, you may damage the Rugged Desk Dock or the laptop. 1 AC adapter cable 2 AC adapter connector 1 Follow the instructions in “Before You Dock for the First Time” on page 11. 2 Place the Rugged Desk Dock with enough flat space in front of it to completely support the laptop when docked to the Rugged desk Dock.
NOTE: You can dock your laptop regardless of whether it is turned on or off. 3 With the rear of the laptop elevated, load the front of the laptop into the Rugged Desk Dock by aligning the front hooks with the appropriate recesses in the laptop case. 4 Lower the rear of the laptop and apply light vertical pressure to the back center of the laptop until it clicks into place on the docking connector.
Securing the Dell Rugged Desk Dock Anti-theft devices usually include a segment of metal-stranded cable with an attached locking device and associated key (available at dell.com). For instructions on how to install this kind of anti-theft device, see the documentation that came with the device. 1 security cable slot The Rugged Desk Dock has the following security feature: SECURITY CABLE SLOT - Attach an anti-theft device to the Rugged Desk Dock to secure a laptop to the Rugged Desk Dock.
Rugged Desk Dock Laptop Power and Docking Status The Rugged Desk Dock power button is used to turn a docked laptop on or off. The power button light indicates the power status of the Rugged Desk Dock or a docked laptop. The docking light on the eject button indicates the AC power and docking status of the Rugged Desk Dock and the laptop.
Using the Rugged Desk Dock With Dual Monitors 1 HDMI connector 2 VGA connector You can use your Rugged Desk Dock for dual monitor display. To enable this feature, connect one HMDI enabled monitor and one VGA enabled monitor to your Rugged Desk Dock.
Undocking Your Laptop 1 eject button Press the eject button to undock the laptop from the Rugged Desk Dock, then lift the rear of the laptop away from the Rugged Desk Dock and extract from the front hook.
4 Specifications Physical Height 67.2 mm (2.64 inches) Depth 277.5 mm (10.93 inches) Width 304.8 mm (12.00 inches) System Level Operational Specifications Serial (DTE) two 9-pin connectors, 16550-compatible, 16-byte buffer USB four USB connectors: one USB 2.0-compliant connector, three USB 3.
5 Finding Information Documents Contents Safety, Regulatory, Warranty, and Support Documentation • • • • • This type of imformation may have shipped with your computer. For additional regulatory information, see the Regulatory Compiance homepage on www.dell.com at the following location: Warranty information Safety instructions Regulatory information Ergonomics information End User License Agreement www.dell.com/regulatory_compliance.
6 Glossary A AC — alternating current — The form of electricity that powers your computer when you plug the AC adapter power cable in to an electrical outlet. D DisplayPort — An interface standard of the Video Electronics Standards Association (VESA) used for digital displays. docking device — Provides port replication, cable management, and security features to adapt your laptop to a desktop workspace.