Dell™ S1709W Flat Panel Monitor User's Guide About Your Monitor Setting Up the Monitor Operating the Monitor Troubleshooting Appendix Notes, Notices, and Cautions NOTE: A NOTE indicates important information that helps you make better use of your computer. NOTICE: A NOTICE indicates either potential damage to hardware or loss of data and tells you how to avoid the problem. CAUTION: A CAUTION indicates a potential for property damage, personal injury, or death.
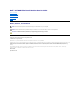
Back to Contents Page About Your Monitor Dell™ S1709W Flat Panel Monitor User's Guide Package Contents Product Features Identifying Parts and Controls Monitor Specifications Plug and Play Capability Maintenance Guidelines Package Contents Your monitor comes with all the items shown below. Ensure that you have all the items. Contact Dell™ if anything is missing. NOTE: Some items may be optional and may not ship with your monitor. Some features or media may not be available in certain countries.
■ Dell S1709W has a 17-inch (431.8 mm) viewable area display. ■ 1440x900 resolution, plus full-screen support for lower resolutions. ■ Wide viewing angle to allow viewing from a sitting or standing position, or while moving from side-to-side. ■ Tilt capability. ■ Removable pedestal and Video Electronics Standards Association (VESA) 100mm mounting holes for flexible mounting solutions. ■ Plug and play capability if supported by your system.
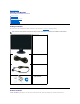
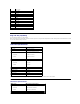
Label Description Use 1 Serial number barcode label To contact Dell for technical support. 2 Security lock slot To help secure your monitor. 3 Cable management slot To organize cables by placing them through the slot. 4 Regulatory rating label Lists the regulatory approvals. 5 Dell Soundbar mounting brackets To attach the optional Dell Soundbar. 6 VESA mounting holes (100mm) (Behind attached base plate) To mount the monitor.
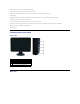
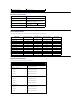
Label Description Use 1 AC power connector To connect the monitor power cable. 2 VGA connector To connect your computer to the monitor using a VGA cable. Monitor Specifications The following sections give you information about the various power management modes and pin assignments for various connectors of your monitor. Power Management Modes If you have VESA's DPM compliance display card or software installed in your PC, the monitor automatically reduces its power consumption when not in use.
2 Video-Green 3 Video-Blue 4 GND 5 Self-test 6 GND-R 7 GND-G 8 GND-B 9 DDC +5V 10 GND-sync 11 GND 12 DDC data 13 H-sync 14 V-sync 15 DDC clock Plug and Play Capability You can install the monitor in any Plug and Play-compatible system. The monitor automatically provides the computer with its Extended Display Identification Data (EDID) using Display Data Channel (DDC) protocols so that the system can configure itself and optimize the monitor settings.
Highest preset resolution 1440 x 900 at 60 Hz Electrical Specifications Model number Dell S1709W Flat Panel Monitor Video input signals Analog RGB: 0.7 Volts +/-5%, 75 ohm input impedance Synchronization input signals Separate horizontal and vertical synchronizations, polarity-free TTL level, SOG (Composite SYNC on green) AC input voltage / frequency / current 100 to 240 VAC/50 or 60 Hz + 3 Hz/2.0A (Max.) Inrush current 120V:30A (Max.) 240V:60A (Max.
Weight with packaging 11.04 lbs (5.02 kg) Weight with stand assembly and cables 8.62 lbs (3.92 kg) Weight without stand assembly (For wall mount or VESA mount considerations - no cables) 6.2 lbs (2.82 kg) Weight of stand assembly 2.07 lbs (0.
Back to Contents Page Appendix Dell™ S1709W Flat Panel Monitor User's Guide CAUTION: Safety Instruction FCC Notice (U.S. Only) and other regulatory information Contacting Dell CAUTION: Safety Instruction For information on safety instructions, see the Safety information that ships with your monitor. FCC Notice (U.S. Only) and other regulatory information For FCC notices and other regulatory information, see the regulatory compliance website located at www.dell.com/regulatory_compliance.
Back to Contents Page Setting Up Your Monitor Dell™ S1709W Flat Panel Monitor User's Guide If you have a Dell™ desktop or a Dell™ portable computer with internet access 1. Go to http://support.dell.com, enter your service tag, and download the latest driver for your graphics card. 2. After installing the drivers for your Graphics Adapter, attempt to set the resolution to 1440x900 again.
Back to Contents Page Setting Up Your Monitor Dell™ S1709W Flat Panel Monitor User's Guide If you have non Dell™ desktop, portable computer, or graphic card 1. Right-click on the desktop and click Properties. 2. Select the Settings tab. 3. Select Advanced. 4. Identify your graphics controller supplier from the description at the top of the window (e.g. NVIDIA, ATI, Intel etc.). 5. Refer to the graphic card provider website for updated driver (for example, http://www.ATI.com OR http://www.NVIDIA.com ). 6.
Back to Contents Page Operating the Monitor Dell™ S1709W Flat Panel Monitor User's Guide Using the Front Panel Using the OSD Menu Setting the Optimal Resolution Using the Dell Soundbar (Optional) Using the Tilt Using the Front Panel Use the buttons on the front of the monitor to adjust the image settings. The following table describes the front panel buttons: Front panel Button A Description Use the Menu button to open and exit the on-screen display (OSD), and exit from menus and sub-menus.
D Use this button to select the input source or select an OSD menu option. NOTE: The floating 'Dell Self-test Feature Check' dialog appears on a black background if the monitor cannot sense a video signal. Depending upon the selected input, the following dialog boxes scroll continually on the screen. Enter E Use the Power button to turn the monitor on and off. A white power light indicates that the monitor is on and fully functional. An amber power light indicates that the monitor is in power save mode.
Auto Adjust Even though your computer recognizes your monitor on startup, the Auto Adjustment function optimizes the display settings for use with your particular setup. NOTE:In most cases, Auto Adjust produces the best image for your configuration. Color Settings : Use the Color Settings menu to set the Input Color format and mode. Input Color Format Choose RGB if monitor is connected to a PC or a DVD using a VGA cable.
In the Graphics mode, you can choose one of the following preset modes: Standard, Multimedia, Game, Warm, Cool, or Custom (RGB); l l l l l l Standard: Allows you to utilize the flat panel's native color format. Multimedia: suitable for viewing media applications like photo or video clips using your computer. Game: suitable for playing games on your computer. Warm: suitable for color-intensive application like image editing, movies, etc.
Reset Display Settings Select this option to restore default display settings. Other Settings : Use the Other Setting menu to adjust the settings of the OSD, such as, the location of the OSD, the amount of time the menu remains on screen, and the rotation of the OSD, and so on. Language "Allows you to choose language of the OSD menu. You can choose from: English, French, Spanish, German, and Japanese. NOTE: The change only affects the OSD. It has no effect on any software running on the computer.
NOTE: You can also lock or unlock the OSD by pushing and holding the DCC/CI button for 15 seconds. Display Data Channel/Command Interface allows you to adjust the monitor parameters (brightness, color, balance, etc.) using software applications on your computer. You can disable this feature by selecting Disable. The following warning message appears: Select Yes to disable DDC/CI and No to exit with out making changes.
NOTE: The Dell S1709W Flat Panel monitor supports VGA input only. Occasionally, no warning message appears, but the screen is blank. This could also indicate that the monitor is not synchronizing with the computer. See General Problems for more information. Setting the Optimum Resolution 1. 2. 3. 4. Right-click on the desktop and select Properties. Select the Settings tab. Set the screen resolution to 1440 x 900. Click OK.
Back to Contents Page
Back to Contents Page Setting Up Your Monitor Dell™ S1709W Flat Panel Monitor Setting the display resolution to 1440X900 (Optimal) For optimal display performance while using the Microsoft Windows operating systems, set the display resolution to 1440 x 900 pixels by performing the following steps: 1. Right-click on the desktop and click Properties. 2. Select the Settings tab. 3. Move the slider-bar to the right by pressing and holding left-mouse button and adjust the screen resolution to 1440X900. 4.
Dell™ S1709W Flat Panel Monitor l User's Guide l Setting the display resolution to 1440x900 (Optimal) Information in this document is subject to change without notice. © 2008 Dell Inc. All rights reserved Reproduction in any manner whatsoever without the written permission of Dell Inc. is strictly forbidden. Trademarks used in this text: Dell and the DELL logo, are trademarks of Dell Inc.
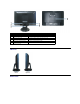
Back to Contents Page Setting Up the Monitor Dell™ S1709W Flat Panel Monitor User's Guide Attaching the Base Connecting Your Monitor Organizing Your Cables Attaching the Optional Dell Soundbar Removing the Base Attaching the Base NOTE: The base is detached when the monitor is shipped from the factory. To attach the base of the stand to the monitor stand: 1. Place the monitor on a stable flat table. 2. Align the groove on the stand base to the raiser on the monitor. 3.
3. Connect the power cable. 4. Turn on your monitor and computer. If you do not see an image, see Troubleshooting your monitor. Organizing Your Cables After attaching all necessary cables to your monitor and computer, (See Connecting Your Monitor for cable attachment), use the cable management slot to neatly organize all cables as shown above. Attaching the Optional Dell Soundbar NOTICE: Do not use with any device other than Dell Soundbar. 1.
Back to Contents Page
Back to Contents Page Troubleshooting Dell™ S1709W Flat Panel Monitor User's Guide Troubleshooting Your Monitor General Problems Product Specific Problems Troubleshooting Your Soundbar CAUTION: Before you begin any of the procedures in this section, follow the safety instructions. Troubleshooting Your Monitor Self-Test Feature Check (STFC) Your monitor provides a self-test feature that allows you to check whether your monitor is functioning properly.
This means that the monitor cannot synchronize with the signal that it receives from the computer. Either the signal is too high or too low for the monitor to use. See Monitor Specifications for the Horizontal and Vertical frequency ranges addressable by this monitor. Recommended mode is 1440 X 900 @ 60Hz. Occasionally, no warning message appears, but the screen is blank. This could also indicate that the monitor is not synchronizing with the computer or that the monitor is in power save mode.
l l Faint Shadow from the static image displayed appears on the screen Image Retention (from a static image) l Perform monitor reset. Perform monitor self-test feature check to determine if the intermittent problem occurs in self-test mode. Use the Power Management feature to turn off the monitor at all times when not in use. Alternatively, use a dynamically changing screen saver left on the monitor for a long period of time.