Dell S2722DC モニター ユーザーズ ガイド モデル:S2722DC 規定モデル:S2722DCb
注:「注」は、コンピューターをよりよく使いこなすための重要な情報を 表します。 注意:「注意」は指示に従わなければ、ハードウェアが故障する危険性、 またはデータが消失する危険性を示しています。 警告:「警告」は物件損害、人的被害または死亡の危険性を表します。 Copyright © 2021 Dell Inc. またはその子会社。複製を禁ず。Dell、EMC、その他の商標は、Dell Inc. またはその子会社の商標です。USB Type-C® および USB-C® は USB Implementers Forum の登 録商標です。その他の商標の所有権は各社にあります。 2021 - 08 Rev.
目次 安全指示 . . . . . . . . . . . . . . . . . . . . . . . . . . . . . . . . . . 6 製品の特徴. . . . . . . . . . . . . . . . . . . . . . . . . . . . . . . . . 7 パッケージの内容 . . . . . . . . . . . . . . . . . . . . . . . . . . . . . . . . 7 製品の特徴 . . . . . . . . . . . . . . . . . . . . . . . . . . . . . . . . . . . . . 8 部品とコントロールの確認 . . . . . . . . . . . . . . . . . . . . . . . . . 9 正面図 . . . . . . . . . . . . . . . . . . . . . . . . . . . . . . . . . . . . . . . . . . . . . . . 9 側面図 . . . . . . . . . . . . . . . . . .
保守のガイドライン . . . . . . . . . . . . . . . . . . . . . . . . . . . . . 27 モニターを洗浄する . . . . . . . . . . . . . . . . . . . . . . . . . . . . . . . . . . . . 27 モニターのセットアップ . . . . . . . . . . . . . . . . . . . . . 28 スタンドのセットアップ . . . . . . . . . . . . . . . . . . . . . . . . . . 28 モニターを接続する . . . . . . . . . . . . . . . . . . . . . . . . . . . . . 31 USB Type-C および電源ケーブルの接続 . . . . . . . . . . . . . . . . . . . . . 31 HDMI ケーブルと電源ケーブルの接続(別売り). . . . . . . . . . . . . . . 32 ケーブルを調整する . . . . . . . . . . . .
問題を解決する . . . . . . . . . . . . . . . . . . . . . . . . . . . . 59 自己テスト . . . . . . . . . . . . . . . . . . . . . . . . . . . . . . . . . . . . 内蔵診断 . . . . . . . . . . . . . . . . . . . . . . . . . . . . . . . . . . . . . . よくある問題. . . . . . . . . . . . . . . . . . . . . . . . . . . . . . . . . . . 製品特有の問題 . . . . . . . . . . . . . . . . . . . . . . . . . . . . . . . . . ユニバーサル シリアル バス (USB) 特有の問題 . . . . . . . . . スピーカー特有の問題 . . . . . . . . . . . . . . . . . . . . . . . . . . . . 59 60 61 64 66 67 付録 .
安全指示 注意:このマニュアルで指定された以外のコントロール、調整、または手 順を使用すると、感電、電気的障害、または機械的障害を招く結果となり ます。 • 本製品は平坦な場所に置き、お取り扱いには十分注意してください。ス クリーンは落としたり、ぶつけたりすると破損しやすく、細心の取り扱 いが必要です。 • 本製品はお住まい地域の規準に従った電圧の AC 電源をお使いください。 • 本製品は室温に維持してください。極端な温度環境では、ディスプレイ の液晶に有害な影響を与える場合があります。 • 本製品を激しく揺ったり、強い衝撃を与えたりしないでください。自動 車のトランクに本製品を入れることなどが含まれます。 • 本製品を長期間ご使用にならない場合は、電源コードを外してください。 • 感電防止のために、カバーを外したり、本製品の内部に手を触れないよ うにしてください。 6 │ 安全指示
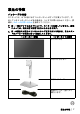
製品の特徴 パッケージの内容 モニターには、以下の表に示すコンポーネントがすべて付属しています。不 足しているコンポーネントがある場合は、Dell までお問い合わせください。詳 細は、Dell へのお問い合わせを参照してください。 注:一部のアイテムはオプションで、モニターに付属していません。機能 によっては、特定の国で使用できないものもあります。 注:本製品に付属されていないスタンドを取り付ける場合は、そのスタン ドのメーカーの指示に従って設定してください。 コンポーネント画像 コンポーネントの説明 ディスプレイ スタンドライザー スタンド ベース 電源ケーブル(国により 異なります) 製品の特徴 │ 7
USB Type-C - USB Type-C 3.2 Gen 1 ケーブル(ケー ブルの長さ:1.80 M) • クイック セットアップ ガイド • 安全、環境および規制 情報 製品の特徴 Dell S2722DC モニターにはアクティブ マトリックス、薄膜トランジスター (TFT)、液晶ディスプレイ (LCD) および LED バックライトが搭載されていま す。モニターの機能は、以下のようになっています: • 68.47 cm(26.
• 電源ボタンと OSD ボタンをロックします。 • セキュリティ ロック スロット。 • スタンバイモード時で < 0.
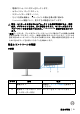
側面図 背面図 背面図(モニターのスタンド付き) ラベル 1 説明 使用 VESA 取り付け穴(100 mm x 100 mm - 接続された VESA カ バーの背面) VESA 互換の壁取付キットを使う壁 取付モニター (100 mm x 100 mm)。 10 │ 製品の特徴
2 バーコード、シリアル番号、 サービスタグ ラベル 技術サポートを受けるには、Dell にお問い合わせください。サービ スタグは、Dell 補修技術者がモニ ターに搭載されたハードウェアの コンポーネントを識別し、保証情 報を知るために付けられた、コン ポーネント毎に異なるアルファ ベットと数字による番号です。 3 スタンドリリースボタン スタンドをモニターから外します。 4 規制ラベル 規制承認を表示します。 5 ケーブル管理スロット ケーブルをスロットに通してケー ブル類を整理するために使います。 底面図 モニタースタンドなし底面図 ラベル 1 説明 使用 セキュリティ ロック スロット セキュリティ ロックでモニターを固定し ます(セキュリティ ロックは含まれませ ん) 。 2 電源コネクター 電源ケーブルを接続します(モニター付 属)。 3 HDMI ポート (HDMI 1) コンピューターに HDMI ケーブルを接続し HDMI ポート (HDMI 2) てください。 4 製品の特徴 │ 11
5 USB Type-C アップス トリーム ポート モニターに付いてきた USB Type-C ケーブ ルをモニターとコンピューターに接続して ください。このポートは、USB パワーデリ バリー、データと DisplayPort ビデオ信号 に対応します。SuperSpeed USB 5 Gbps (USB 3.2 Gen 1) Type-C ポートは、75 Hz、 PD 20 V/3.25 A、15 V/3 A、9 V/3 A、5 V/ 3 A で 2560 x 1440 の最大解像度を DP 1.2 代替モードで実現します。 注:USB Type-C は Windows 10 以前のバー ジョンではサポートされていません。 6 出力ポート スピーカーに接続してください。 注:このポートはヘッドフォンには対応し ていません。 7 SuperSpeed USB 5 Gbps (USB 3.
モニター仕様 モデル S2722DC スクリーン タイプ 有効マトリックス - TFT LCD パネルテクノロジー IPS アスペクト比 16:9 表示可能画像 対角 684.67 mm(26.95 インチ) 幅(有効エリア) 縦(有効エリア) 596.74 mm(23.49 インチ) 合計エリア 200302.79 mm2(310.47 インチ 2) ピクセル ピッチ 0.2331 x 0.2331 mm ピクセル / インチ (PPI) 109 335.66 mm(13.
色の深さ 16.7 百万色(8 ビット) 色域 sRGB 99%(標準) 接続性 • 1 x USB Type-C アップストリーム ポート (DisplayPort 1.2、最大 65 W のパワーデリバ リーの代替モード)* • 1 x SuperSpeed USB 5 Gbps (USB 3.2 Gen 1) (2 A (最大)で BC1.2 充電) • 1 x SuperSpeed USB 5 Gbps (USB 3.2 Gen 1) ダウンストリームポート • 2 x HDMI ポートバージョン 1.4 (HDCP 1.4) • 1 x オーディオ出力ポート 境界幅(モニターの端からアクティブ エリアまで) 上 7.42 mm 左/右 7.43 mm/7.43 mm 下 21.
解像度仕様 モデル S2722DC 水平走査幅 30 kHz ~ 114 kHz(自動) 垂直走査幅 48 Hz ~ 75 Hz(自動) 事前設定の最高解像度 75 Hz で 2560 x 1440 ビデオのサポートモード モデル S2722DC ビデオ表示機能(HDMI & USB Type-C 代替モード) 480p、480i、576p、576i、720p、1080i、 1080p、QHD 事前設定ディスプレイ モード HDMI ディスプレイ モード 水平周波数 (kHz) 垂直周波数 (Hz) 周波数 (MHz) 720 x 400 31.47 70.08 28.32 同期極 (水平 / 垂直) -/+ VESA、640 x 480 31.50 60.00 25.20 -/- VESA、640 x 480 37.50 75.00 31.50 -/- VESA、800 x 600 37.90 60.30 40.00 +/+ VESA、800 x 600 46.90 75.00 49.
VESA、1920 x 1080 67.50 60.00 148.50 +/+ 2048 x 1080 66.70 60.00 147.18 +/- 2560 x 1440 88.79 59.95 241.50 +/- 2560 x 1440 111.00 74.98 298.50 +/- 垂直周波数 (Hz) 周波数 (MHz) USB Type-C ディスプレイ モード 水平周波数 (kHz) 720 x 400 31.47 70.08 28.32 同期極 (水平 / 垂直) -/+ VESA、640 x 480 31.50 60.00 25.20 -/- VESA、640 x 480 37.50 75.00 31.50 -/- VESA、800 x 600 37.90 60.30 40.00 +/+ VESA、800 x 600 46.90 75.00 49.50 +/+ VESA、1024 x 768 48.40 60.00 65.00 -/- VESA、1024 x 768 60.00 75.
電気的仕様 モデル S2722DC ビデオ入力信号 • HDMI 1.4、各差動線路毎に 600 mV、作動ペアあたり 100 Ω 入力インピーダンス • USB Type-C(DisplayPort 1.2 で代替モード)、作動ペ アあたり 90 Ω 入力インピーダンス AC 入力電圧 / 周波 100 VAC から 240 VAC / 50 Hz または 60 Hz ± 3 Hz / 2 A 数 / 電流 (標準) インラッシュ電流 • 120 V:40 A(最大) (0°C で) (コールドスタート) • 240 V:80 A(最大)(0°C で) (コールドスタート) 電源消費 • 0.2 W(オフモード)1 • 0.3 W(スタンバイモード)1 • 17.7 W(オンモード)1 • 155 W(最大)2 • 18.5 W (Pon)3 • 59.
物理特性 モデル S2722DC 信号ケーブル タイプ • デジタル:HDMI、19 ピン(ケーブ ルは含まれていません) • デジタル:ユニバーサル シリアル バス:Type-C、24 ピン 注:Dell モニターは、本機に付属するビデオケーブルを使用したときに最高 の性能を発揮するよう設計されています。Dell はこれ以外のケーブル製造会 社の製品について、素材、コネクター、これらのケーブルの生産工程等の点 において責任を負うことができません。そのため、Dell は Dell モニターに付 属しないケーブルのビデオ性能については保証いたしかねます。 寸法(スタンド付き) 高さ(引き伸ばし時) 510.05 mm(20.08 インチ) 高さ(圧縮) 400.05 mm(15.75 インチ) 幅 611.60 mm(24.08 インチ) 奥行き 174.72 mm(6.88 インチ) 寸法(スタンドなし) 高さ 364.64 mm (14.35 インチ) 幅 611.60 mm(24.08 インチ) 奥行き 55.43 mm(2.
5.40 kg (11.91 lb) 重さ(スタンド アセンブリなし) (壁取付または VESA 取付用 - ケーブ ルなし) 1.50 kg (3.31 lb) スタンド アセンブリの重さ 環境特性 モデル S2722DC 準拠規格 • RoHS 準拠 • BFR/PVC 低減モニター(基板は BFR/PVC フリーのラミネート製です。) • パネルのみ無ヒ素ガラスかつ無水銀です 温度 運転時 0°C ~ 40°C (32°F ~ 104°F) 非運転時 • ストレージ:-20°C ~ 60°C (-4°F ~ 140°F) • 輸送時:-20°C ~ 60°C (-4°F ~ 140°F) 湿度 運転時 10% ~ 80%(結露しないこと) 非運転時 • ストレージ:5% ~ 90%(結露しないこと) • 輸送時:5% ~ 90%(結露しないこと) 高度 運転時 5,000 m (16,404 ft)(最大) 非運転時 12,192 m (40,000 ft)(最大) 熱発散 • 528.88 BTU/ 時(最大) • 60.
ピン割当 HDMI コネクター ピン数 接続した信号ケーブルの 19 ピン側 1 TMDS データ 2+ 2 TMDS データ 2 シールド 3 TMDS データ 2- 4 TMDS データ 1+ 5 TMDS データ 1 シールド 6 TMDS データ 1- 7 TMDS データ 0+ 8 TMDS データ 0 シールド 9 TMDS データ 0- 10 TMDS クロック + 11 TMDS クロックシールド 12 TMDS クロック - 13 CEC 14 予約済み(デバイスの N.C.
プラグ アンド プレイ機能 プラグ アンド プレイ互換システムで、モニターをインストールすることがで きます。モニターがディスプレイ データ チャンネル (DDC) プロトコルを使っ て、コンピューターシステムに拡張ディスプレイ特定データ (EDID) を自動的 に提供するため、システムが、自己設定により、モニター設定を最適化しま す。ほとんどのモニターインストールは自動で行われます。必要に応じて異 なる設定を選択できます。モニター設定の変更の詳細については、モニター の操作を参照してください。 ユニバーサル シリアル バス (USB) インターフェース 本項では、モニターで使用できる USB ポートについて説明します。 SuperSpeed USB 5 Gbps (USB3.2 Gen 1) 転送速度 SuperSpeed データ率 5 Gbps 対応する最大電力(各ポート)* 4.50 W 高速 480 Mbps 4.50 W 全速度 12 Mbps 4.50 W USB Type-C 説明 USB Type-C ビデオ DisplayPort 1.
USB Type-C コネクター ピン数 A1 信号名 GND ピン数 B1 信号名 GND A2 TX1+ B2 TX2+ A3 TX1- B3 TX2- A4 VBUS B4 VBUS A5 CC1 B5 CC2 A6 D+ B6 D+ A7 D- B7 D- A8 SBU1 B8 SBU2 A9 VBUS B9 VBUS A10 RX2- B10 RX1- A11 RX2+ B11 RX1+ A12 GND B12 GND USB 3.
6 SSRX+ 7 GND 8 SSTX- 9 SSTX+ USB ポート • 1 USB Type-C(USB 3.2 Gen 1 、 5 Gbps)アップストリーム - 背面 • 1 SuperSpeed USB Type-A(USB 3.2 Gen 1 、 5 Gbps)ダウンストリーム 背面 • 1 SuperSpeed USB Type-A(USB 3.2 Gen 1 、 5 Gbps)ダウンストリーム 底面 充電ポート 電池アイコンが示されたポート。BC1.2 互換機器使用 時に最大 2 A の高速充電に対応。 注:SuperSpeed USB 5 Gbps (USB 3.2 Gen 1) の機能を活用するには、 SuperSpeed USB 5 Gbps (USB 3.
エルゴノミクス 注意:キーボードの不適切な、あるいは長時間にわたり使用は、体調不良 の原因となる場合があります。 注意:長時間モニタースクリーンを見続けると、眼精疲労の原因となりま す。 コンピューターの作業環境を整える際は、次のガイドラインに従って快適に お使いください。 • コンピューターを操作するとき、体の真正面にキーボードとモニターを 設置します。キーボードを正しい位置に設置できる特殊な棚も市販され ています。 • モニターを長時間使用することから生じる目の疲れ、首 / 腕 / 背中 / 肩 の痛みを軽減するには、次のことをお薦めします。 1. スクリーンを 20 インチ - 28 インチ (50 cm - 70 cm) 離した位置に設置 します。 2. モニターを長時間見た後は、瞬きを頻回にしたり、目を水で潤すなど して、目の渇きを防ぎます。 3. 2 時間毎に 20 分の休憩を入れてください。 4. 休憩中はモニターから目を離し、20 フィート 先にある物を 20 秒以上 見つめてください。 5.
• 座った状態のときには、前傾姿勢にならないように重心を両足にかけま す。正しい姿勢を維持するために椅子の高さを調整するか、必要であれ ば足台をお使いください。 • 仕事の仕方よります。作業が長時間にならないように、仕事を管理する ようにしてください。定期的に休憩をとり、立ち上がったり、歩き回っ たりしてください。 • ケーブルや電源コードが快適な作業の邪魔にならないように、またこれ らに躓いたりしないように、机の下は常に整理しておいてください。 モニタースクリー ンは目の高さ、ま たは若干下に モニターと キーボードは 使用者の真正 面に 手首はまっす ぐゆったりと 足はしっかり と床に 製品の特徴 │ 25
ディスプレイの取り扱いと移動 モニターを持ち上げたり、移動させたりする際は、次のガイドラインに従っ て丁寧にお取り扱いください。 • モニターを移動または持ち上げる前に、コンピューターとモニターの電 源を切ってください。 • モニターからすべてのケーブルを外します。 • モニターを最初に梱包されていた梱包材料に入れます。 • モニターを持ち上げたり、移動したりする際は、圧力をかけずにモニ ターの底面と側面をしっかりと持ちます。 • モニターを持ち上げたり、移動したりする際は、キズが付かないように スクリーンを外向きに持ち、ディスプレイエリアを押さないようにして ください。 • モニターを移送するときには、急激な振動を与えないようにしてくださ い。 26 │ 製品の特徴
• モニターを持ち上げたり、移動したりする際は、スタンドベースやスタ ンドライザーを持ってモニターを上下逆さにしないようにしてください。 モニターの故障やケガの原因となる場合があります。 保守のガイドライン モニターを洗浄する 注意:モニターの洗浄前には、安全指示を読み、その指示に従ってくださ い。 警告:モニターの洗浄前には、電源コンセントからモニター電源ケーブル を外してください。 最高の性能を引き出すために、モニターを開梱、洗浄、または操作している 間、以下のリストの指示に従ってください: • 静電気防止スクリーンを洗浄するには、柔らかい、きれいな布を水で軽 く湿らせてください。できれば、特殊スクリーン洗浄ティッシュまたは 静電気防止コーティングに適して溶液を使用してください。ベンゼン、 シンナー、アンモニア、研磨クリーナー、または圧縮空気は使用しない でください。 • ぬるま湯で軽く湿らせた布を使用して、モニターを洗浄します。合成洗 剤によりモニターの乳白色のフィルムがはがれることがあるため、合成 洗剤の使用は避けてください。 • モニターの梱包を開けている間に白いパウダーにお気づきになりました ら
モニターのセットアップ スタンドのセットアップ 注:スタンドは出荷時には設置されていません。 注:モニター付属のスタンドを接続するには、次の手順に従ってくださ い。本製品に付属されていないスタンドを取り付ける場合は、そのスタン ドのメーカーの指示に従って設定してください。 モニタースタンドを取り付ける: 1. 箱のふた部分に記載された指示に従って、スタンドを保護しているクッ ション材を取り外してください。 2. ゆっくりとスタンドベースとスタンドライザーを発砲スチロールから取 り出します。 3. スタンドライザーをスタンドベースに合わせます。 4. スタンドベースの底面にあるネジハンドルを起こし、右に回してスタン ドを安定させます。 5.
6. ディスプレイの VESA スロットが見えるようにモニターの保護カバーを 開きます。 注:ディスプレイにスタンドを取り付ける前に、フロントプレート フ ラップを開きスタンドを取り付けるためのスペースを確保してください。 7. スタンド アセンブリをディスプレイに取り付けます。 a. VESA スロットにスタンドライザーのつまみをスライドさせます。 b.
8. 両手でしっかりとスタンドライザーを持ち、モニターを持ち上げます。 次に、モニターを平たい場所にまっすぐに配置します。 注:事故を防止するために、モニターを持ち上げる際はスタンドライザー をしっかりと持ってください。 9.
モニターを接続する 警告:このセクションで手続きをはじめる前に、安全指示に従ってくださ い。 注:Dell モニターは、Dell 提供の同梱ケーブルと最適な状態で機能するよ うに設計されています。Dell は Dell 製でないケーブルを使用した場合の 映像品質および性能については保証いたしません。 注:ケーブルを接続する前に、ケーブルスロットにケーブルを通して整理 してください。 注:すべてのケーブルを同時にコンピューターに接続しないでください。 注:画像は、実例を示す目的で使用されます。コンピューターの外観は変 わることがあります。 モニターをコンピューターに接続する: 1. コンピューターの電源をオフにして、電源ケーブルを外します。 2. モニターの USB Type-C ケーブル(モニターに付属)または HDMI ケーブ ルをコンピューターに設族します。(詳細は底面図を参照 してくださ い)。 3. USB 3.2 Gen 1 周辺機器をモニターの USB 3.
• 65 W 以上を必要とするノートブックで、バッテリーの残量がなくなって いる場合は、ノートブックが起動しない場合があります。または、本機 の USB PD ポートで充電されます。 HDMI ケーブルと電源ケーブルの接続(別売り) ケーブルを調整する 必要なケーブルすべてを取り付けた後、(ケーブルの取り付けについては、モ ニターを接続するを参照してください)上記のとおり、ケーブル管理スロッ トを使って、すべてのケーブルを適切に調整します。 32 │ モニターのセットアップ
モニターの電源をオンにする ケンジントンロック(別売り)を使ってモニターを固定する セキュリティ ロックスロットはモニターの背面にあります(セキュリティ ロックスロットを参照してください)。 Kensington ロック(別売り)の使い方についての詳しい説明は、ロックの説 明書をお読みください。 Kensington セキュリティロックを使ってモニターをテーブルに固定します。 注:画像は、実例を示す目的で使用されます。ロックの外観は変わること があります。 モニターのセットアップ │ 33
モニタースタンドを取り外す 注:台を取り外している間に LCD スクリーンに傷が付かないように、モ ニターは必ずきれいな面に置くようにしてください。 注:モニター付属のスタンドを取り外すときは、次の手順に従ってくださ い。本製品に付属されていないスタンドを外す場合は、そのスタンドの メーカーの指示に従って設定してください。 スタンドを取り外すには: 1. 柔らかい布またはクッションの上にモニターを置きます。 2. ディスプレイの背面にあるスタンド取り外しボタンを押したままにしま す。 3. スタンド本体を持ち上げ、モニターから離します。 VESA 壁取り付け(別売り) (ネジの寸法:M4 x 10 mm) 。 VESA 互換壁取り付けキットに付いている使用説明書を参照してください。 1.
2. モニタースタンドを取り外します(モニタースタンドを取り外すを参照 します) 。 3. ねじ回しを使って、ディスプレイのバックカバーを固定している 4 個の ネジを外します。 4. 壁取り付けキットのブラケットをディスプレイに取り付けます。 5. モニターを壁に取り付けます。詳細は、壁取り付けキットの説明書をお 読みください。 注:21.
モニターの操作 モニターの電源をオンにする 電源ボタンを押してモニターをオンにします。 前面パネルのコントロールを使う モニターの正面にあるボタンを使って、設定を調整してください。 正面パネルのボタンについては、次の表にまとめてあります: 正面パネルボタン 説明 プリセット カラー モードのリストから選択す る際には、このボタンを選択してください。 1 ショートカットキー / プリセットモード 音量スライダーに直接アクセスできます。 2 ショートカットキー / 音量 36 │ モニターの操作
オンスクリーンディスプレイ (OSD) を開くに は、メニューボタンを使います。メニューシ ステムにアクセスするを参照してください。 3 メニュー このボタンは、OSD メインメニューを終了す るときにも使用します。 4 終了 モニターをオン / オフにします。 5 電源 (電源ライトインジ ケーター付き) 白く点灯すると、モニターの電源が入ってお り性能が正常であることを意味しています。 白く点滅しているときには、モニターがスタ ンバイモード。 正面パネルボタン モニターの正面にあるボタンを使って、画像設定を調整してください。 正面パネルボタン 説明 上ボタンを押すと、OSD メニューのアイテムを調整 できます(範囲を広げます)。 1 上 下ボタンを押すと、OSD メニューのアイテムを調整 できます(範囲を狭めます)。 2 下 OK ボタンを使って、選択内容を確定します。 3 OK 戻るボタンを使用すると、前のメニューに戻りま す。 4 戻る モニターの操作 │ 37
オンスクリーンディスプレイ (OSD) メニューの使用 メニューシステムにアクセスする 注:設定を変えてから別のメニューに進んだり OSD メニューを終了した りすると、モニターはこれらの変更を自動的に保存します。設定を変更し てから OSD メニューが消えるのを待っても、変更は保存されます。 1. ボタンを押して OSD メニューを起動し、メイン メニューを表示し ます。 2. と ボタンを押して、設定オプション間を移動します。あるアイコ ンから別のアイコンに移動すると、オプション名がハイライト表示され ます。モニターで利用できるすべてのオプションについては、次の表を 参照してください。 3. または または ボタンを一度押すと、ハイライトされたオプ ションが有効になります。 注:表示された矢印ボタン(および OK ボタン)は選択したメニューに よっては異なる場合があります。ボタンを使って選択してください。 4. 5. 6.
アイ コン メニューとサブ メニュー 輝度 / コントラ スト 輝度 説明 ディスプレイの輝度とコントラストを調整しま す。 輝度は、バックライトの輝度を調整します。 輝度を上げるには 下げるには ボタンを押します。輝度を ボタンを押します(最小 0/ 最大 100)。 コントラスト まず輝度を調整し、それでも調整が必要な場合の みコントラストを調整します。 ボタンを押してコントラストを上げ、 ボタ ンを押してコントラストを下げます(最小 0/ 最 大 100)。 コントラスト機能は、モニターの画面の暗い部分 と明るい部分の違いの程度を調整します。 モニターの操作 │ 39
入力信号 モニターに接続されている別のビデオ信号を選択 します。 USB-C USB Type-C コネクターを使用しているときには、 USB-C 入力を選択します。 ボタンを押して、 選択内容を確定します。 HDMI 1 HDMI コネクターを使用しているとき、HDMI 1 ま HDMI 2 たは HDMI 2 入力を選択します。 ボタンを押し て、選択内容を確定します。 自動選択 使用可能な入力ソースを自動的にスキャンしま す。 USB-C の自動 選択 ボタンを押して、選択内容を確定します。 USB-C の自動選択を設定できます: • 複数入力を求めるプロンプト:切り換えるかど うかを選択するために、常に「USB-C ビデオ 入力への切り替え」メッセージが表示されま す。 • はい:USB Type-C ケーブルを接続した場合は、 常に USB-C ビデオ入力に切り替えます(確認 メッセージなし)。 • いいえ:USB Type-C ケーブルを接続した場合 は、USB-C ビデオ入力に切り替えません。 注: ボタンを押して、選択内容を確定します。 このオプションは、自動選
入力信号のリ セット 色 プリセット モード モニターの入力設定を工場出荷時の設定にリセッ トします。 色を使って色設定モードを調整します。 リストからプリセットモードを選択できます。 モニターの操作 │ 41
プリセット モード • 標準:モニターのデフォルトの色設定をロード します。これは、デフォルトのプリセットモー ドです。 • ComfortView:スクリーンから放射されるブ ルーライトのレベルを軽減させ、スクリーンを 見やすくします。 警告:モニターから放出されるブルーライトを 長時間見続けると、デジタルアイ、眼精疲労を 含め、目に影響を与えます。長時間モニターを 見続けると、首、腕、背中、肩など身体に痛み が生じる場合があります。詳細は、エルゴノミ クスを参照してください。 • ムービー:ムービーに適した色設定をロードし ます。 • FPS:ファーストパーソン・シューティング (FPS) ゲームに適したカラー設定を読み込みま す。 • RTS:リアルタイムストラテジー ゲーム (RTS) に適したカラー設定を読み込みます。 • RPG:ロールプレイイング ゲーム (RPG) に適 したカラー設定を読み込みます。 • 暖色:低い色温度で色を再現します。画面は 赤 / 黄の色合いで暖かく見えます。 • 寒色:高い色温度で色を再現します。画面は 青い色合いで冷たく見えます。 • ユーザーカラー:色設定を手動
入力カラー形式 ビデオ入力モードを次のように設定できます: • RGB:モニターが RGB 出力に対応するコン ピューターやメディアプレーヤーに接続されて いる場合は、このオプションを選択します。 • YCbCr:メディアプレーヤーが YCbCr 出力し かサポートしていない場合は、このオプション を選択してください。 ボタンを押して、選択内容を確定します。 色相 この機能により、ビデオ画像の色は緑または紫に シフトします。色相は、望ましいフレッシュな色 調を調整するために使用されます。 または を使って色合いを「0」~「100」の範囲で調整し ます。 注:色相調整は、ムービー、FPS、RTS、RPG プリセットモードでのみ使用できます。 彩度 この機能は、ビデオ画像の色の彩度を調整しま す。 または を使って彩度を「0」~「100」 の範囲で調整します。 注:彩度調整は、ムービー、FPS、RTS、RPG プリセットモードでのみ使用できます。 色のリセット モニターの色設定を工場出荷時の設定にリセット します。 モニターの操作 │ 43
ディスプレイ ディスプレイメニューを使って画像を調整しま す。 アスペクト比 画像の比率は 16:9、4:3、5:4 に設定できます。 シャープネス この機能を使って、画像をよりシャープにまたは ソフトにします。 または を使ってシャープネスを「0」~ 「100」の範囲で調整します。 応答時間 応答時間を通常、高速、最速に設定できます。 画面のリセット すべてのディスプレイ設定を工場出荷時のプリ セット値にリセットします。 オーディオ 音量 スピーカーの音量を調整します。 または を使って、音量レベルを「0」から 「100」の範囲で調整します。 44 │ モニターの操作
スピーカー オーディオのリ セット メニュー 言語 透明度 スピーカーを有効または無効にします。 デフォルトの音設定に戻します。 このオプションを選択して、OSD の言語、メ ニューが画面に表示されている時間など、OSD の設定を調整します。 OSD ディスプレイを 8 つの言語(英語、スペイ ン語、フランス語、ドイツ語、ブラジルポルトガ ル語、ロシア語、簡体字中国語、日本語)の 1 つ に設定する言語オプション。 このオプションを選択し、 および ボタンを 押してメニュー透明化を変更します(最小 0 / 最 大 100)。 タイマー ボタンを最後に押してから OSD が有効になって いる時間の長さを設定します。 または を使ってスライダを 5 ~ 60 秒ま で、1 秒刻みで調整します。 モニターの操作 │ 45
ロック モニターの制御ボタンをロックすると、他の人は 制御できなくなります。また、複数のモニターを 横に並べたとき、誤って操作してしまうのを防止 することもできます。 • メニューボタン:すべてのメニュー / 機能ボタ ン(電源ボタンを除く)がロックされ、ユー ザーはアクセスできなくなります。 • 電源ボタン:電源ボタンだけがロックされ、 ユーザーはアクセスできなくなります。 • メニュー + 電源ボタン:メニュー / 機能ボタ ンと電源ボタンの両方がロックされ、ユーザー はアクセスできなくなります。 デフォルト設定はオフです。 他のロック方法 [ メニュー / 機能ボタン用 ]: 電源ボタンの横にあるメニュー / 機能ボタンを 4 秒間押し続けても、ロックオプションを設定でき ます。 注:ボタンをロック解除するには、電源ボタンの 横にあるメニュー / 機能ボタンを 4 秒間押し続け ます。 メニューのリ セット 46 │ モニターの操作 すべての OSD 設定を工場出荷時のプリセット値 にリセットします。
カスタマイズ ショートカット キー 1 ショートカット キー 2 プリセットモード、輝度 / コントラスト、入力信 号、アスペクト比、音量の中から機能を選択し、 ショートカットキーとして設定することができま す。 LED 電源ボタン 節電のために、電源 LED インジケーターのオン / オフを設定できます。 USB-C 充電 デフォルト設定は、オフモード時はオフです。オ フモード時はオンを選択すると、本製品は電源が 切れているときにも、USB Type-C ケーブルを使 用してノートブックやモバイルデバイスを充電す ることができます。 その他の USB 充電 モニターがスタンバイ モードのときに、USB Type-A(ダウンストリームポート)充電機能を有 効 / 無効にすることができます。 カスタマイズの リセット カスタマイズメニューですべての設定を初期値に 戻します。 モニターの操作 │ 47
その他 ディスプレー 情報 DDC/CI 48 │ モニターの操作 DDC/CI、LCD コンディショニングなど、OSD 設 定を調整する場合はこのオプションを選択しま す。 モニターの現在の設定が表示されます。 DDC/CI(ディスプレイ データチャンネル / コマ ンド インターフェイス)により、コンピュー ターのソフトウェアを介してモニターのパラメー ター(輝度、色バランスなど)を調整します。 オフを選択すると、この機能が無効になります。 ユーザー体験を最大限に高め、モニターのパ フォーマンスを最適にする場合、この機能を有効 にします。
LCD コンディ ショニング 画像保持の微細な問題を軽減します。画像保持の 程度によっては、プログラムが実行されるまでに 少し時間がかかることがあります。オンを選択す ることで、この機能を有効にできます。 ファームウェア モニターのファームウェアバージョンを表示しま す。 サービスタグ モニターのサービスタグを表示します。このタグ は、Dell のホームページ等で電話サポートを依頼 したり、保証状況を確認したり、ドライバをアッ プデートしたりするときに必要です。 他をリセット その他メニューですべての設定を初期値に戻しま す。 工場リセット すべてのプリセット値を初期値に戻してくださ い。 モニターの操作 │ 49
OSD 警告メッセージ モニターが特定の解像度モードをサポートしていないとき、次のメッセージ が表示されます: これは、モニターがコンピューターから受信している信号と同期できないこ とを意味します。このモニターが使用できる水平および垂直周波数幅につい ては、モニター仕様を参照してください。推奨モードは 2560 x 1440 です。 注:接続した入力信号によっては、メッセージが異なる場合があります。 DDC/CI 機能が無効になる前に、次のメッセージが表示されます: 初めて輝度レベルを調整するとき、次のメッセージが表示されます: 注:はいを選択すると、次回輝度設定を変更しようとしてもこのメッセー ジは表示されません。 50 │ モニターの操作
初めて USB-C 充電やその他の USB 充電などの省エネ機能のデフォルト値を 変更すると、次のメッセージが表示されます: 注:上記のいずれかの機能ではいを選択すると、次回これらの機能の設定 を変更しようとしてもこのメッセージは表示されません。初期値にリセッ トすると、メッセージが再度表示されます。 ロック機能が有効になる前に、次のメッセージが表示されます: 注:選択した設定によっては、メッセージが異なる場合があります。 モニターがスタンバイモードに入ると、次のメッセージが表示されます: コンピューターを有効にして、モニターを立ち上げ、OSD にアクセスします。 注:接続した入力信号によっては、メッセージが異なる場合があります。 モニターの操作 │ 51
OSD は、通常の動作モードでのみ機能します。スタンバイモードで電源ボタ ン以外のボタンを押すと、選択した入力によって次のメッセージが表示され ます: コンピューターがアクティブになり、モニターで OSD にアクセスできるよう になります。 注:接続した入力信号によっては、メッセージが異なる場合があります。 USB-C または HDMI 入力が選択されているが相当するケーブルが接続されて いない場合、以下のような浮動ダイアログボックスが表示されます: 注:接続した入力信号によっては、メッセージが異なる場合があります。 モニターが HDMI 入力に設定されており、USB Type-C ケーブルで DP 代替 モードに対応するノートブックに接続されている場合は、USB-C の自動選択 が有効になっていると、次のメッセージが表示されます。 52 │ モニターの操作
工場リセットを選択すると、次のメッセージが表示されます: はいを選択すると、次のメッセージが表示されます。 詳細は、問題を解決するを参照してください。 モニターの操作 │ 53
最大解像度を設定する 注:ご使用の Windows のバージョンにより異なる場合があります。 モニターの最大解像度を設定するには: Windows® 7、Windows® 8、Windows® 8.1: 1. Windows® 8 および Windows® 8.1 専用です。デスクトップ タイルを選択 して、元々のデスクトップに切り替えます。 2. デスクトップで右クリックして、画面の解像度をクリックします。 3. 1 台以上のモニターが接続されている場合は、S2722DC を選択してくだ さい。 4. 画面の解像度のドロップダウン リストをクリックし、2560 x 1440 を選 択します。 5. OK をクリックします。 Windows® 10: 1. デスクトップ上を右クリックし、ディスプレイの設定をクリックします。 2. 1 台以上のモニターが接続されている場合は、S2722DC を選択してくだ さい。 3. 解像度のドロップダウン リストをクリックし、2560 x 1440 を選択しま す。 4.
傾き、旋回、垂直に伸ばす 注:次の手順は、モニター付属のスタンドを接続するための説明です。本 製品に付属されていないスタンドを取り付ける場合は、そのスタンドの メーカーの指示に従って設定してください。 モニターにスタンドを取り付けると、モニターを最も快適な角度に調整する ことができます。 傾き 注:出荷時には、スタンドは設置されていません。 スイベル モニターの操作 │ 55
垂直に伸ばす 注:スタンドは、垂直に最大 110 mm 伸ばせます。下の図で、伸ばし方を 示します。 ディスプレイを回転させる ディスプレイを回転させる前に、ディスプレイが垂直に延ばされているか、 またモニターの底部エッジの傾きを避けるために傾けてあるか確認してくだ さい。 56 │ モニターの操作
右回転 左回転 注:Dell コンピューターでディスプレイ回転機能(横対縦表示)を使用す るには、このモニターに含まれていない最新のグラフィックスドライバが 必要です。最新のグラフィックスドライバをダウンロードして更新するに は、www.dell.
システムのディスプレイ回転設定の調整 モニターを回転させた後、以下の手順でシステムのディスプレイの回転設定 を調整する必要があります。 注:Dell コンピューター以外でモニターを使用している場合、グラフィッ プスドライバのウェブサイトまたはお使いのコンピューターの製造元ウェ ブサイトに進み、オペレーティングシステムの回転についての情報を確認 します。 ディスプレイの回転設定を調整するには: 1. デスクトップ上を右クリックした後、プロパティをクリックします。 2. 設定タブを選択し、詳細設定をクリックします。 3. ATI グラフィックスカードを使っている場合は、回転タブを選択して、 お気に入りの回転を設定します。 4. NVIDIA グラフィックスカードを使っている場合は、NVIDIA タブをク リックして、左カラムで NVRotate を選択し、次にお気に入りの回転を 選択します。 5.
問題を解決する 警告:このセクションで手続きをはじめる前に、安全指示に従ってくださ い。 自己テスト お使いのモニターには、自己テスト機能が装備され、適切に機能しているか どうかを確認できます。モニターとコンピューターが適切に接続されていて、 モニター スクリーンが暗い場合は、次の手順でモニター自己テストを実行し てください: 1. コンピューターとモニター両方の電源をオフにする。 2. コンピューターからビデオ ケーブルを外す。 3. モニターの電源をオンにする。 モニターがビデオ信号を検知できないが正しく作動している場合、画面に浮 動ダイアログ ボックスが(黒い背景に)表示されます。自己テストモードで は、電源 LED が白になります。 注:接続した入力信号によっては、メッセージが異なる場合があります。 4. ビデオ ケーブルが外されているか、または破損している場合、通常シス テムの運転中、このボックスが表示されます。 5.
内蔵診断 モニターには内蔵の診断ツールが付属しており、発生している画面の異常が モニターに固有の問題か、またはコンピューターやビデオ カードに固有の問 題かを判断します。 内蔵診断を実行するには、以下の手順に従います: 1. 画面がきれいであること(または、画面の表面に塵粒がないこと)を確 認します。 2. ポップアップメニューが表示されるまでボタン 4 を約 4 秒押し続けます。 3. ボタン 1 または ボタン 2 を使って診断ツール を選択し、ボタン 3 で 確定します。診断プログラムの最初でグレイのテストパターンが表示さ れます。 4. 画面に異常がないか、慎重に検査します。 5. 再度ボタン 1 を押して、テストパターンを変更します。 6. ステップ 4 と 5 を繰り返して、赤、緑、青、黒、白い色の画面およびテ キスト画面についてもディスプレイを検査します。 7.
よくある問題 次の表には、発生する可能性のあるモニターのよくある問題と考えられる解 決策に関する一般情報が含まれます: 一般的な症状 発生した問題 ビデオなし / 電 源 LED オフ 画像が表示され ない 実行可能な解決策 • コンピューターにモニターを接続 しているビデオ ケーブルが適切に 接続され、しっかり固定されてい ることを確認します。 • 他の電気機器を使用して、コンセ ントが正しく機能していることを 確認します。 • 電源ボタンが完全に押されている ことを確認します。 • 入力信号メニューにより適切な入 力信号が選択されていることを確 認してください。 ビデオなし / 電 源 LED オン 画像なし、また は輝度がない • OSD によって、輝度とコントラス ト コントロールを増加します。 • 自己テスト機能が呼び出されます (自己テスト参照してください)。 • ビデオ ケーブル コネクター に曲 がったり破損したピンがないか、 チェックします。 • 内蔵診断を実行します。 • 入力信号メニューにより適切な入 力信号が選択されていることを確 認してください。 フォーカスが 弱い
ビデオが揺れた り / ずれたりす る 画像が波打った り、微妙にぶれ る • モニターを工場出荷時設定にリ セットします。 • 環境係数をチェックします。 • モニターの場所を変えて、他の部 屋でテストします。 ピクセルが抜け ている LCD スクリーン に点が入る • モニターを一旦オフにした後、再 度オンにします。 • 永久的にオフになっているピクセ ルがありますが、これは LCD テク ノロジに固有の欠陥です。 • Dell 社のモニターの品質とピクセル に関する方針の詳細、詳細につい ては、Dell サポート www.dell.com/pixelguidelines. ドット落ち LCD スクリーン に明るい点が 入る • モニターを一旦オフにした後、再 度オンにします。 • 永久的にオフになっているピクセ ルがありますが、これは LCD テク ノロジに固有の欠陥です。 • Dell 社のモニターの品質とピクセル に関する方針の詳細、詳細につい ては、Dell サポート www.dell.com/pixelguidelines.
水平 / 垂直ライ ン スクリーンに複 数の線が入る • モニターを工場出荷時設定にリ セットします。 • 自己テスト機能チェックを行い (自己テストを参照してください)、 これらの線が自己テストモードで も入るかどうかを確認します。 • ビデオ ケーブル コネクター に曲 がったり破損したピンがないか、 チェックします。 • 内蔵診断を実行します。 同期化の問題 スクリーンがス クランブル状態 か、磨り減って 見える • モニターを工場出荷時設定にリ セットします。 • 自己テスト機能チェックを行い (自己テストを参照してください)、 これらの線が自己テストモードで も入るかどうかを確認します。 • ビデオ ケーブル コネクター に曲 がったり破損したピンがないか、 チェックします。 • セーフモードでコンピューターを 再起動します。 安全関連問題 断続的問題 スモークまたは スパークの明ら かな症状 • トラブルシューティング手順を実 行しないでください。 モニターの誤作 動をオンおよび オフ • コンピューターにモニターを接続 しているビデオケーブルが適切に 接続され、しっかり固定
色が欠けている 画像の色が欠け ている • モニター自己診断テスト機能 チェックを実行します。 • コンピューターにモニターを接続 しているビデオケーブルが適切に 接続され、しっかり固定されてい ることを確認します。 • ビデオ ケーブル コネクター に曲 がったり破損したピンがないか、 チェックします。 色違い 画像の色が正し くない • アプリケーションによって、色メ ニュー OSD のプリセットモードの 設定を変更します。 • 色メニュー OSD のユーザーカラー で R/G/B 値を調整してください。 • 色設定 OSD で入力カラー形式を RGB または YCbCr/YPbPr に変更 します。 • 内蔵診断を実行します。 長時間モニター に静止画像を表 示したために起 こる画像焼き付 き 表示された静止 画像のかすかな 影が画面に表示 される • スクリーンが無作動状況になって から、数分でスクリーンがオフに なるように設定します。これらの 設定は、Windows 電源オプション または Mac 省エネルギー設定で調 整できます。 • または、動的に変わるスクリーン セーバーを使用
正面パネル上の ボタンで、モニ ターを調整でき ない OSD がスクリー ン上に表示され ない ユーザコント ロールを押して も入力信号が ない 画像が表示され ず、LED が白く 点灯 • モニターの電源をオフにして、電 源コードを外し、もう一度コード を差して、電源を入れます。 • OSD メニューがロックされます。 電源ボタンの横にあるメニュー / 機能ボタンを 4 秒間押し続けると ロック解除できます(詳細は、 ロックを参照してください)。 • 信号ソースをチェックします。マ ウスを動かすかキーボードのどれ かのキーを押して、コンピュー ターが省電力モードに入っていな いことを確認します。 • 信号ケーブルが正しく差し込まれ ているかどうかをチェックしま す。必要に応じて、信号ケーブル を差し込み直してください。 • コンピューターまたはビデオプ レーヤーを再起動します。 ピクチャが画面 全体に表示され ない ピクチャを画面の • DVD の異なるビデオ形式により、 モニターが全画面で表示できない 高さまたは幅いっ ことがあります。 ぱいに表示でき ない • 内蔵診断を実行します。 HD
ユニバーサル シリアル バス (USB) 特有の問題 一般的な症状 発生した問題 USB インター USB 周辺機器 フェースが作 が作動してい 動していない ない 実行可能な解決策 • モニターの電源がオンになっているかを チェックします。 • アップストリーム ケーブルをコンピュー ターに再接続します。 • USB 周辺機器(ダウンストリーム コネク ター)を再接続します。 • モニターを一旦オフにした後、再度オン にします。 • コンピューターを再起動します。 • 外付けポータブル HDD のような一部の USB デバイスは、高い電流を必要とする ことがあります。デバイスをコンピュー ター システムに直接接続してください。 USB Type-C ポートは電源 を供給しま せん USB 周辺機器 を充電するこ とができま せん • 接続したデバイスが USB-C 仕様に準拠し ているか確認してください。USB Type-C ポートは、65 W 出力と USB 3.
ワイヤレス USB 周辺機器 は、USB 3.2 デ バイスを繋ぐ と作動を停止 します ワイヤレス USB 周辺機器 は応答が遅く なるか、その 周辺機器と受 信装置の距離 が短くなると 作動します • USB 3.2 周辺機器とワイヤレス USB 受信 装置の距離をあけます。 • ワイヤレス USB 受信装置とワイヤレス USB 周辺機器の距離をできるだけ短くし てください。 • USB 延長ケーブルを使って、ワイヤレス USB 受信装置をできるだけ USB 3.
付録 警告: 安全指示 警告:このマニュアルで指定された以外のコントロール、調整、または手 順を使用すると、感電、電気的障害、または機械的障害を招く結果となり ます。 安全についての説明は、安全、環境および規制情報 (SERI) をご覧ください。 米国連邦通信委員会 (FCC) 通告(米国内のみ)およびその他規 制に関する情報 米国連邦通信委員会 (FCC) 通告(米国内のみ)およびその他規制に関する情 報に関しては、規制コンプライアンスに関するウェブページ www.dell.